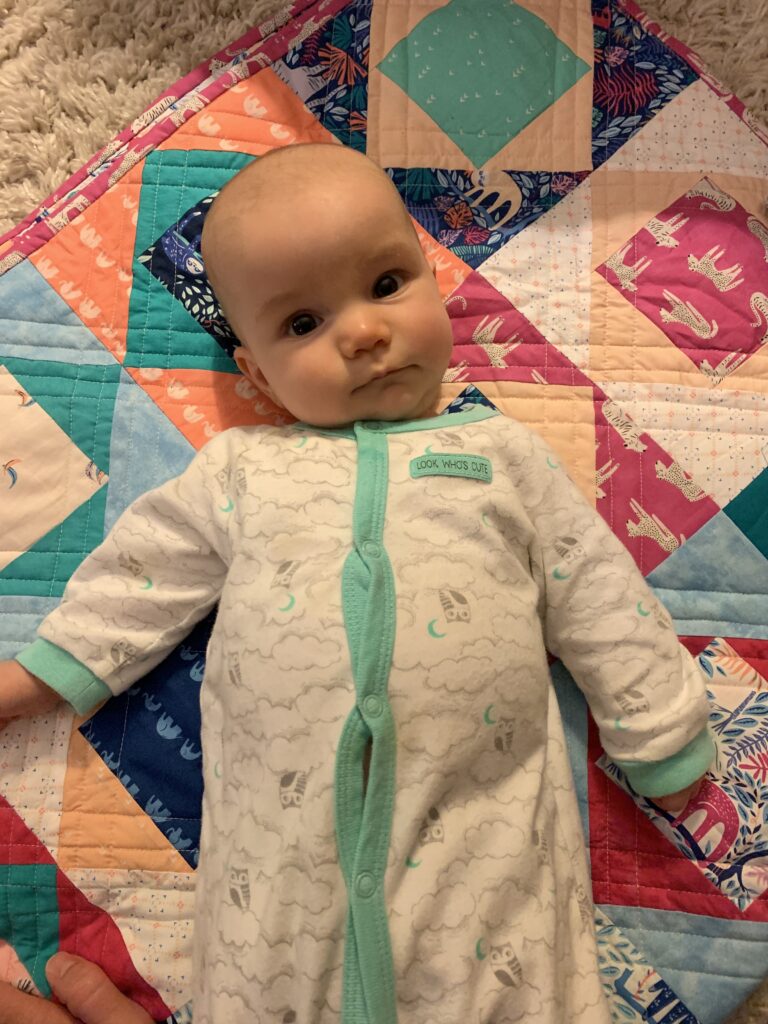
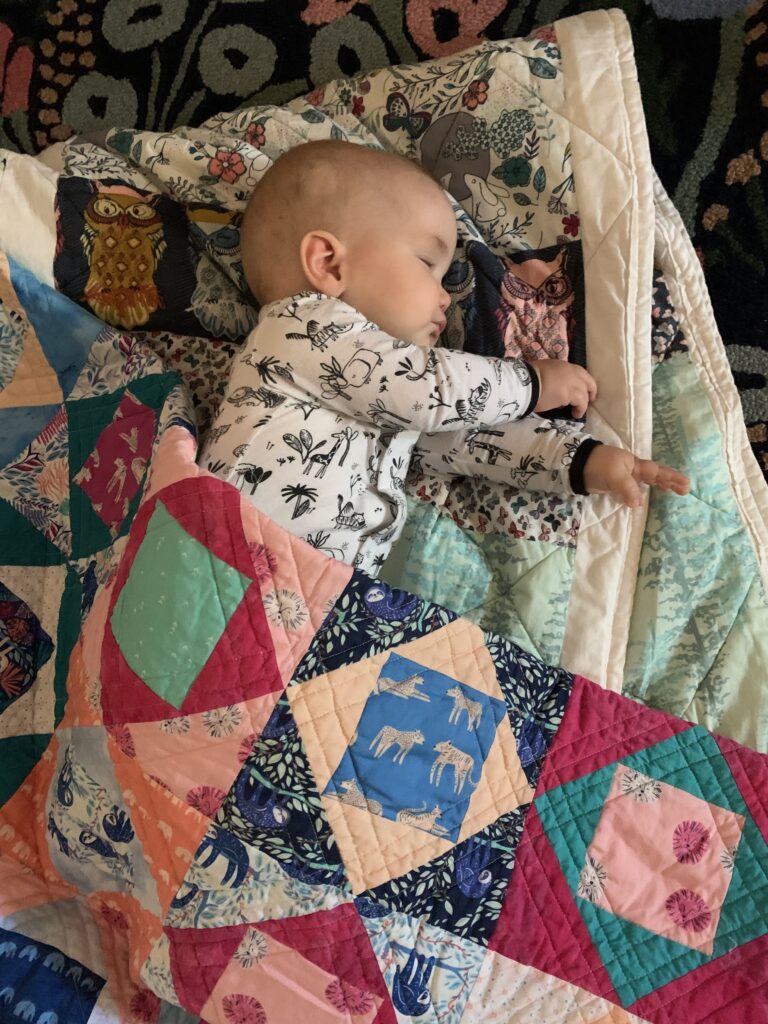
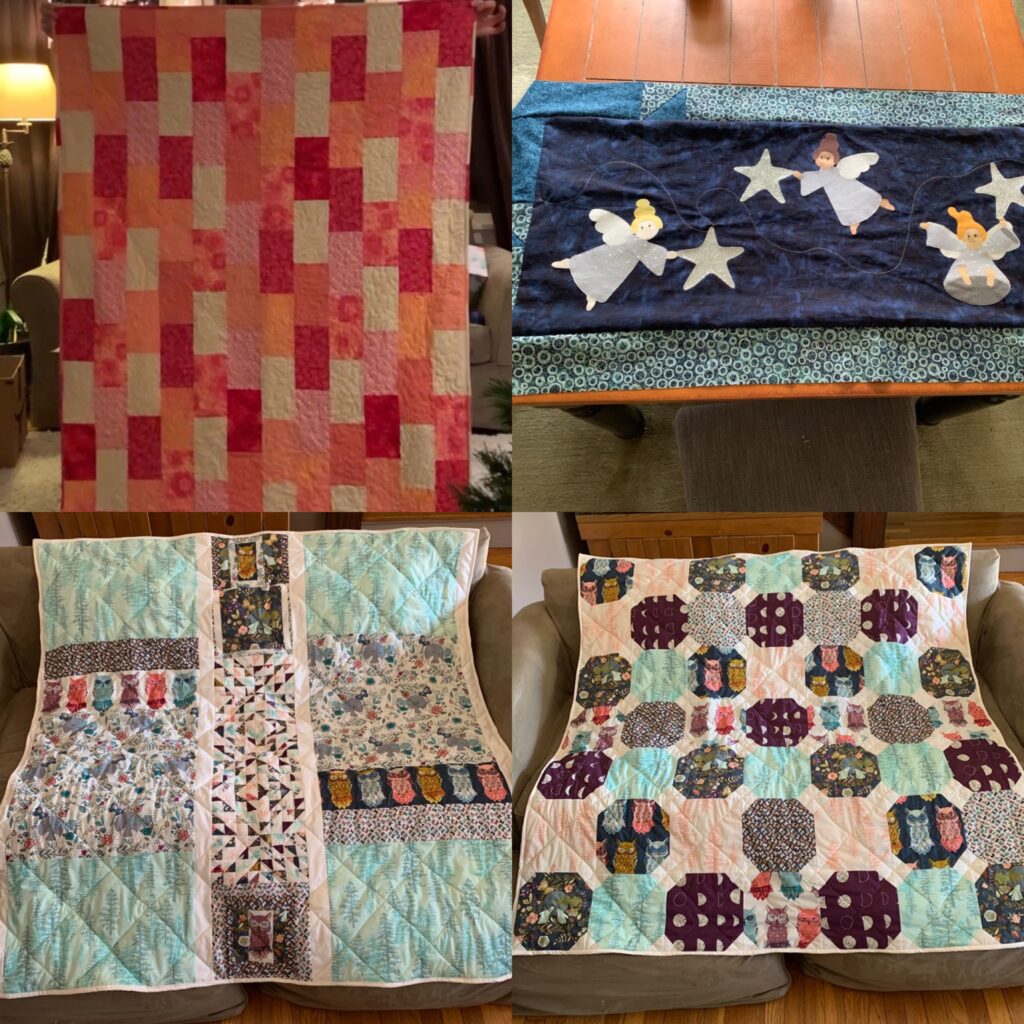
After my baby Margaret was born and after I finished her dad’s quilt, I wanted to make a little quilt for her. She has a quilt, of course, the coolest baby quilt you’ve ever seen, which is hanging on my wall so that it can be admired without risk of contamination by baby fluids. This reminds me: Amanda, we should enter that into a quilt show. It’s so good, it may be QuiltCon material. Definitely 3 Rivers show material!!
A year before my baby’s birthday, I saw this very cute jungle fabric collection on Etsy shops, and I bought a bunch of it with no idea what I would use if for. It was early 2021, I went on a crazy fabric buying binge. I was unhinged! An unhinged binge!
(Note: more than 8 months have passed since I started this blog post, and my baby is now 1 year old. So I don’t remember too much about the quilt making process, or really anything, let’s be honest).
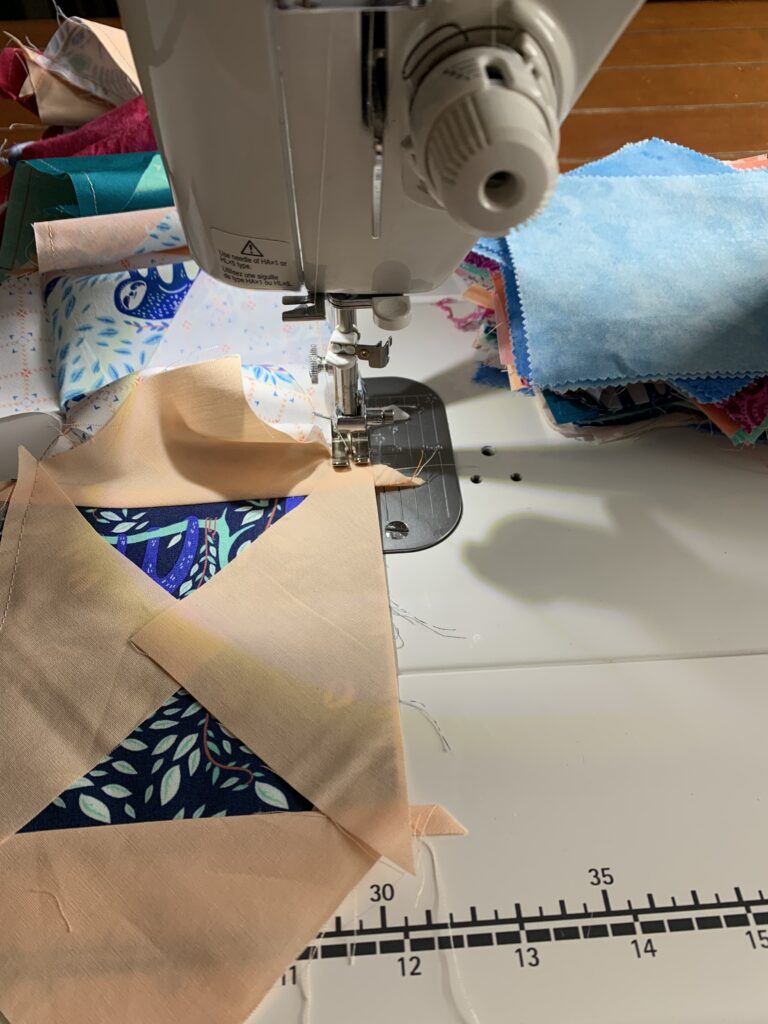
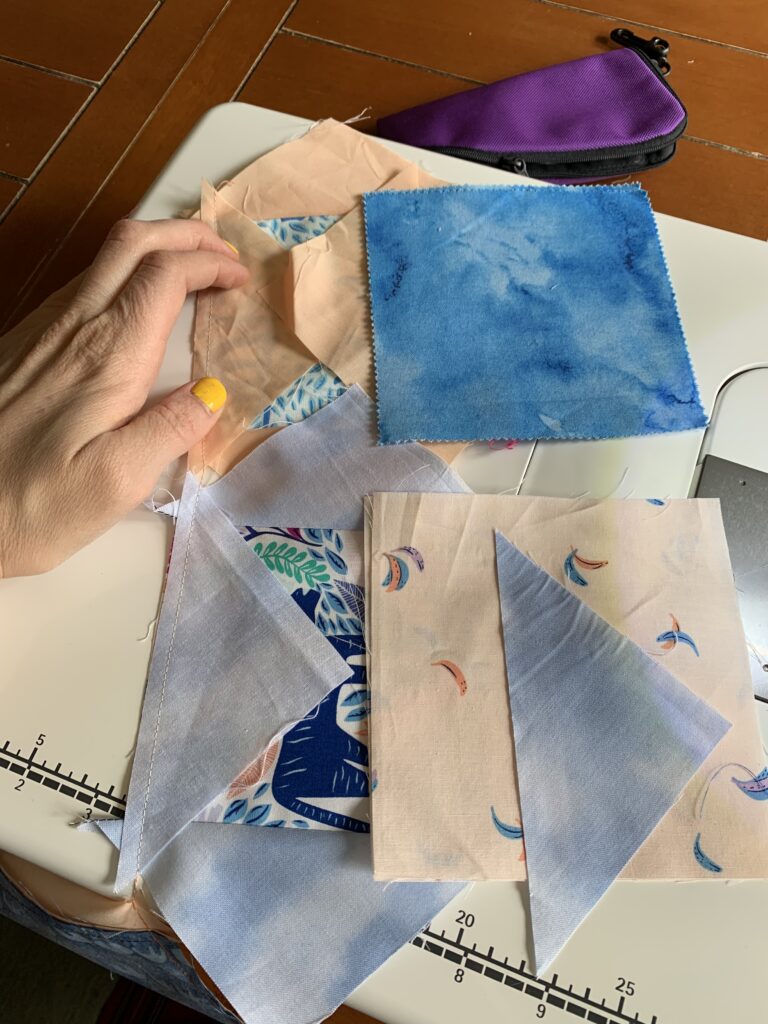
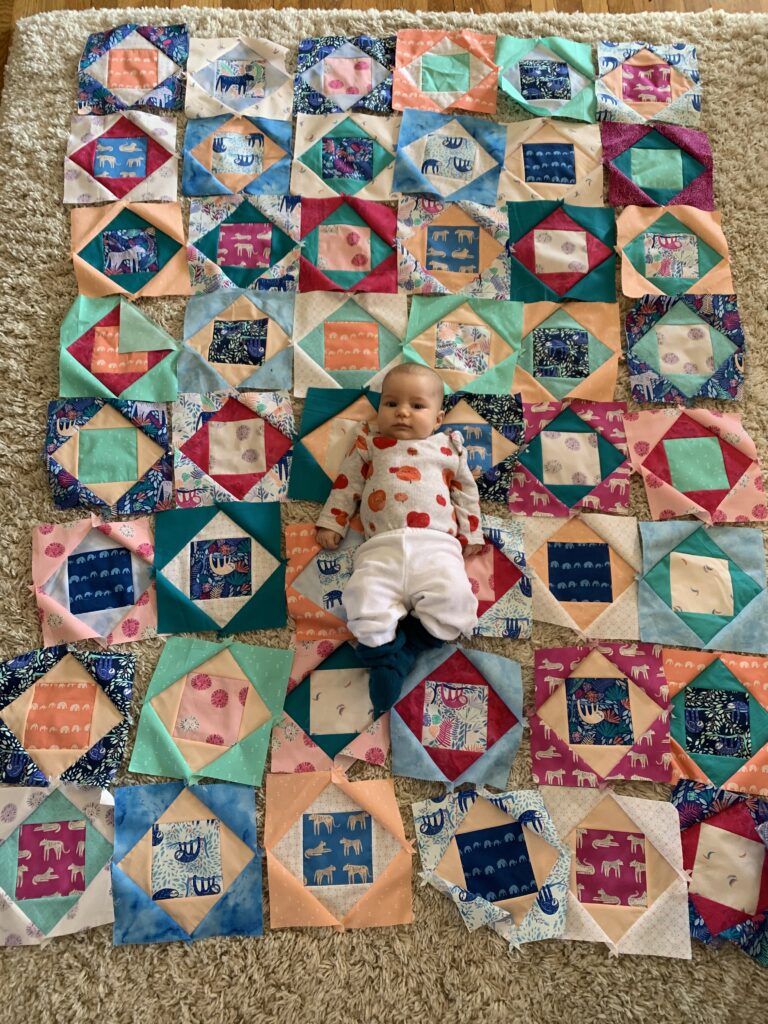
I must have thought, “wow, so glad 2021 me went nuts and bought all of this fabric. I’ll use it for my baby quilt.” I decided to make a bunch of economy blocks to highlight the great prints. I am a big fan of sloths, so I fussy cut a bunch of these so they’d look just right.
Sloth fabric!
This was a pretty good pattern for a sleep deprived new mom. I think it came together easily but like I said, it’s a bit foggy.
Not sure what I was trying to capture with this photo
I also used a few squares from a charm pack that Amanda gave to my other daughter but I stole. That blue tie dye looking one above came from Amanda. I’ve really gotten some mileage out of those, I think they are all in quilts now! Thank you, Amanda!
Posing with the blocks, helping with the layout
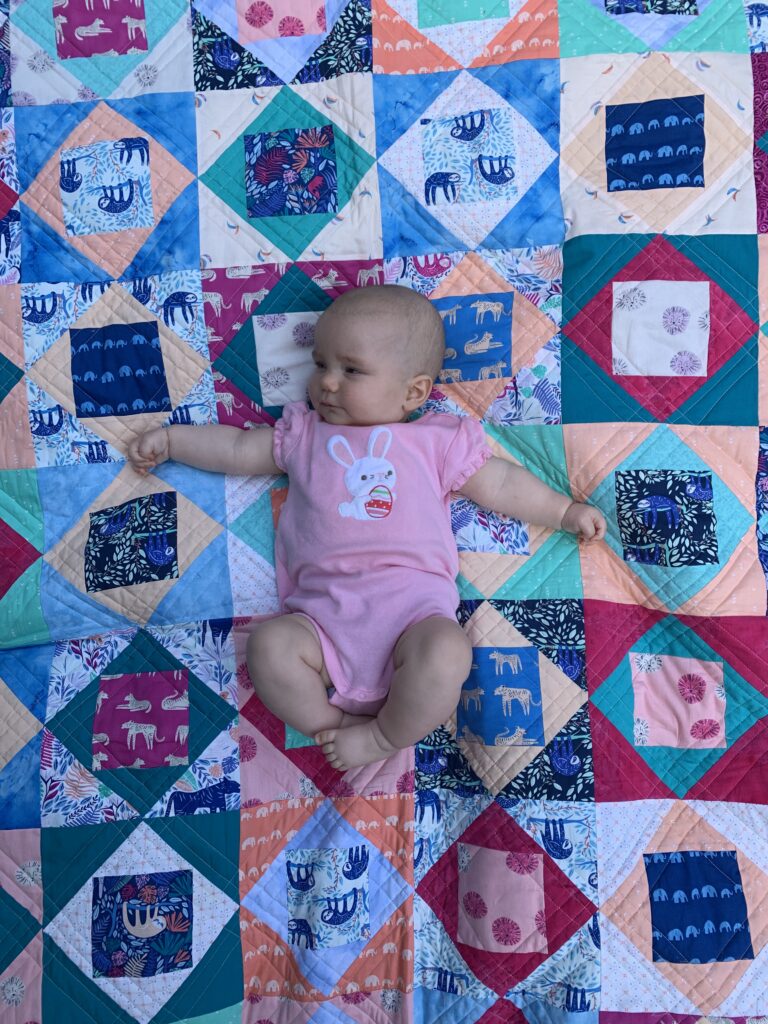
It took me a while to figure out a layout where there weren’t too many same prints or colors side by side – one of the pitfalls of just making blocks without considering the layout ahead of time. But NO WAY was I going to rip seams for that.
I love these colors
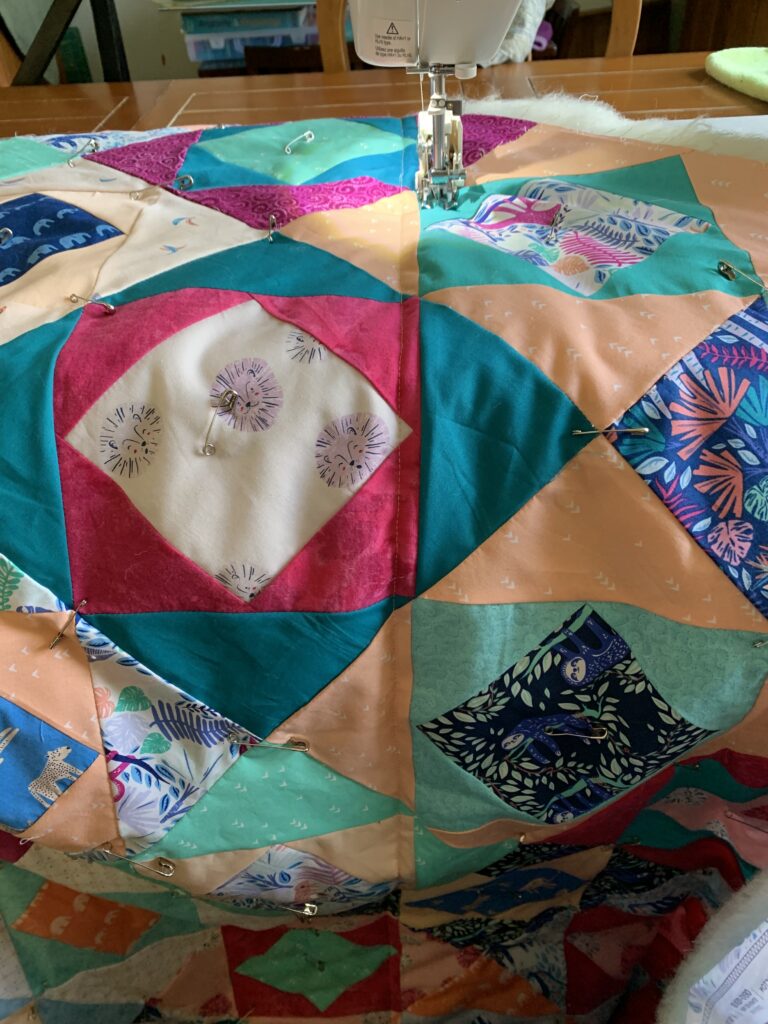
I was really pleased with the quilting on this. Just straight lines, but I think the pattern looks good.
Trim trim trim
I think I used a silk/tencel/cotton blend for the batting. Honestly I can’t tell the difference between this and regular cotton batting. Maybe I’m just too tired? It does have a nice drape I suppose.
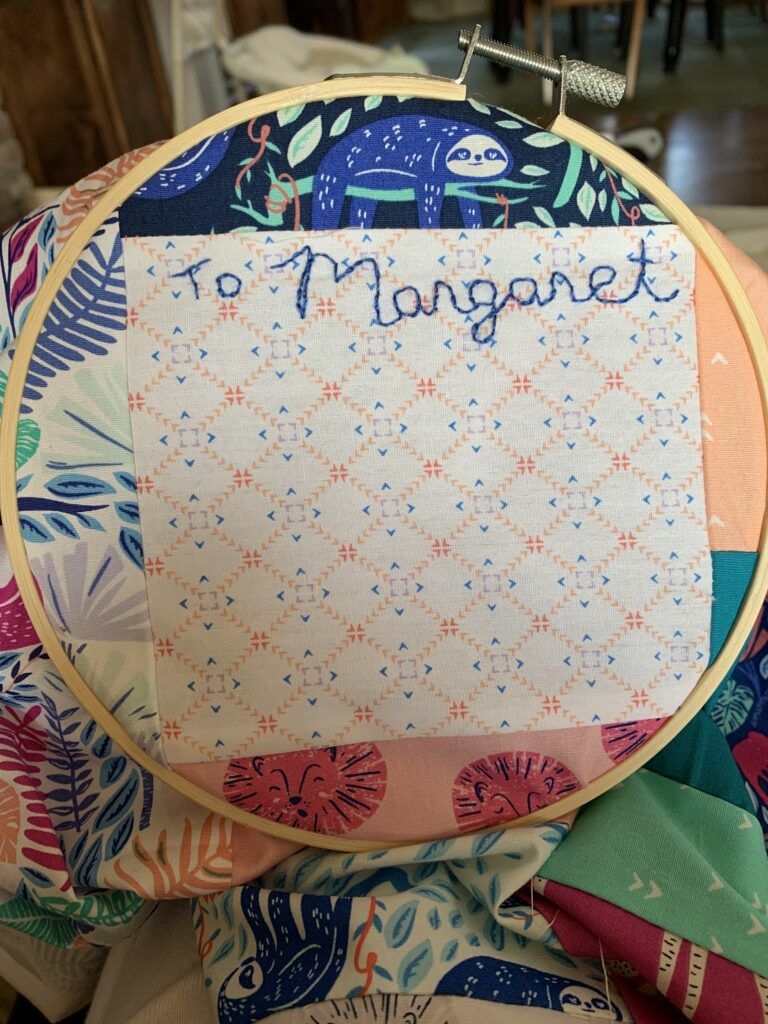
maybe someday I will learn to embroider neat lettersAll doneMakes a nice bed when folded upOutdoor shot of the scrappy backShe seems to like it. My bunny
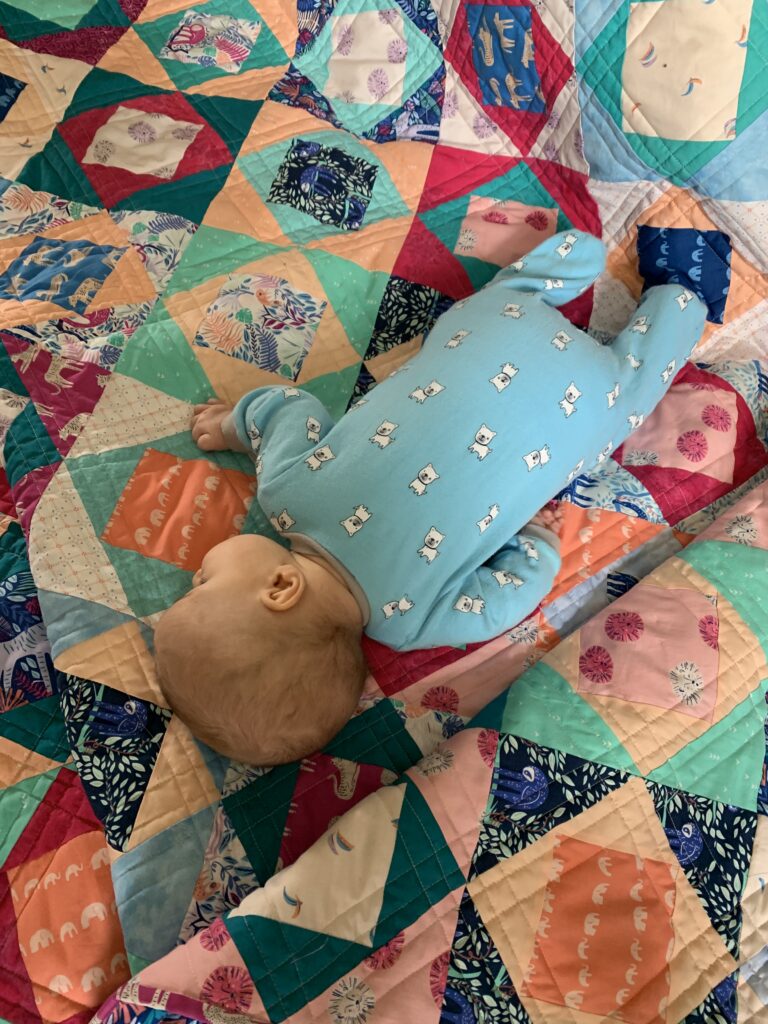
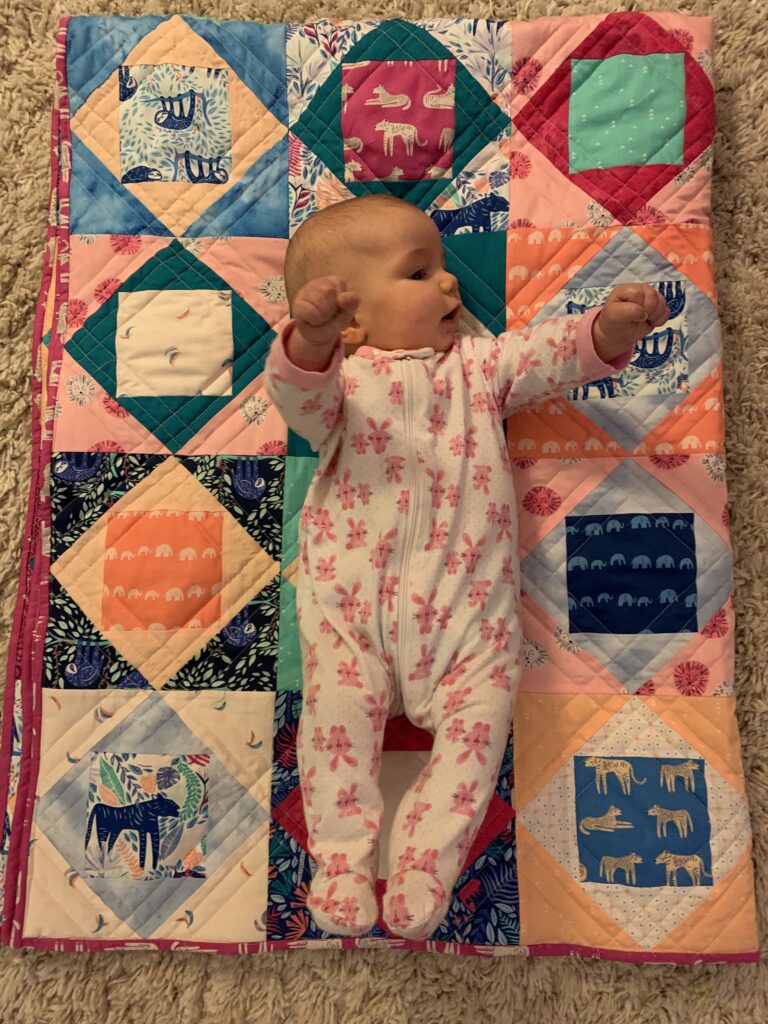
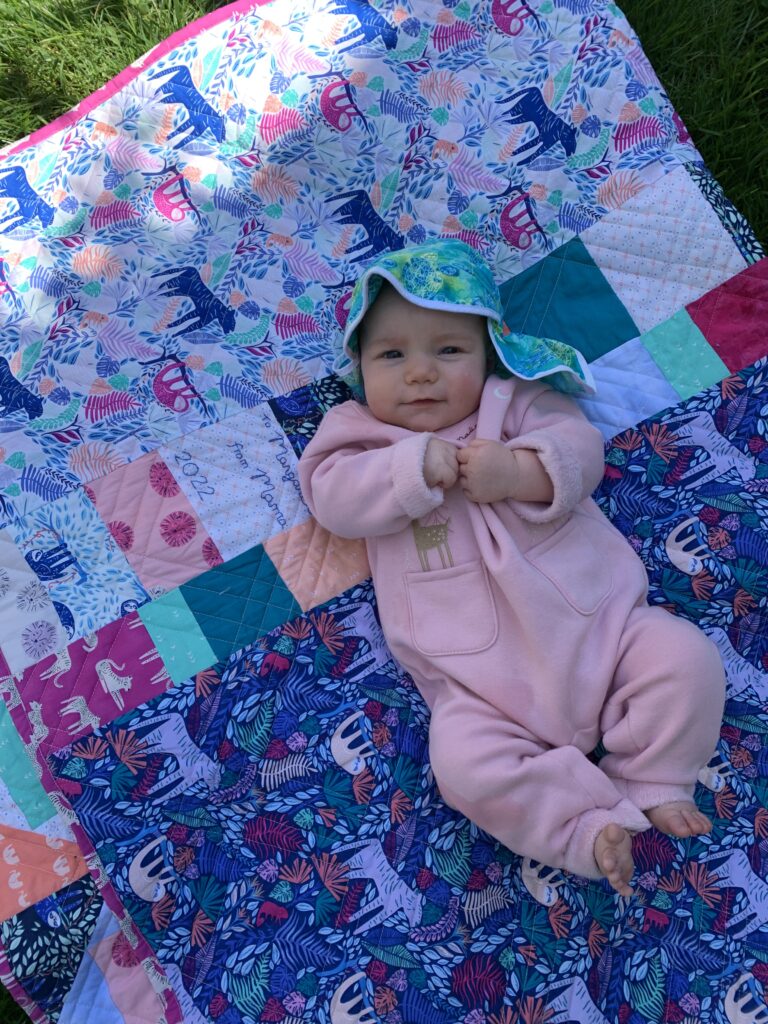
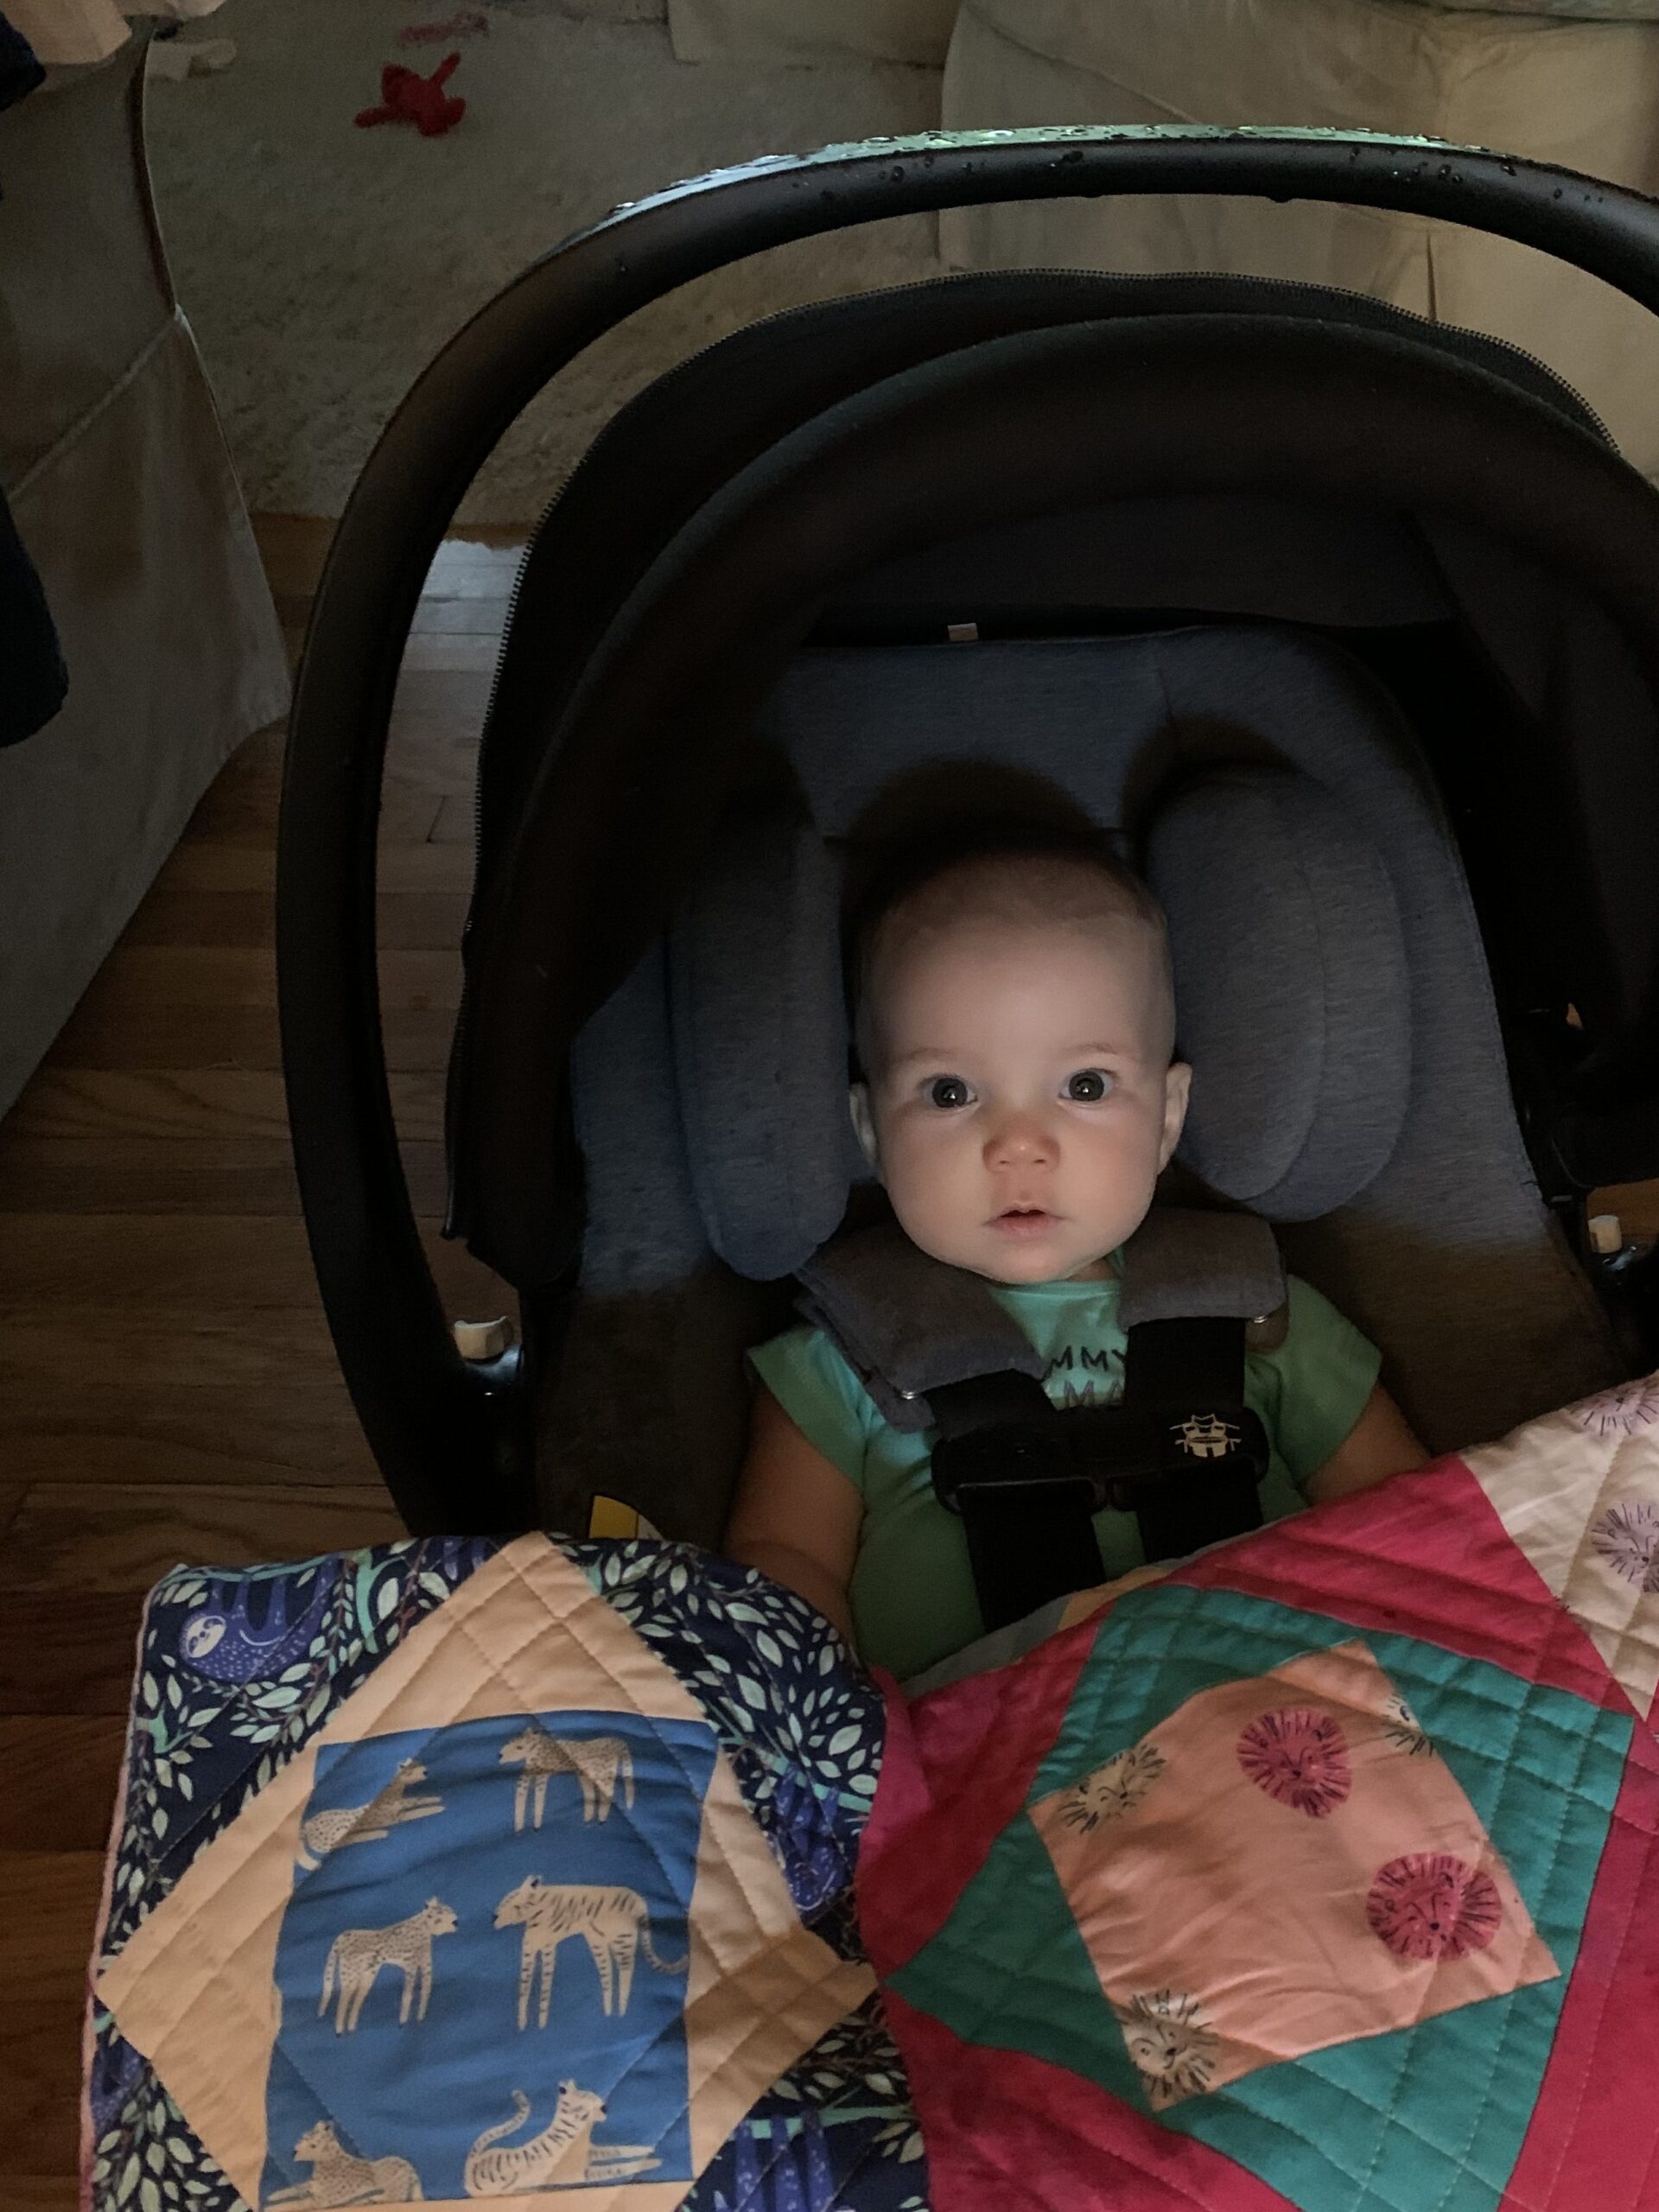
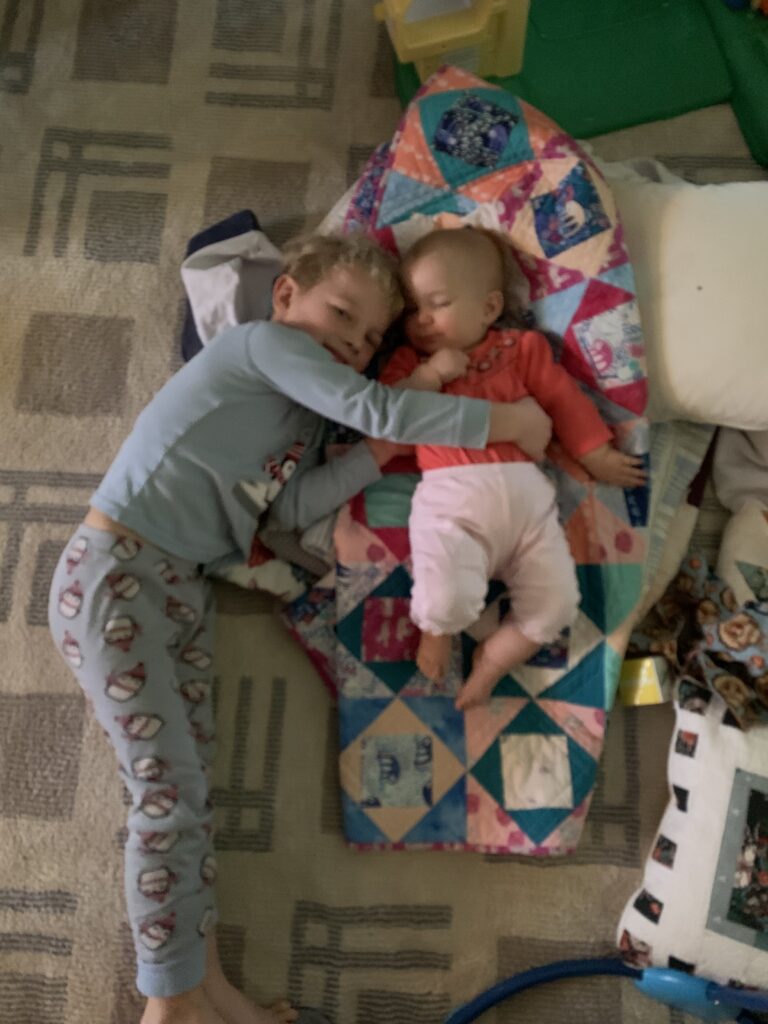
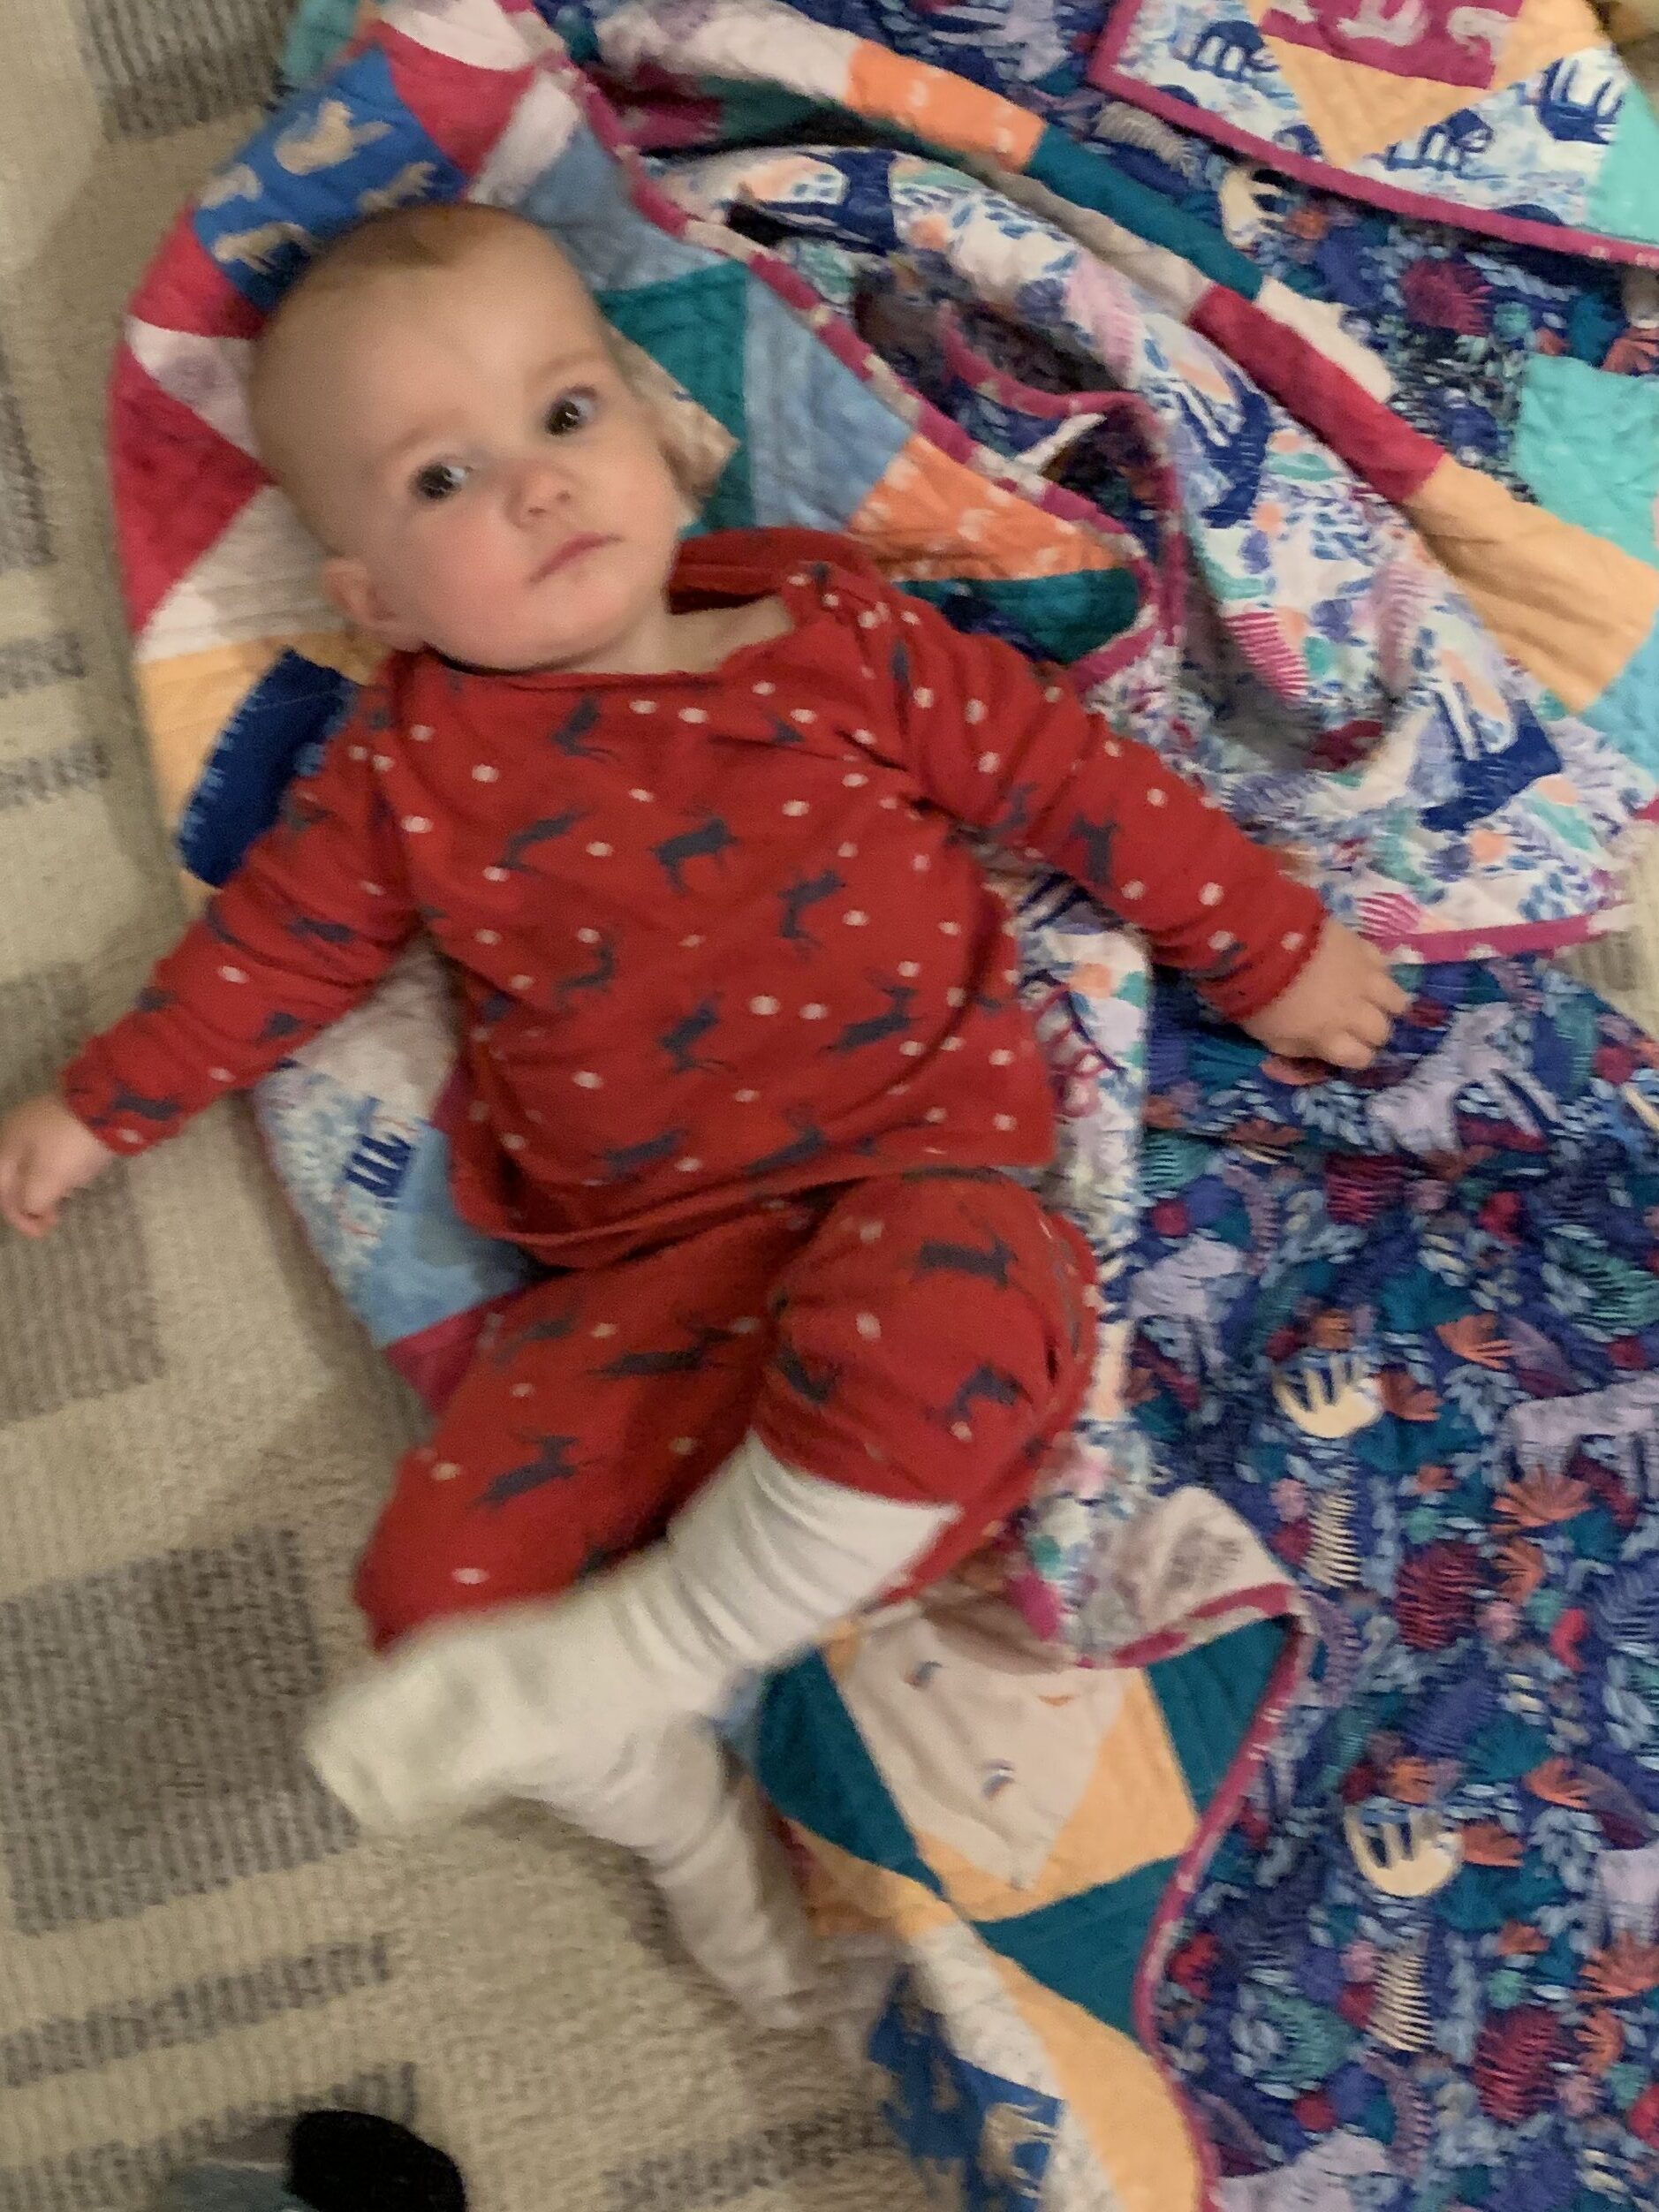
I guess one advantage to waiting so long to post about this baby quilt is that I have lots of pics of my baby with the quilt.
Ready to help with the next quilt
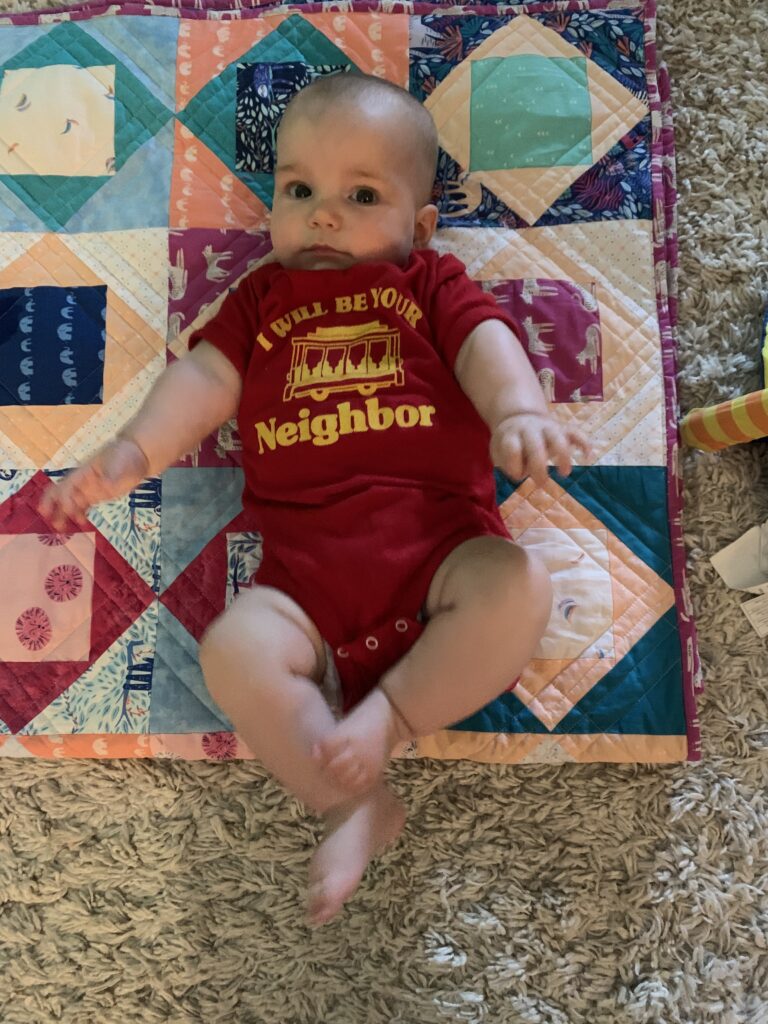
It was a lot easier to quilt before she figured out how to move around the house! But she’s worth it. 🙂
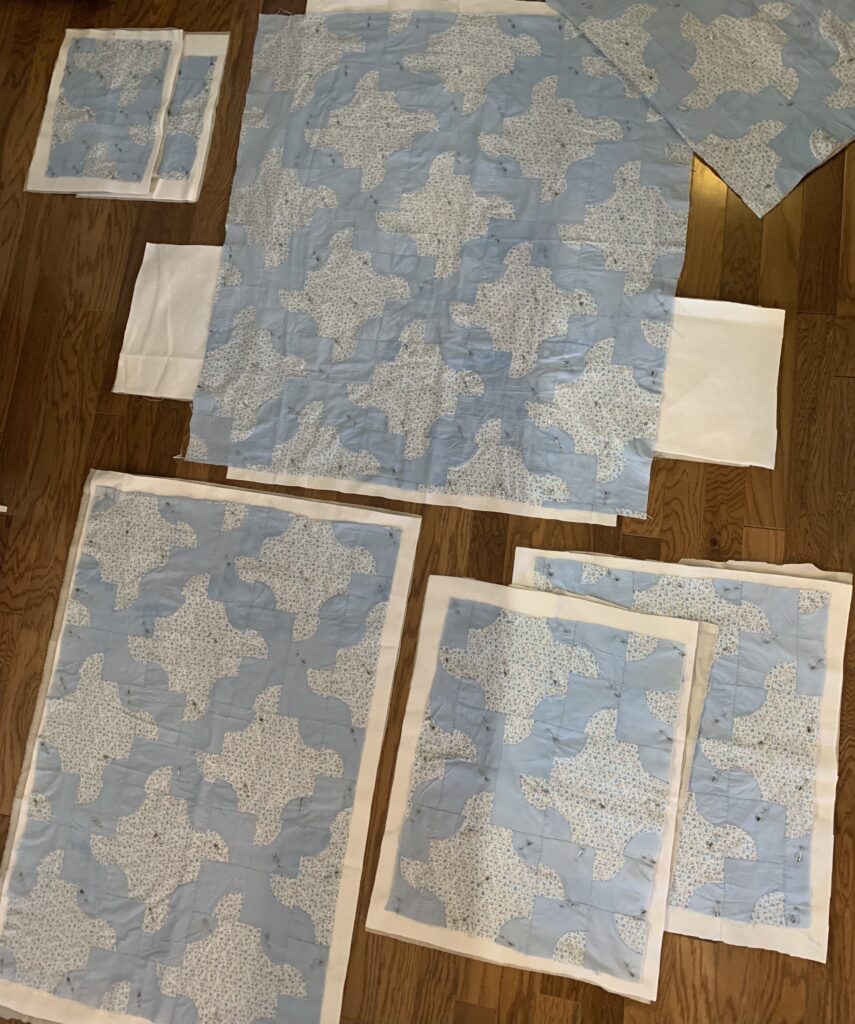
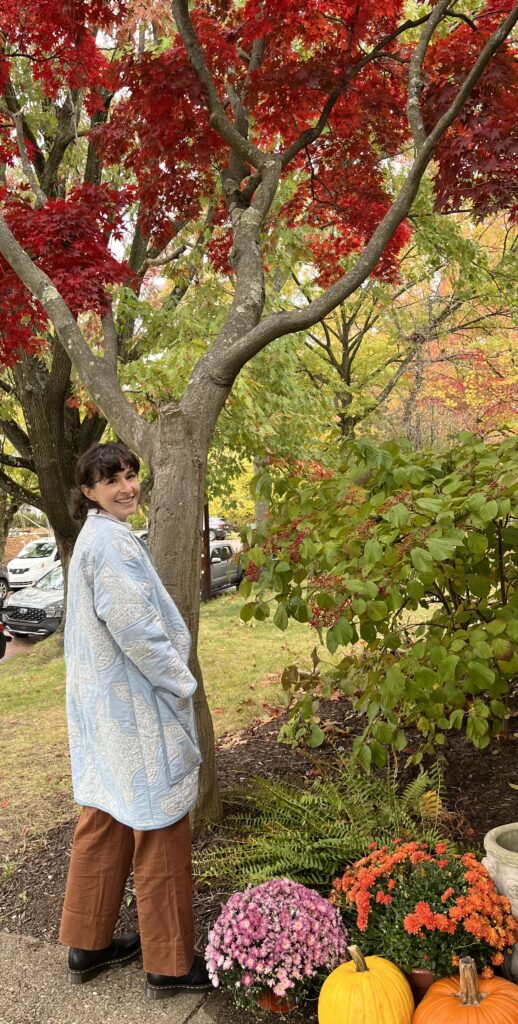
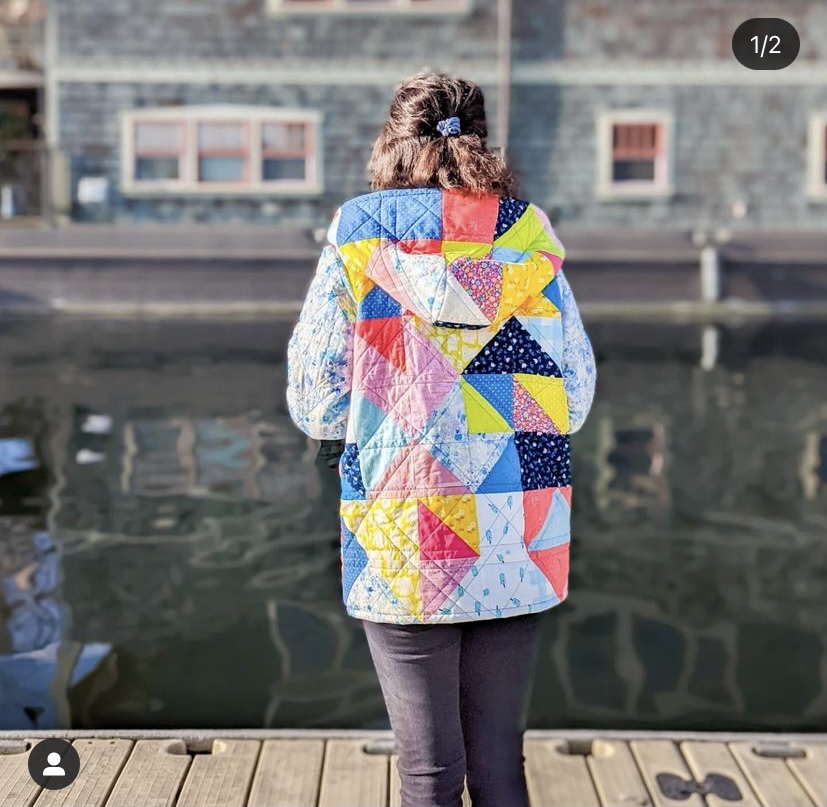
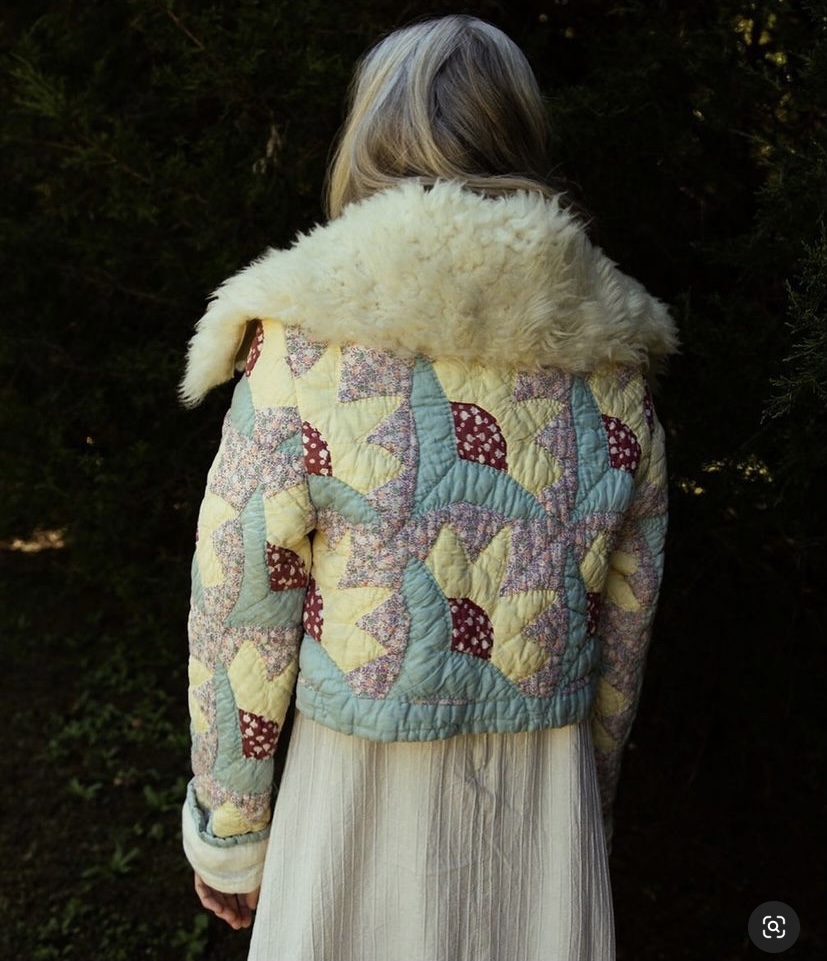
Way back in January I announced that I am riding the quilt coat trend! I started my first quilt coat and wrote about my progress in that long ago and long forgotten post. I believe when we left off I had basted together all of my little mini quilt sandwiches and was ready to begin quilting!
When last you saw the quilt coat, it looked like this.
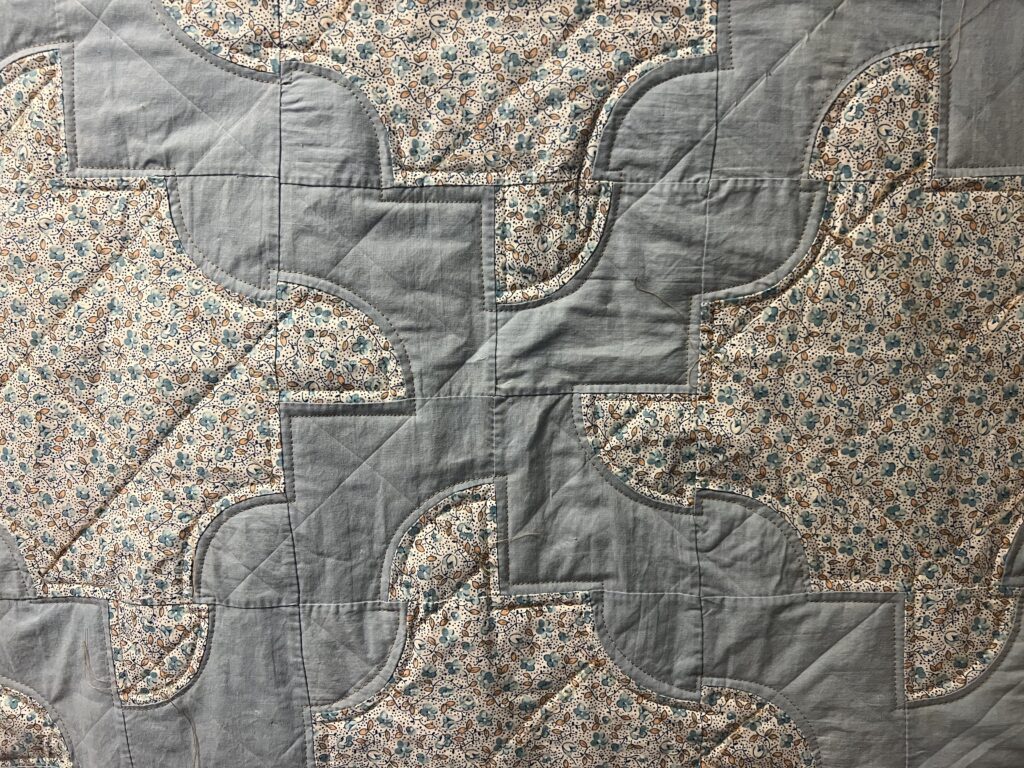
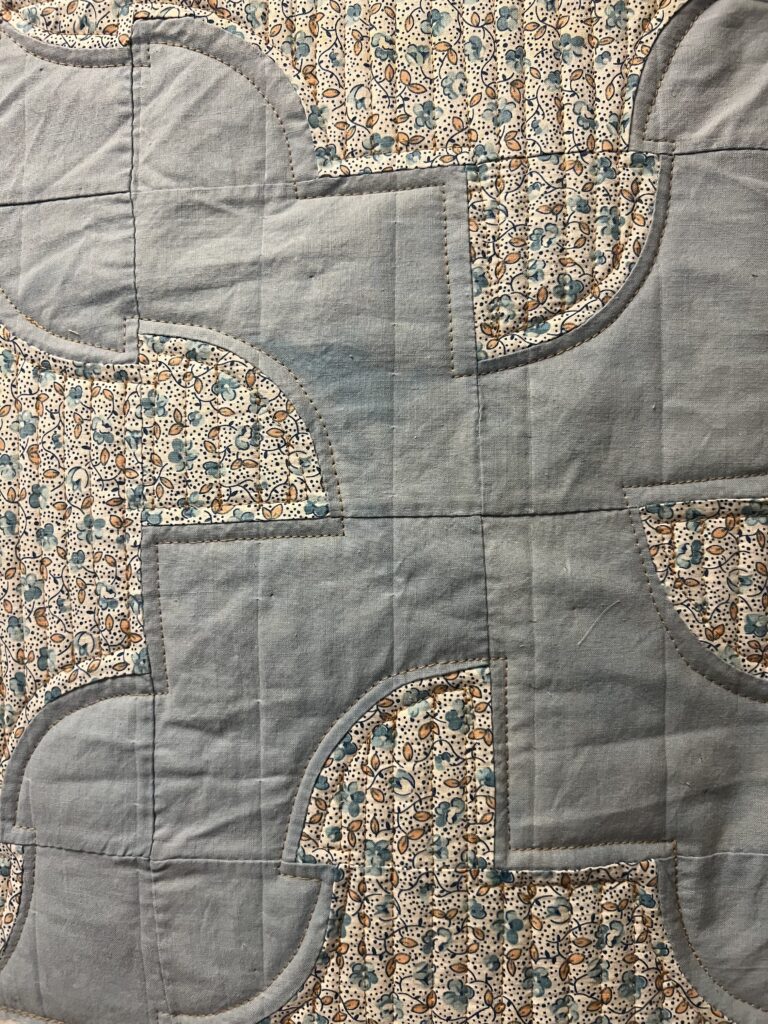
Eventually, I did start quilting and boy did that take a while! I was not sure how to quilt this and planned to do some simple diagonal lines. However, Rachel gave me the fantastic suggestion of quilting around the drunkard’s path shapes. So, I did that. And then also I quilted intersecting diagonal lines in the patterned sections of fabric. The quilting took much longer than expected, but I love how it turned out!
I made a slight change on the pockets, quilting straight lines closer together in the patterned fabric sections.
Then, other things in life interfered with my quilting and I set aside the quilt coat for a while. But then! When I felt the fall weather upon us, I was motivated to finish the coat for the chilly days ahead!
By this time, the quilting was basically finished and the assembly of the quilt was not too terribly difficult. As I mentioned in the last post, I don’t know how to sew garments. I picked what looked like a very simple coat pattern. (Again, the pattern was called “cozy coat” from an Etsy shop called tropicalresearch.) That choice worked out well because it essentially only took five pieces sewn together to have a coat!
Finishing the inside seams was something new for me. It was not too complicated though and the instructions in the pattern were helpful. Also new to me was making the bias tape! Admittedly, I spent one rainy Saturday watching YouTube videos on making continuous bias tape while my son played Subway Surfers on my phone. I used a light chambray fabric from Firecracker Fabrics — our fav neighborhood fabric shop — for all of the bias trim and it worked out great!
There are two things I wish I had done differently on the coat. 1. I could have made it in a size small. At the last minute I cut the pattern to size medium because I was worried about it being too small. (As I wrote in the first post, I could have taken the time to make a muslin and get the size right, but I was too impatient for that.) 2. I wish I had discovered bamboo batting before I made the coat. I think the bamboo batting would have been less stiff than the regular ol’ cotton batting I used.
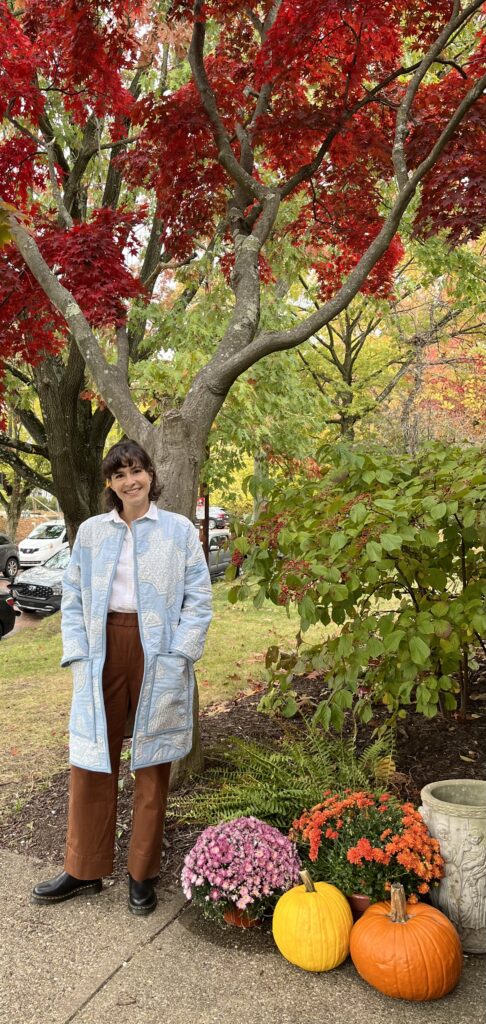
Other than those things, I am happy with how my first quilt coat turned out!
It’s chilly in Pittsburgh this week. Perfect weather to wrap myself in a quilt all day!
It’s the most wonderful time of the year! Hockey playoffs, that is. Staying up too late watching the teams on the west coast, watching highlights at breakfast with the kids in the morning, debating whether taking a four month old baby to a Penguins playoff game is a good idea (it’s not!)… it’s springtime in Pittsburgh.
I have always loved hockey. My dad took me and my siblings to see the now defunct Cleveland Lumberjacks when we were kids, I played with my cousins on my grandma’s lake in Michigan, and in college I joined a D-league rec team that played at 1am on Wednesdays with a bunch of people that could barely skate. So you can imagine how delighted I was back in 2007 when the guy I had just started dating told me that he had season tickets to the Pittsburgh Penguins games and invited me to go. Reader, I married him… three years (and many hockey games) later.
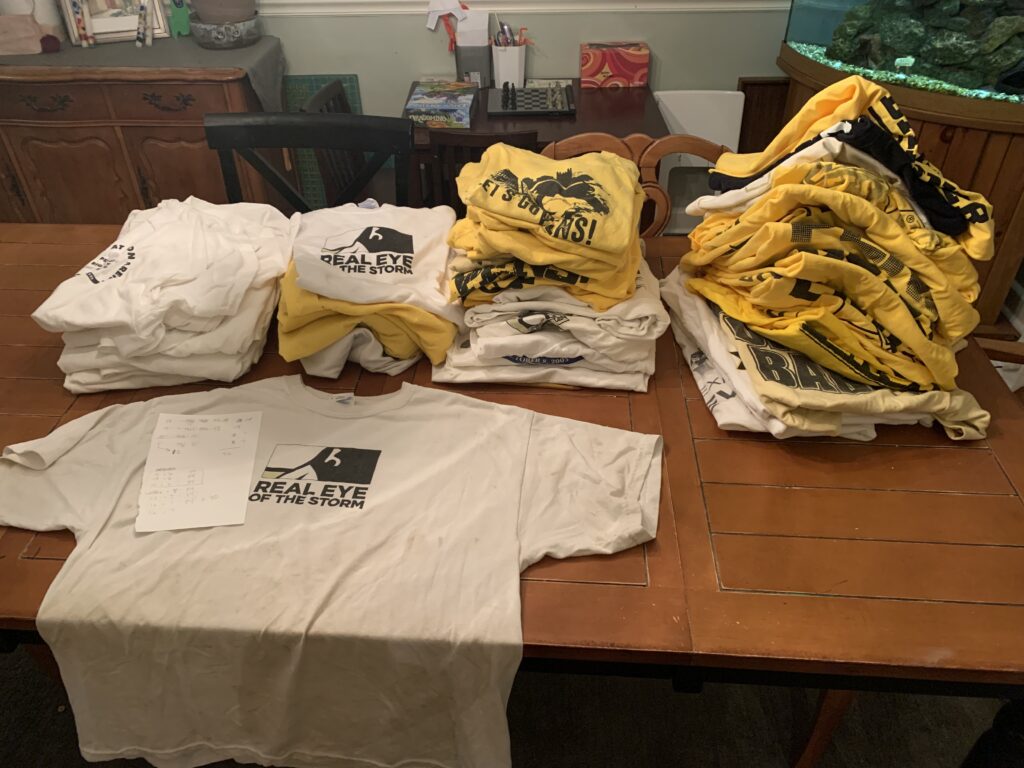
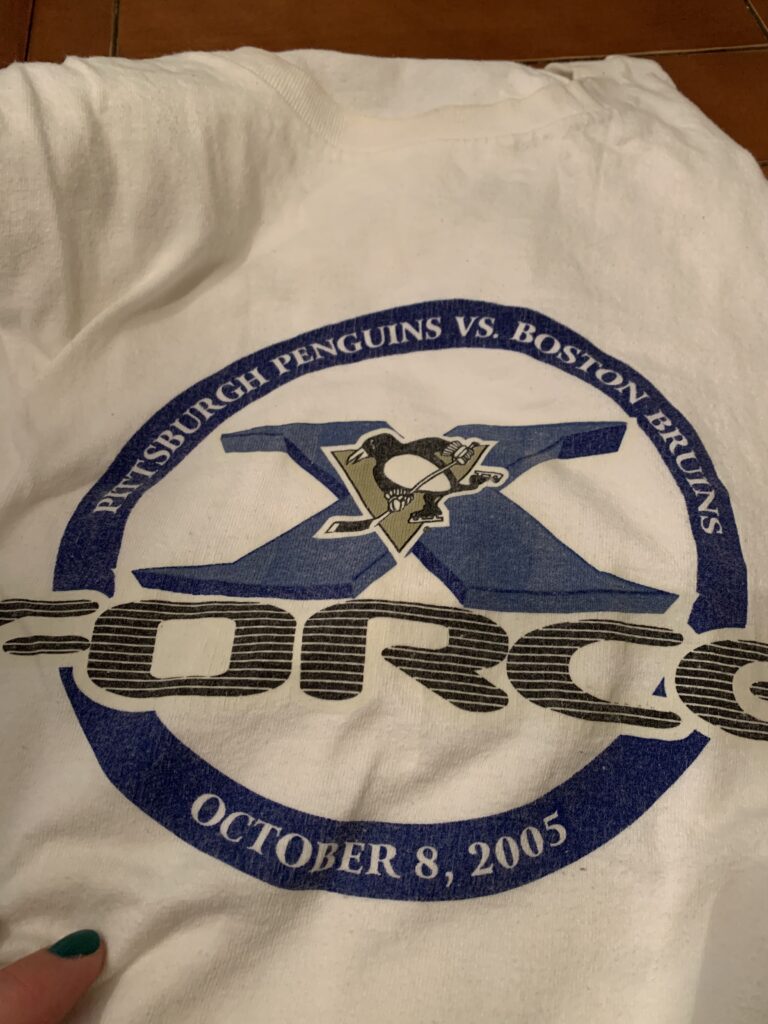
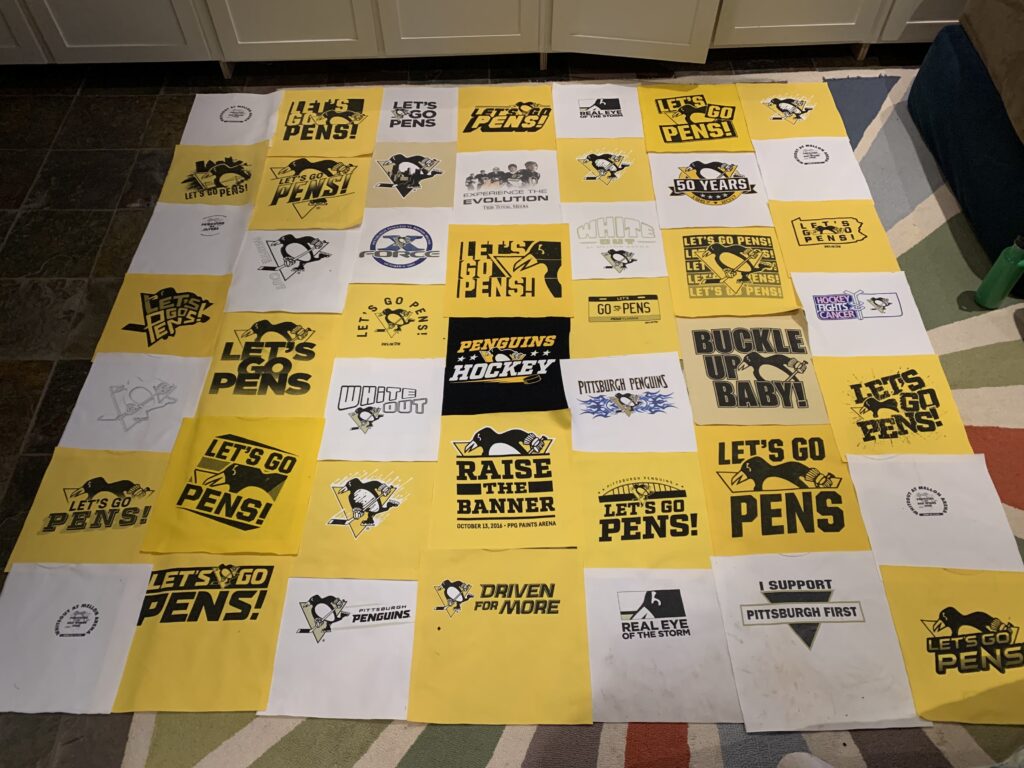
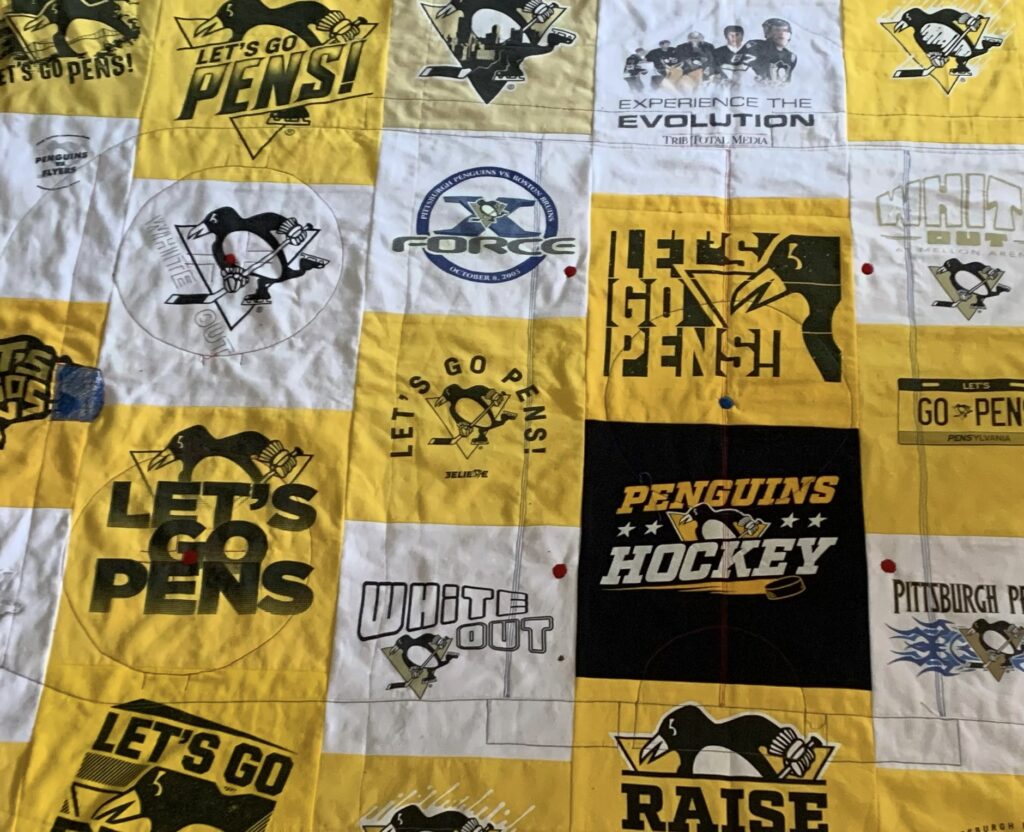
The Penguins have consistently been in the playoffs for many (16?) years, and Brad has attended many many playoff games. (I know, I know! You thought this was a quilting blog, why am I going on and on about hockey? I’m getting there.) At many (all?) of these games, the fans would receive a t-shirt. Years of attending playoff games led to amassing many, many, MANY t-shirts. At one point he went through them and removed the duplicate designs: 46 t-shirts still remained! I can’t remember whether he or I suggested that I turn those into a t-shirt quilt, but that is what I did.
This is not all of the shirts!
I began this project on January 2nd, 12 days away from my due date for our third child. “I can finish one more quilt before I have this baby,” thought I, naively.
An oldie but a goodie
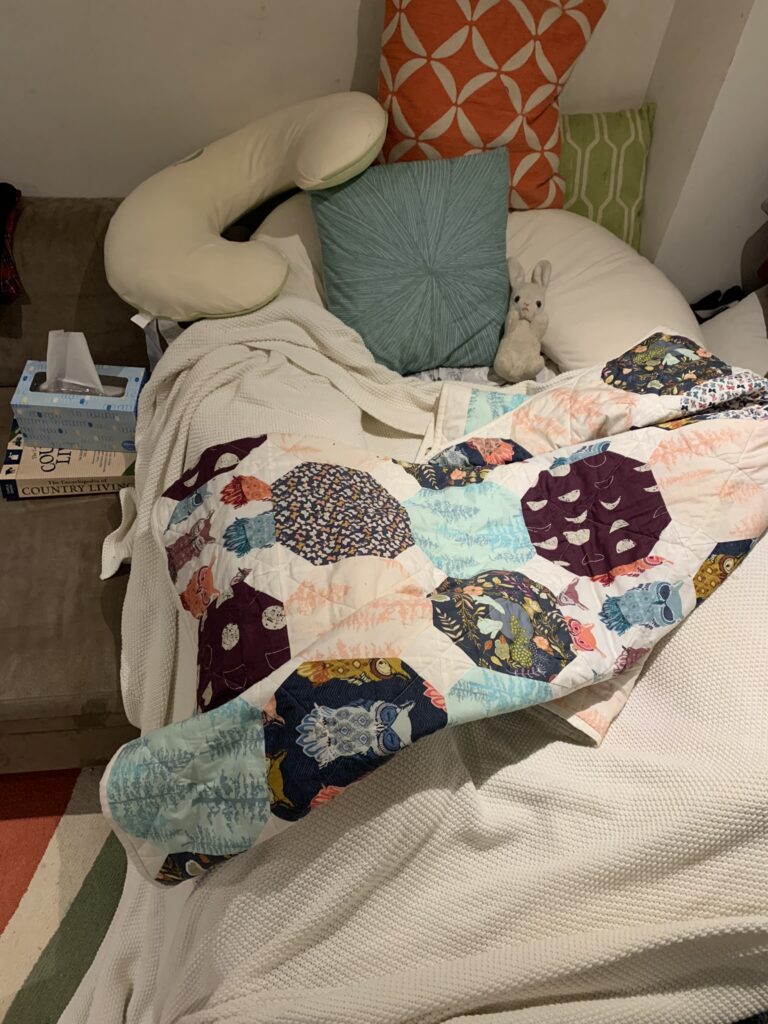
The next day I started to feel bad. Covid bad. The day after that I tested positive and went into our (finished) basement to isolate from the rest of my family, who somehow managed to not get sick. I took my rotary cutter, mat, and the pile of t-shirts with me.
A snuggly quilt is essential during times of sickness, and a favorite stuffed animal from childhood helps too
At first I just slept as much as possible, but eventually felt well enough to iron on interfacing and cut shirts between naps and reading about how to deliver a baby alone in the Encyclopedia of Country Living, just in case. “Maybe I can still finish this quilt before the baby comes,” I coughed.
Not the most beautiful color palette…
With a mask on, I crept upstairs to grab my sewing machine and pins, then proceeded to set up the least ergonomic sewing station imaginable at the coffee table in the basement. It was uncomfortable, hunched over with my gigantic belly in the way, but I managed to sew the rows together. My husband ran out to Joann’s for a curbside pickup of some official Pittsburgh Penguins flannel that I ordered online to use for the backing. I pieced that, then I finished the top. ”My first two babies were a week late, so I still have time to baste, quilt, and bind this quilt before I go into labor,” I said to my reflection in the basement bathroom mirror, probably delirious with fever and insanity from being alone in the basement for so long.
In the wee hours of the morning of day 10 in the basement, my last day of isolation and one day before my due date, I went into labor. “I guess I’m not finishing your quilt before the baby comes,” I said to my husband between contractions in the hospital (so glad I didn’t need to use any of that solo home birth info from the Encyclopedia!).
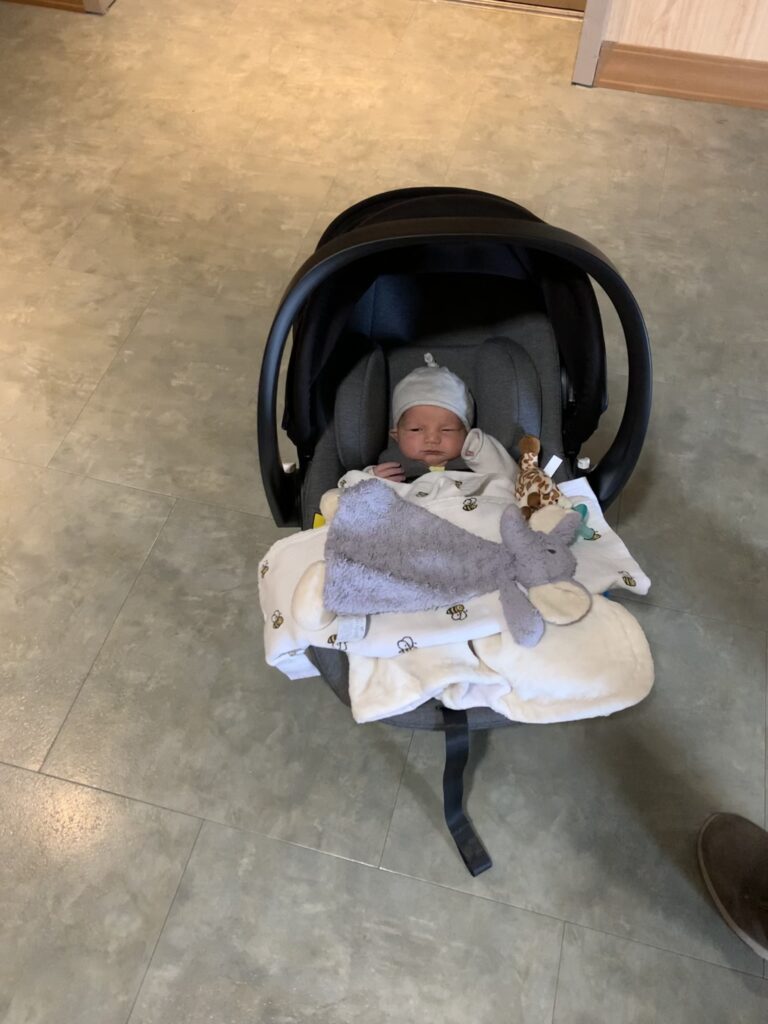
After our baby girl was born and I was settled into my negatively-pressurized mother-baby recovery room in the covid section of the hospital, he asked me if I wanted him to bring back anything from home when he returned the next day. ”My sewing machine!” I (mostly) joked.
Ready to go home and meet the sewing machine
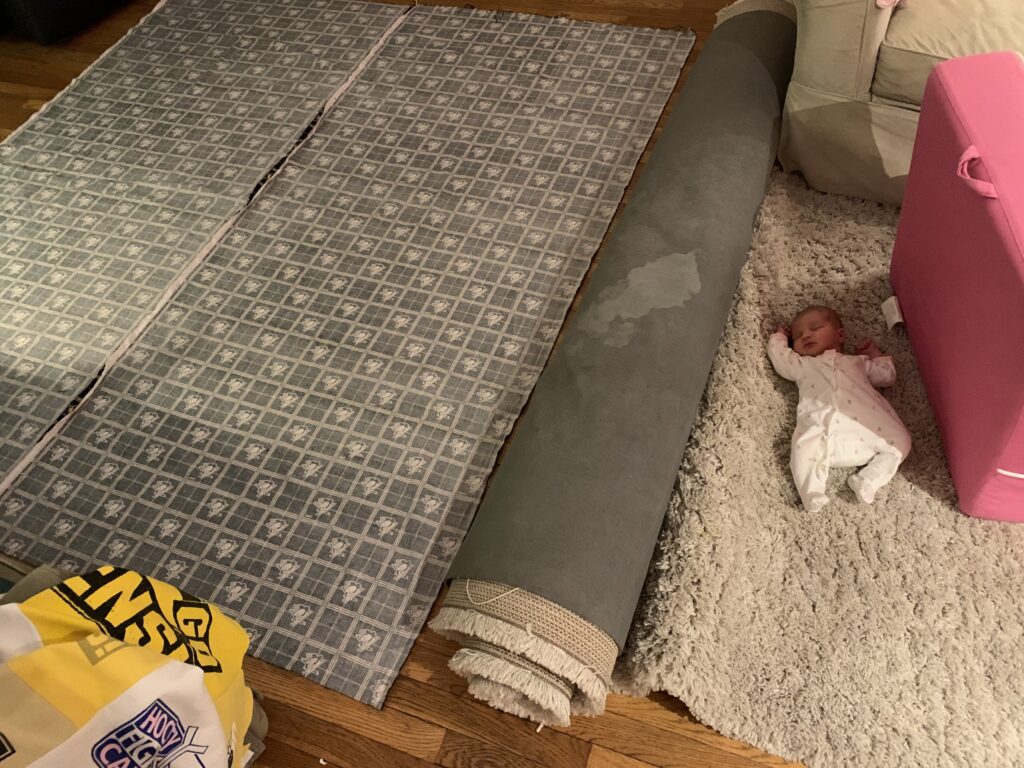
Two days after that, we were on our way home! Then two days after that (according to the time stamp on the picture below), I was getting ready to baste this quilt. Not really sure what I was thinking, pushing the heavy rug out of the way a mere four days postpartum… I probably wasn’t.
Photographic evidence of my insanity (and cute baby)
My photo time stamps tell me that I didn’t actually baste the thing until 9 days postpartum, with some help from my neonate.
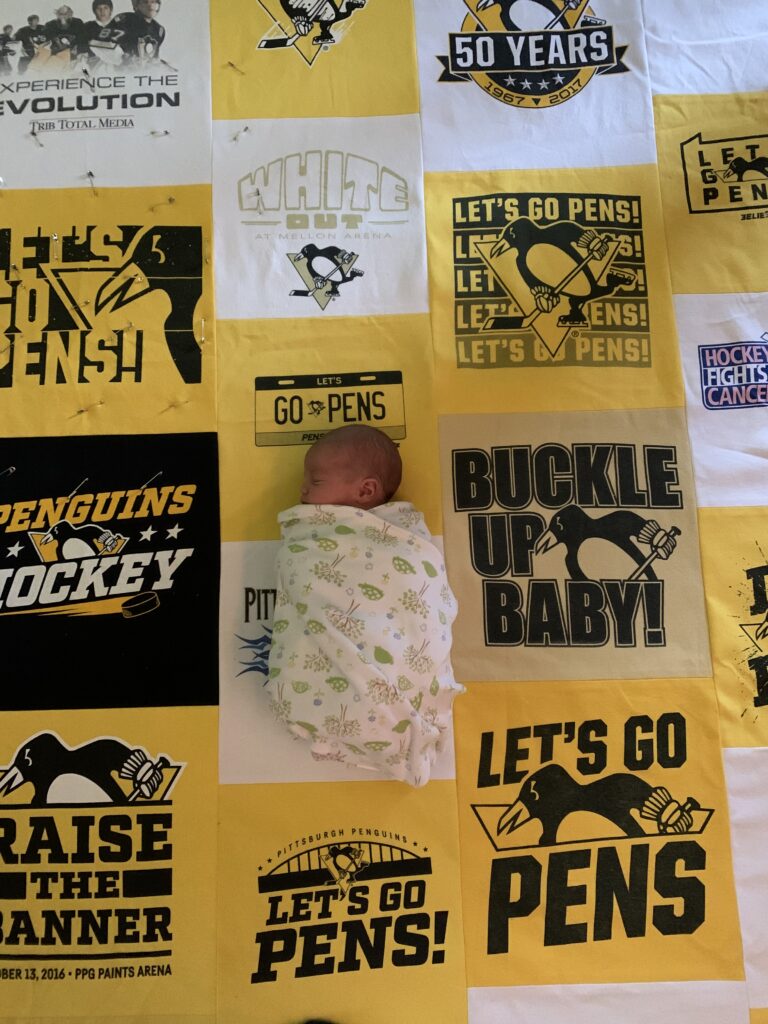
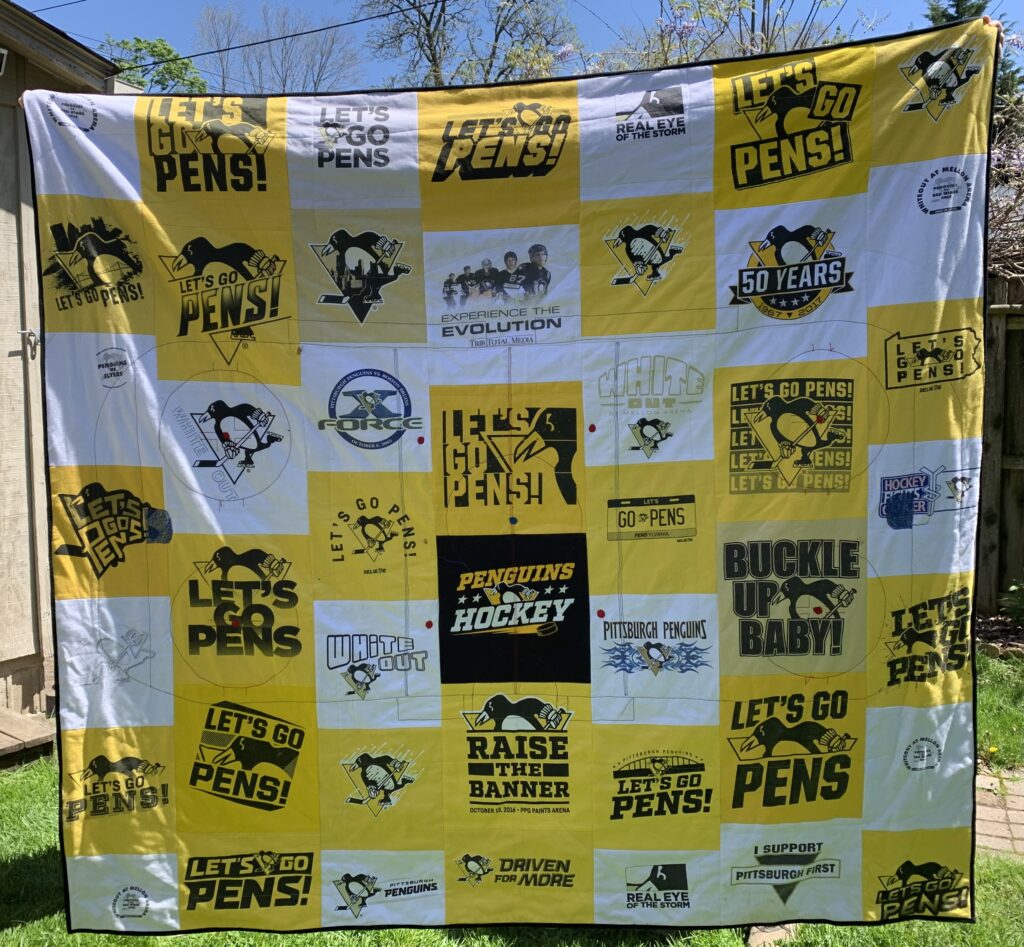
Buckle up baby, indeed
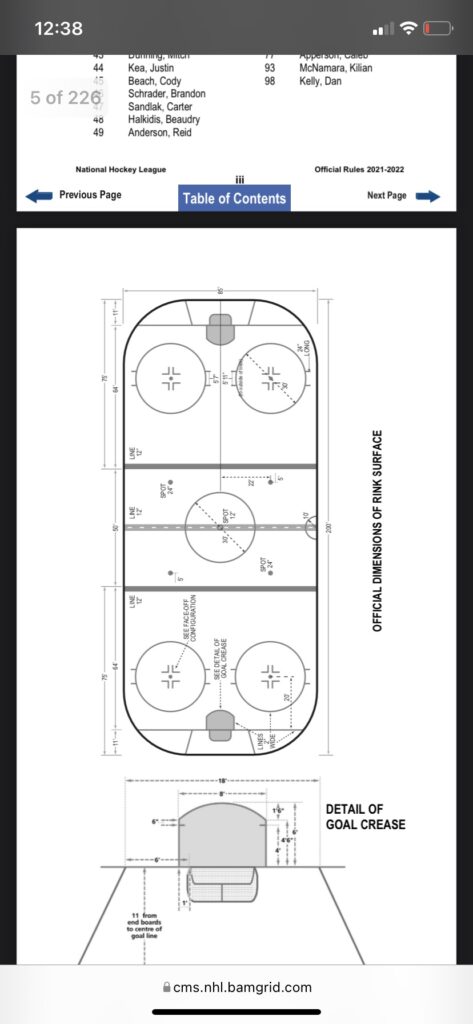
Normally at this point in the quilting process, I figure out how far apart I can safely quilt straight lines, sew those lines at full bunny speed, and then call the thing done… but I got a crazy idea in my head that I would quilt the markings of a hockey rink instead. This involved downloading and reading portions of the official NHL rule book…
Unclear whether this screenshot was taken at 12pm or 12am
…and getting my rulers back out to mark the lines and circles and make sure everything was to scale. Initially I thought I would quilt these lines by hand, but the Juki can handle 12wt thread, so I was only forced to embroider the little dots in the face off circles by hand.
Can you see center ice? The blue lines? Faceoff circles?
My trusty time stamps tell me that I finished this quilt in mid-March, and I finally got it outside for a photo on Mother’s Day. Thank you to my wonderful mother in law for taking this picture.
They say that to win the Stanley Cup, you need both grit and finesse, as well as a little bit of luck. There will be adversity, but you must tackle it head on. Never give up. It’s an epic journey, but only the strongest and most determined make it to the end. Well, I might say the same thing about quilting. Again, I would be mostly joking.
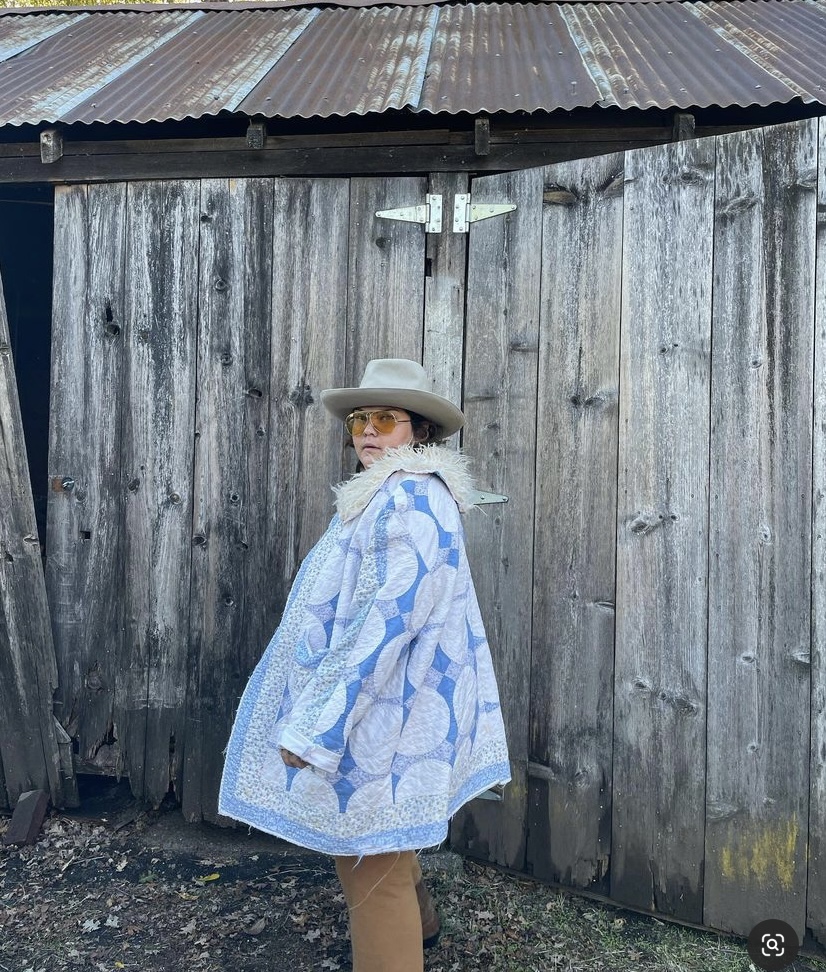
It’s happening. One of my 2022 goals is to jump on the quilt coat train! Sometime last year, Rachel said she wanted to make a quilt coat. I’m not going to lie, I was skeptical. But, she planted a seed that day in my quilty brain and now I can think of nothing else!
Quilters/people everywhere are making quilt coats. And they are all so fun to look at! Scrolling through #quiltcoat on Instagram is an amazing pastime.
@brittney.frey — her quilt coat tutorial on Suzy Quilts is so good!
@themtalons
@dazesmoki
@shelb.montana
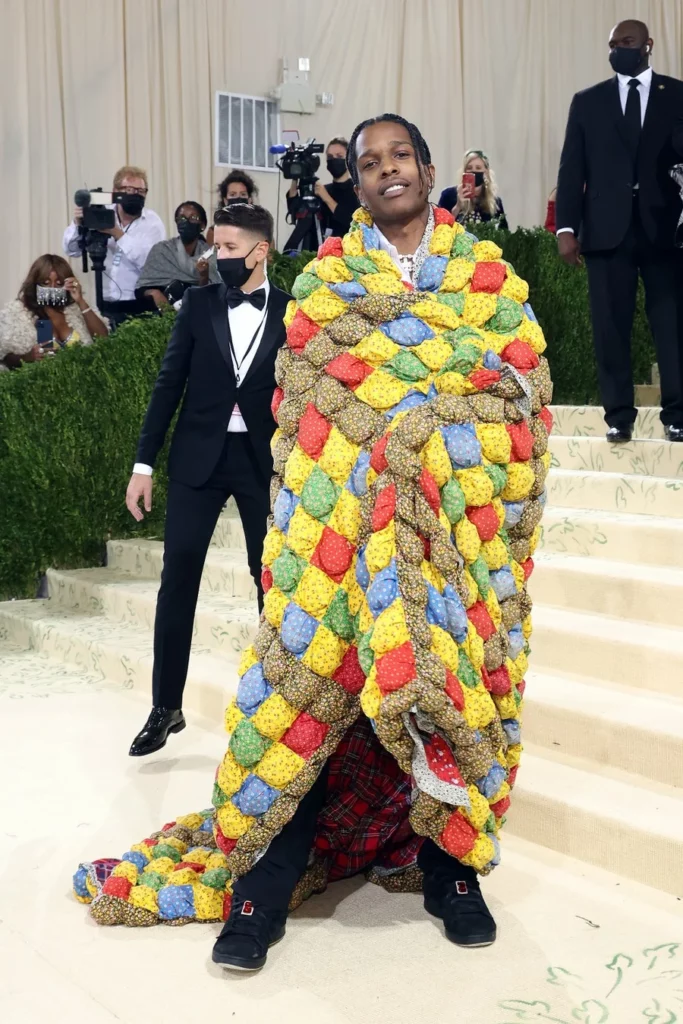
A$AP Rocky
And of course, who can forget when A$AP Rocky wore an actual puffy quilt to the Met Gala. (Side note: I read a little more about this. The designer actually bought this quilt at a thrift shop. Then, a woman recognized it as a quilt her great-grandmother had made and she posted a photo of the quilt on her bed! Talk about a small world; or worlds colliding; or something!)
So, yes, quilt coats are currently super trendy. I am not going to pretend I don’t love riding a trend wave. I also really want to visit Iceland!
In addition, I think I wanted to take on the challenge of sewing something different. I have never sewn apparel before. At least, not since I made a dress for my American Girl doll when I was maybe 8.
So, this is how my quilt coat started:
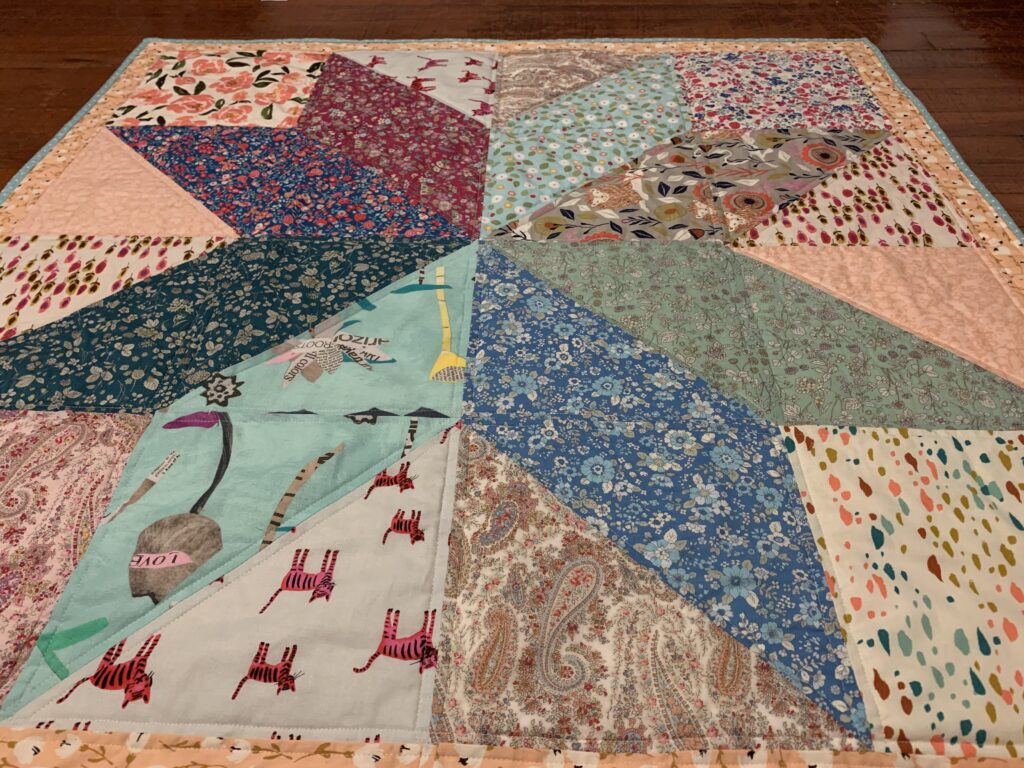
Every year our neighborhood has a giant yard sale. At the sale last year a woman was selling vintage quilts and linens. She said she used to own a vintage linen shop and these things were left after the shop closed. I bought a quilt top. It was an entirely hand-pieced “drunkards path” quilt.
Now, I understand there is some turmoil about whether it is at all appropriate to cut up a quilt or top, especially something hand-pieced! I thought about this a lot. I realize someone spent so much time piecing this top. But, if my coat turns out the way I am imagining it in my head (big if) I think I will love it more than if I simply quilted this. I decided to go for it not because I don’t appreciate the top for what it is, but I just kept imagining it as my beautiful coat! If the woman who sold it to me ever sees me walking through the neighborhood wearing it I hope she isn’t super mad!
Also, the fabric in the top has some discoloration, which I actually love. It reminds me of a chambray button-down shirt I owned for a decade that was literally falling apart, but I still wore it. Eventually the sleeves fell off and I continued wearing it under sweaters, like a dickey! So, something about that fabric discoloration spoke to me and said—wear me forever.
Lastly, I texted Rachel and asked if I should cut up this vintage, hand-pieced quilt top and she said yes. So, that was settled.
I downloaded a pattern from an Etsy shop called Tropical Research. The pattern is called “Cozy Coat,” which is exactly the goal I am hoping to achieve. I needed something simple—no buttons, zippers, tailoring—since I know zero about making clothes.
It did take me a bit to puzzle the pattern together after I printed it, but eventually I got it! I really, really should have sewed a muslin or a practice coat to make sure I have the right fit. I also just randomly decided to chop off the bottom of the pattern to make it a bit shorter based on pure eyeballing. But, I am super impatient and was excited to get to it—I hope I don’t regret that in the end! ??????
Then, I realized I still needed a backing fabric. Again, based on zero knowledge and not enough research I ordered three yards of a taupe-y/gray cotton sateen from Mood. I did not really know what cotton sateen is (it looks exactly like bed sheets), but it seemed more like a coat lining than regular quilting cotton without being too different or impossible to work with.
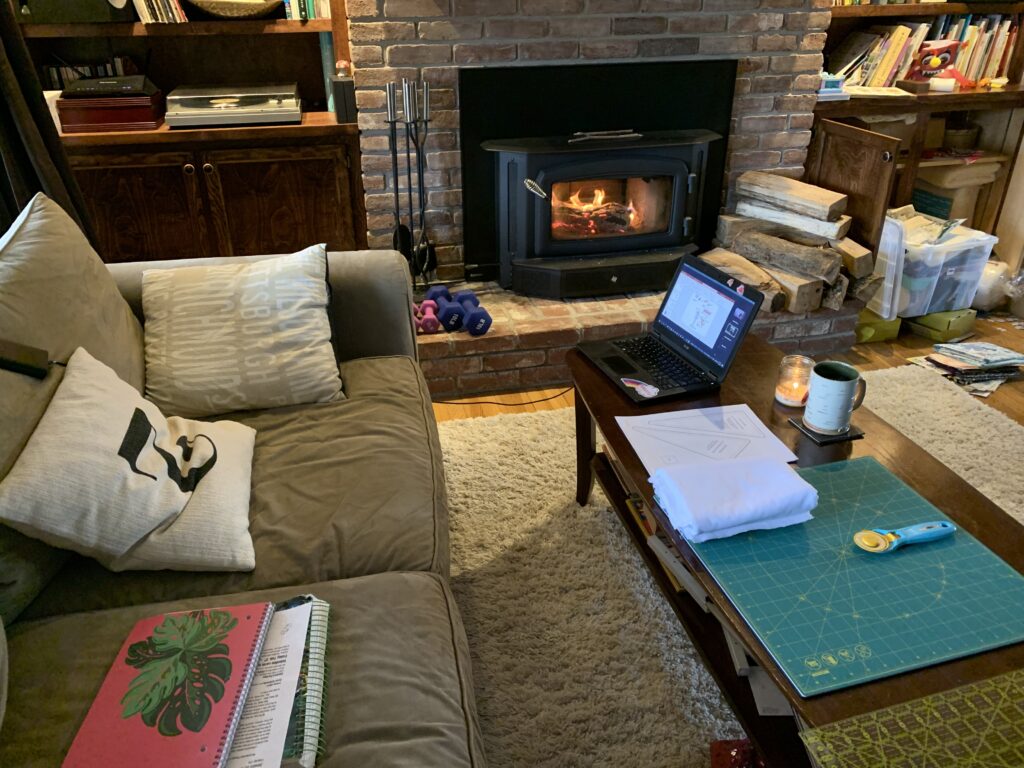
Finally, I was ready to roll! Louie was at my parents’ for a night so I had time to cut out and baste all of the little mini quilts that will eventually be coat pieces!
The next steps are quilting each section, cutting each piece out using the pattern, and then…sewing the pieces together? I am not entirely sure what to do after the quilting, but here’s hoping the “Cozy Coat” pattern instructions can answer that! I look forward to updating everyone on my progress!
We finally got some snow! Good news for the local ski resorts and even better news for those who love to photograph quilts in the snow.
If I could go back in time, I’d pick a spot without so many footprints but you live and learn.
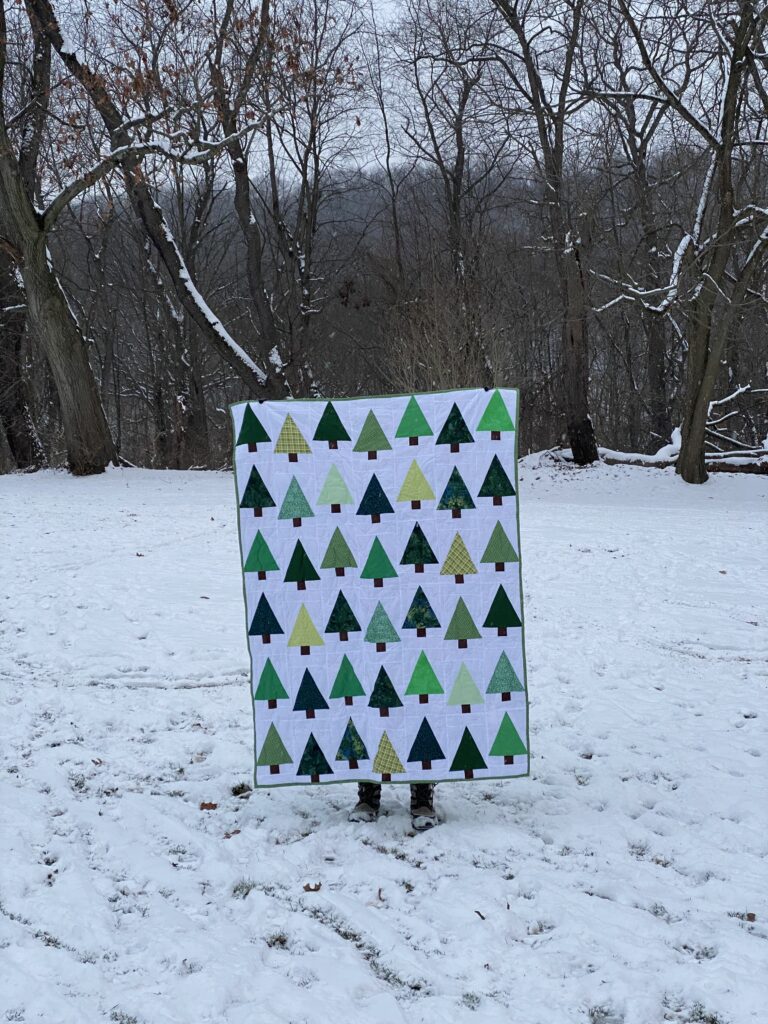
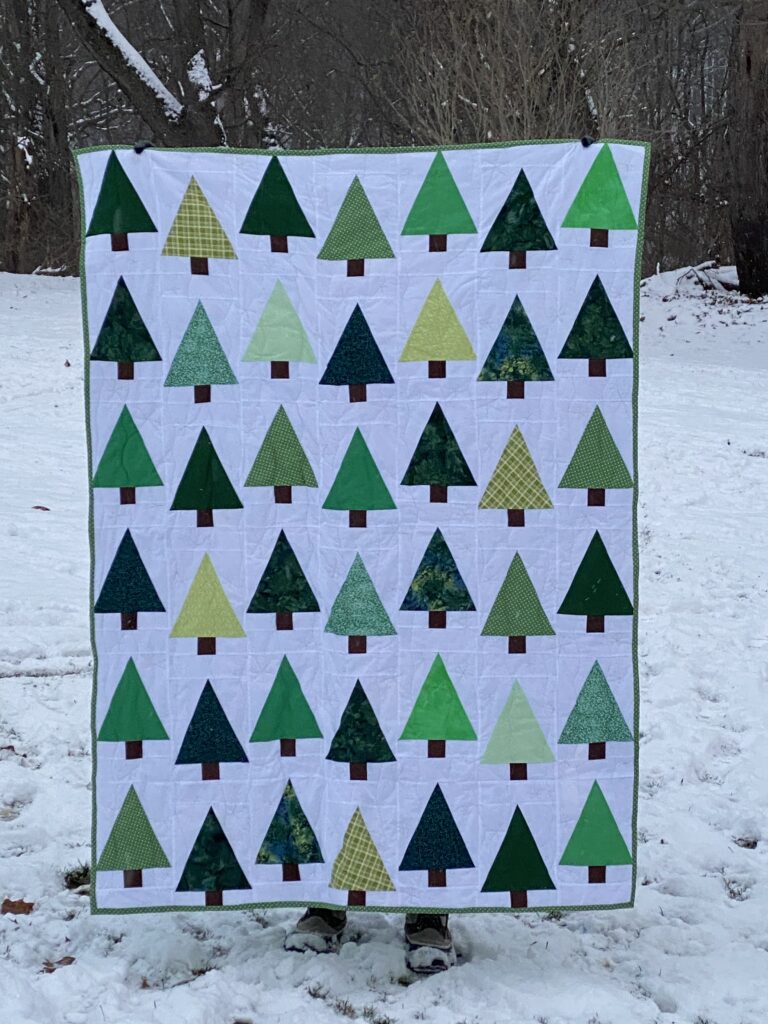
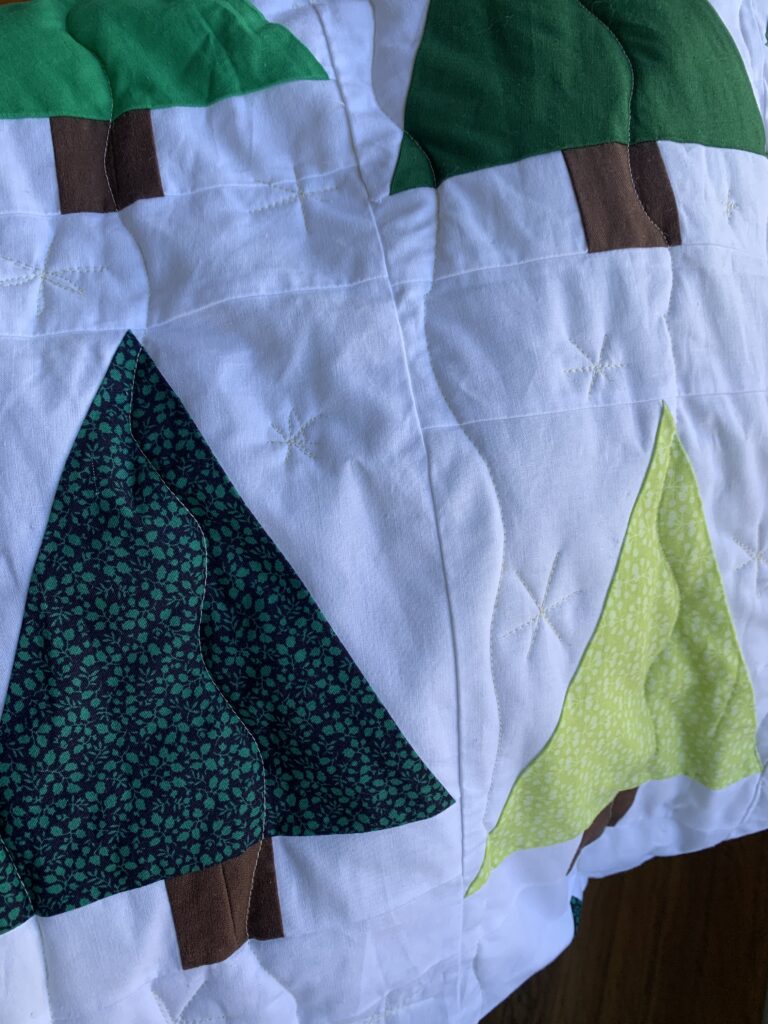
This Christmas tree quilt is actually one of the first quilts that I started working on this year, and it was the last one that I finished, on December 30 at 11:30pm. Not bad!
Multitasking at its finest in January 2021
I used the free Evergreen Quilt pattern from Cluck Cluck Sew, which I cut and pieced while listening to lectures for my anatomy and physiology class. This was probably not the best for concentration and learning. But I managed to pass the class, so it all worked out. (At the beginning of this year I was telling everyone that I wanted to change careers and become a nurse, but taking this pre-requisite course showed me that doing so while also working a different job and raising children would be extremely challenging, more challenging than I am willing to take on at this moment of my life. When would I quilt?!)
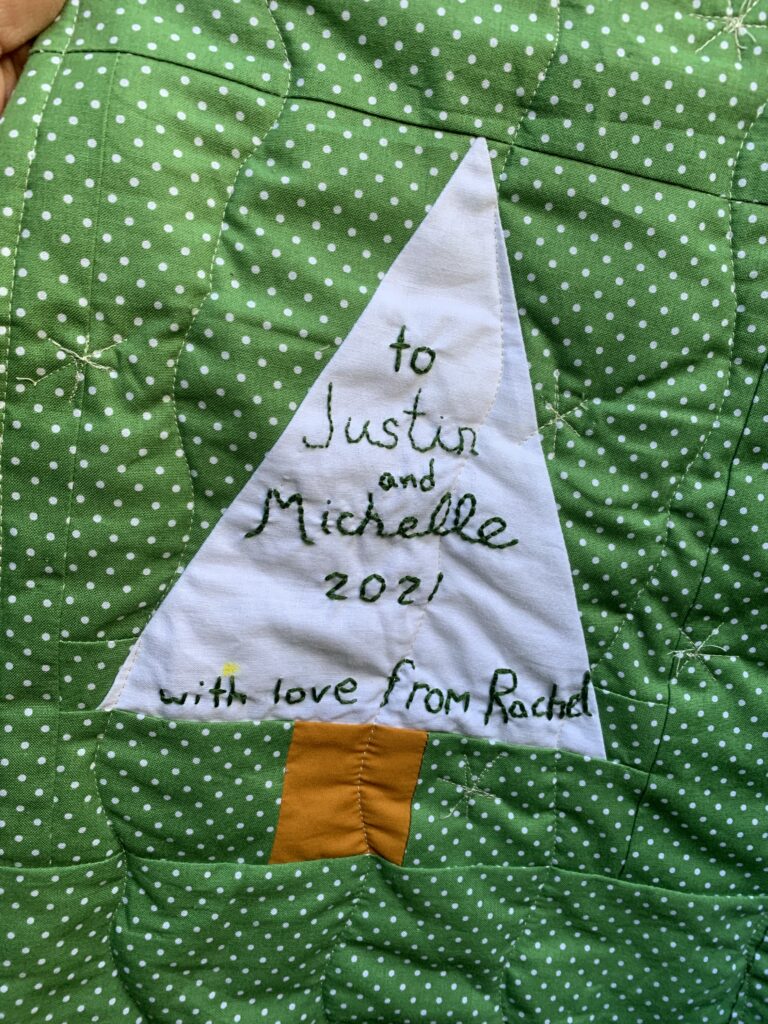
I finished the Evergreen quilt top in February and then stashed it away and decided to quilt it later (which turned out to be the end of December…). This quilt is a wedding present for my friend who is getting married in April of this year, but with the crazy pandemic, I scrapped my idea of embroidering their wedding date and went with the make year instead. I don’t want to jinx anything.
Another goal for 2022 should be to work on my embroidery so it looks less like a child wrote it. Also, keep quilts away from my actual children, I’m hoping that yellow mark is washable crayon….
Using my walking foot, I quilted squiggly vertical lines and then attempted some FMQ “snowflakes” that were more like asterisks. I ended up putting the walking foot back on and finishing the snowflakes with that, which was much easier.
Snowflakes
I used a green polka dot fabric for the backing, which I also wanted to use as the binding… but I cut into it while trying to trim the batting. UGH!! One really needs to trim the batting before quilting and not quilt to the edge of the quilt top when using this method, as Allison of Cluck Cluck Sew has shown me. But! I scrolled through the comments and found some tips for repairs when this does happen. Fortunately the cuts were tiny and the repairs were easy. Thank you to my guild, i.e., the comments sections of quilt blogs.
As I was basting and quilting this, I regretted that I hadn’t had my revelation about using the iron earlier, because the piecing could be a bit neater. I really love this quilt pattern though, it’s a great way to use up scraps, so I think I will make it again someday, maybe as a wall hanging or table runner? Check out this adorable version that Allison made this past Christmas.
Despite its flaws, I hope that my dear friends Michelle and Justin snuggle under it for years to come. I used a wool batting so it will be nice and warm. I’m going to send it to them early, but after I wash it and hopefully that yellow mark comes off. (Facepalm)
Sadly I did not finish my personal Christmas quilt in time for actual Christmas, but I did finish it on Dec. 29.
My husband/webmaster and I were not quite tall enough to hold this quilt up off the ground. Thank you to neighbor Lucia for taking this photo!
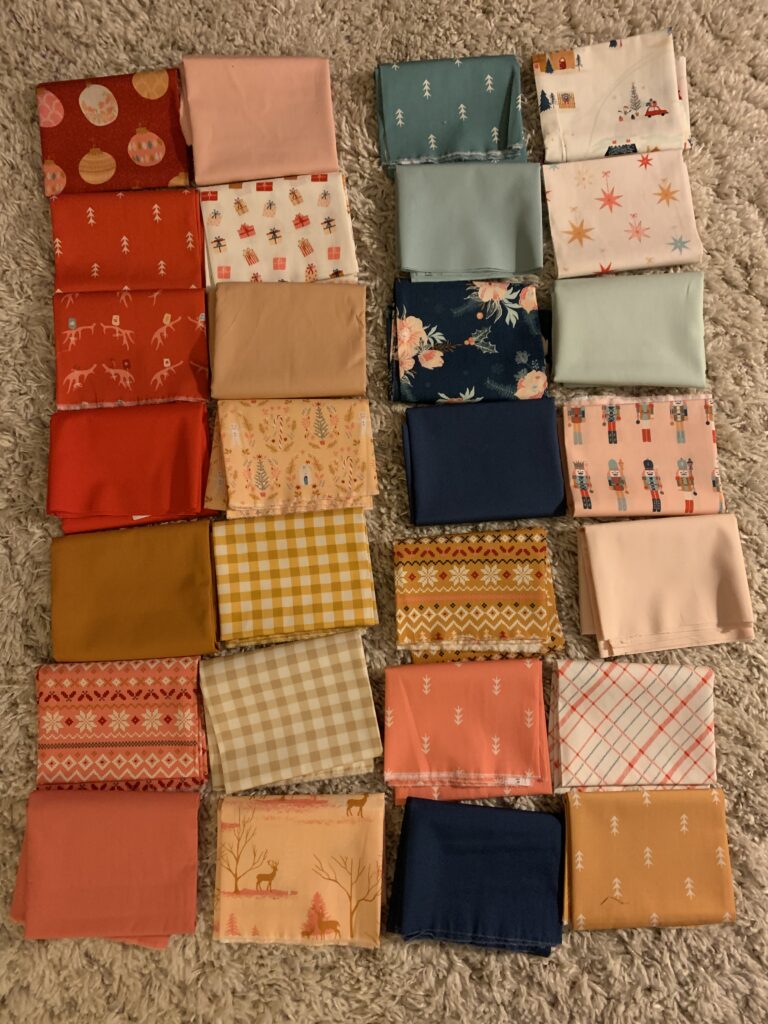
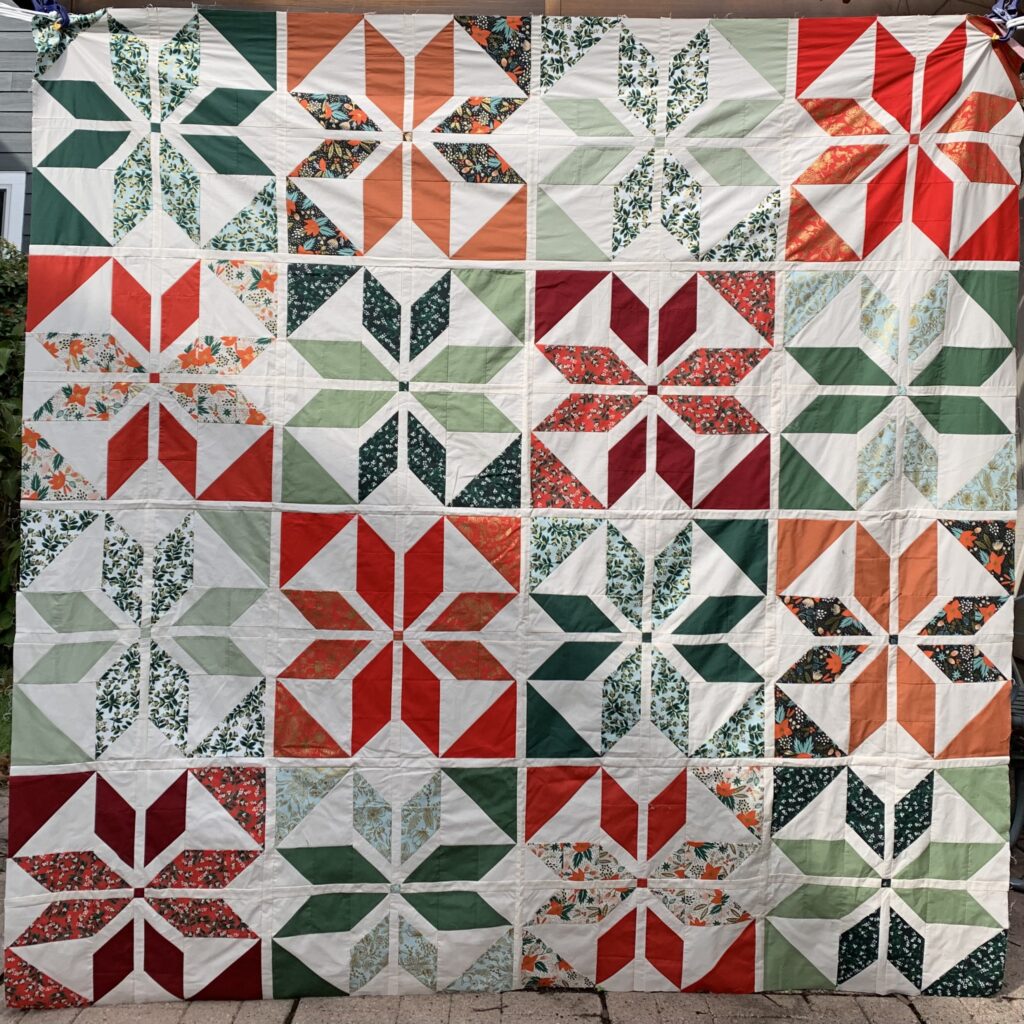
I bought a fat quarter bundle of Maureen Cracknell’s Cozy and Magical fabric collection, along with some coordinating solids and plaid prints. I also had a few things in my fabric bin that I added to the fabric pull.
Cozy and Magical
I didn’t have a plan for this fabric when I bought it, but I landed on Suzy Quilts’ Reverse Sawtooth Star Pattern. I made a test block while I was in the middle of the Holiday Party Quilt Sew Along, and then forced myself to put it away until that quilt was finished. I like having many quilts going at once, but the number was getting out of control at this point.
I did managed to figure out how to get the directional prints to go in the right direction; thank you again, internet quilt guild of blogs and comments
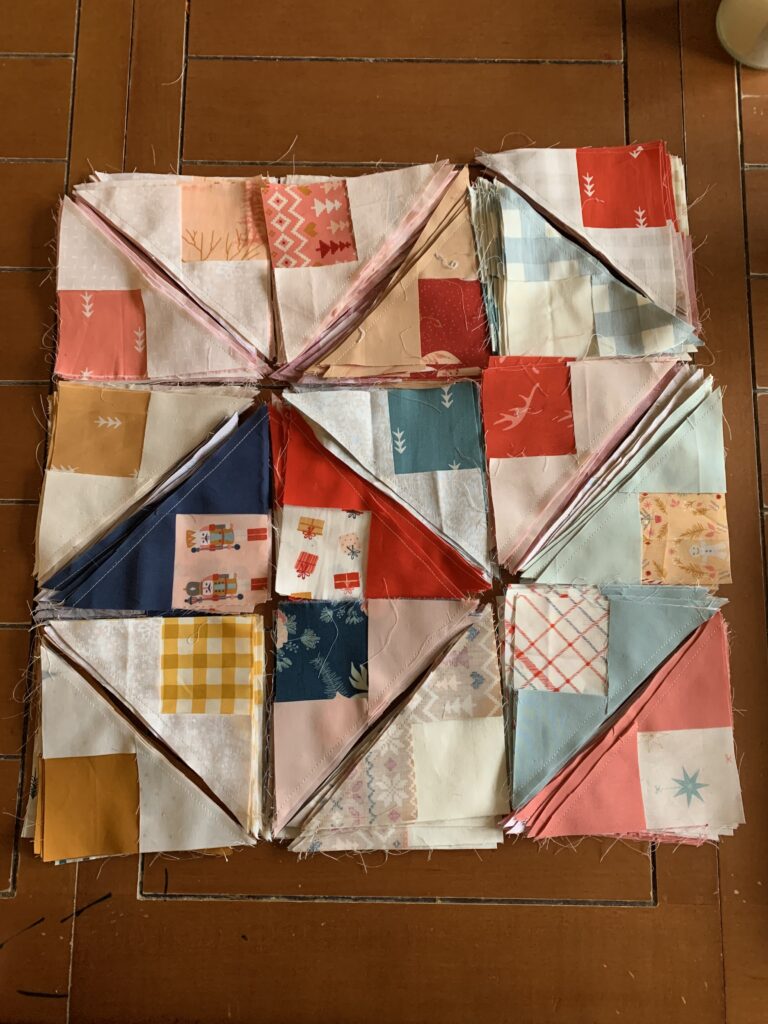
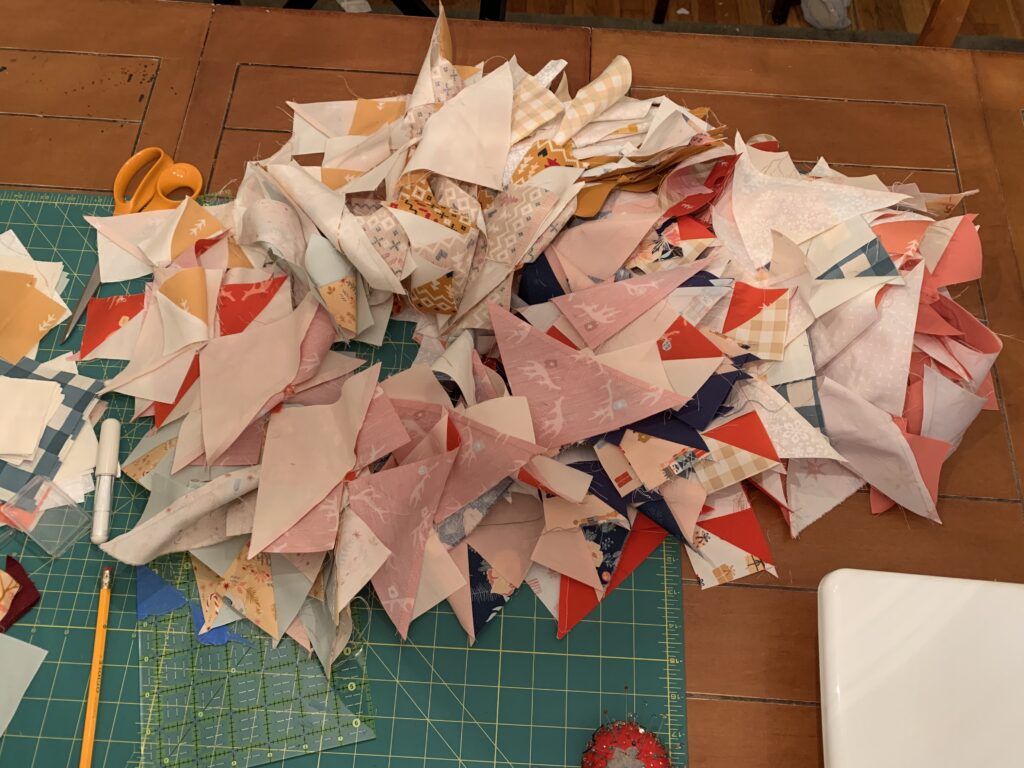
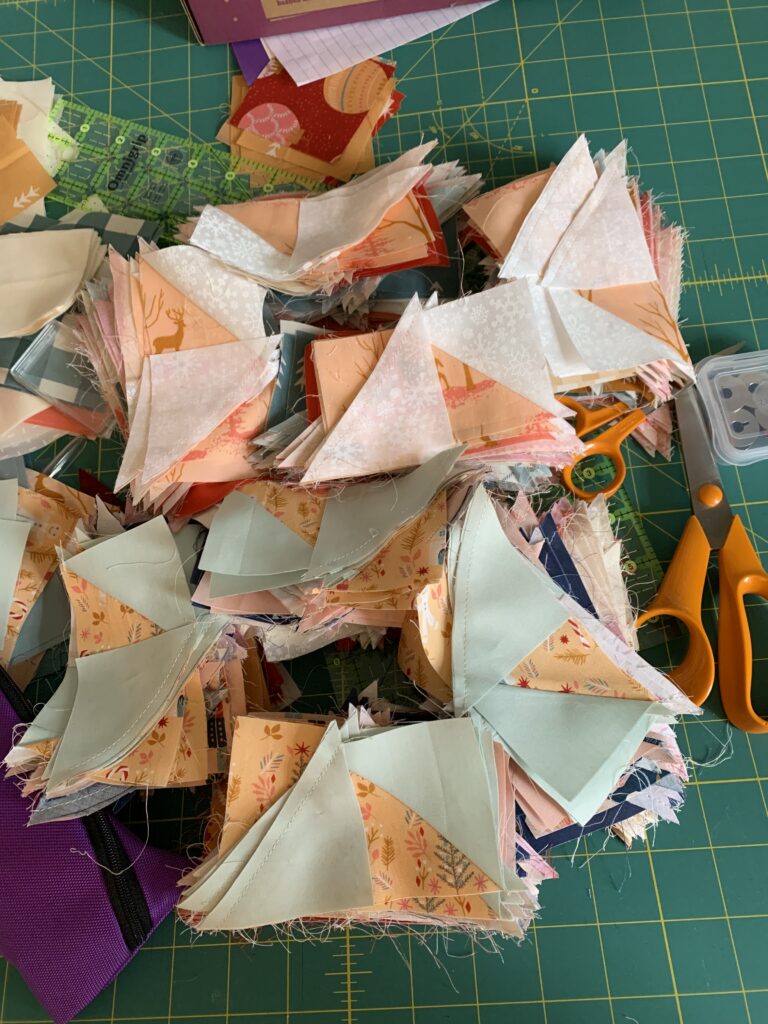
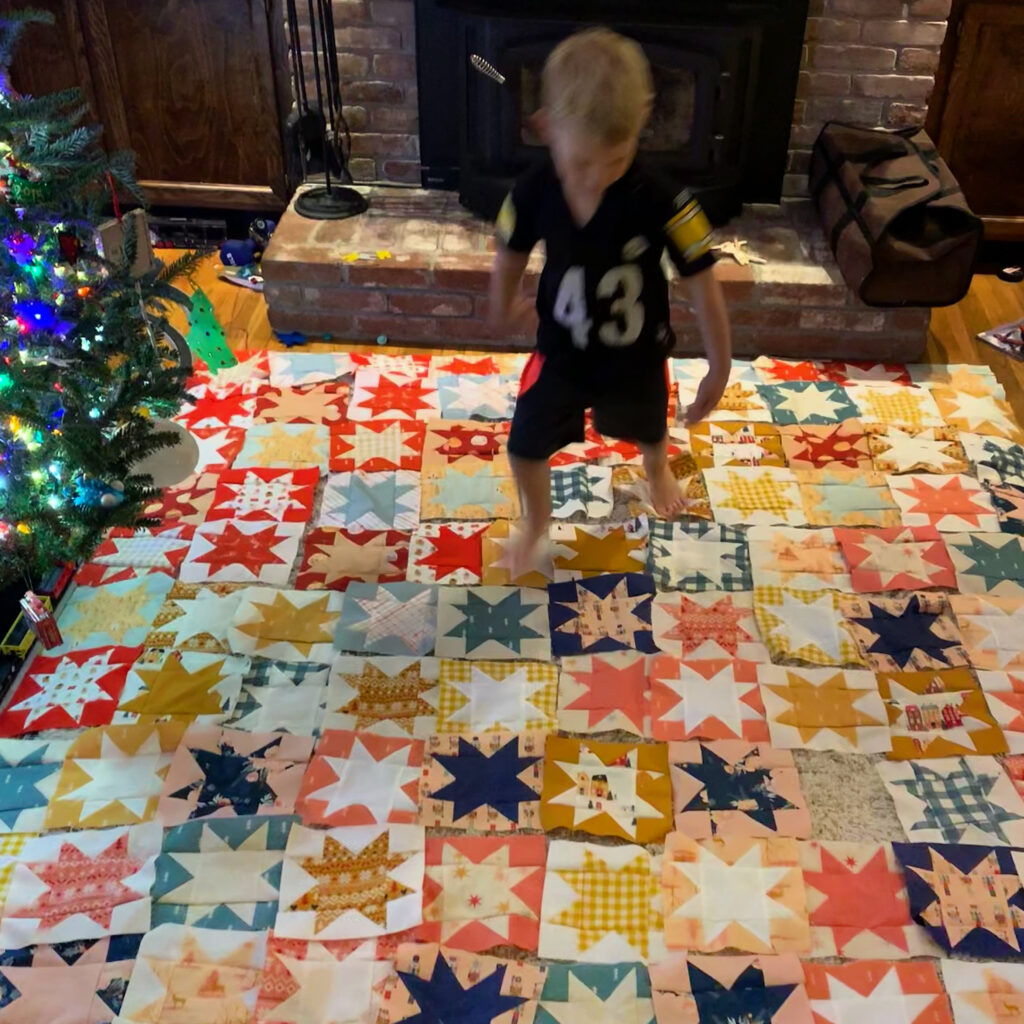
This quilt is basically just an explosion of sawtooth stars, so I decided to chain piece all of them at once. This proved to be a bit daunting. Soooo many flying geese, a very unruly flock!
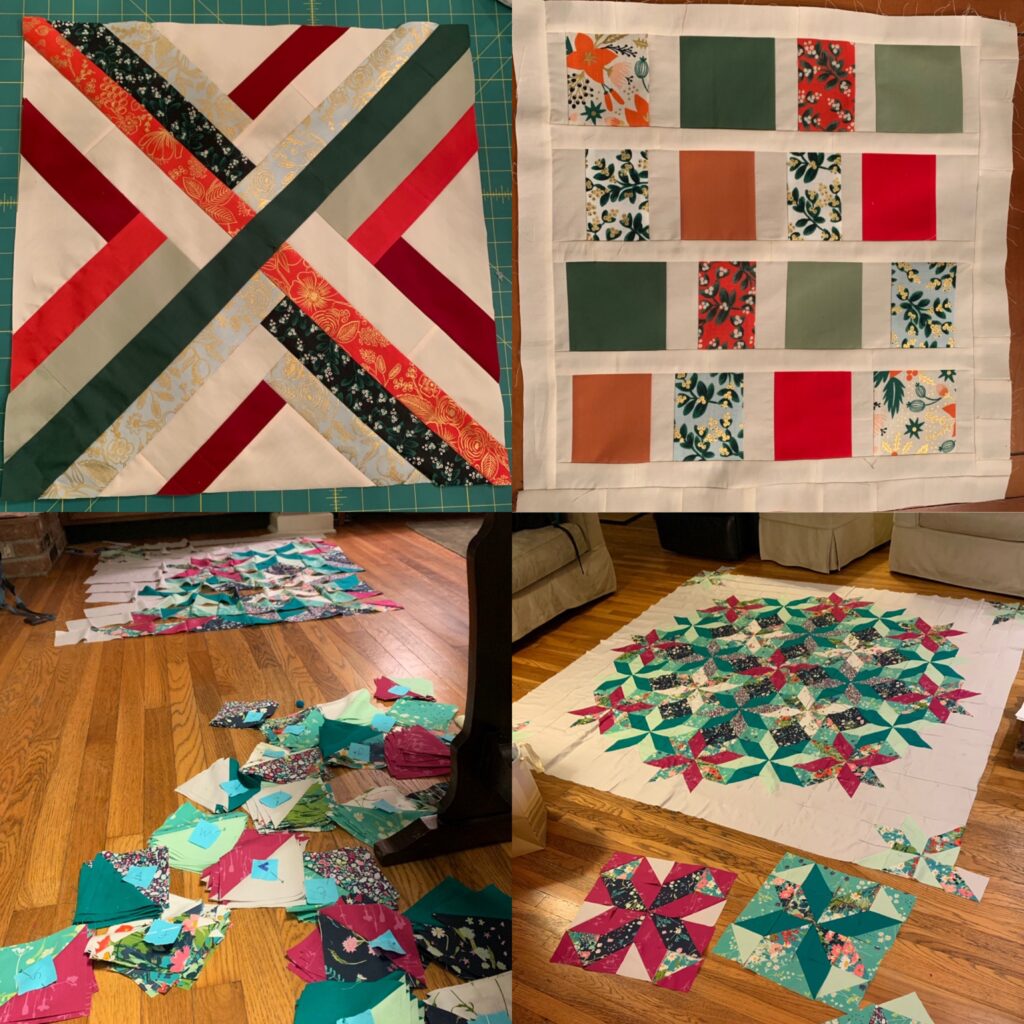
First steps for generating the flock. Ignore the sharpie marker stain on my dining room table please. The candle kept me calm UmmmAhhhh betterReady for a pressing session!Trimming dog ears. Amanda suggested I save these to use as confetti but I got them into the trash before my children could get their hands on them and scatter them about my house to be found years from now. Come togetherrrrrch-ch-ch-chain piecing!Troy Polamalu assisting with the layout Pushed all the furniture out of the way to baste this thing. Scrappy back. I was going to cut and sew the leftover fat quarters into horizontal strips, but it’s the back and I just wanted to finish this up. Scrappy back in the wild
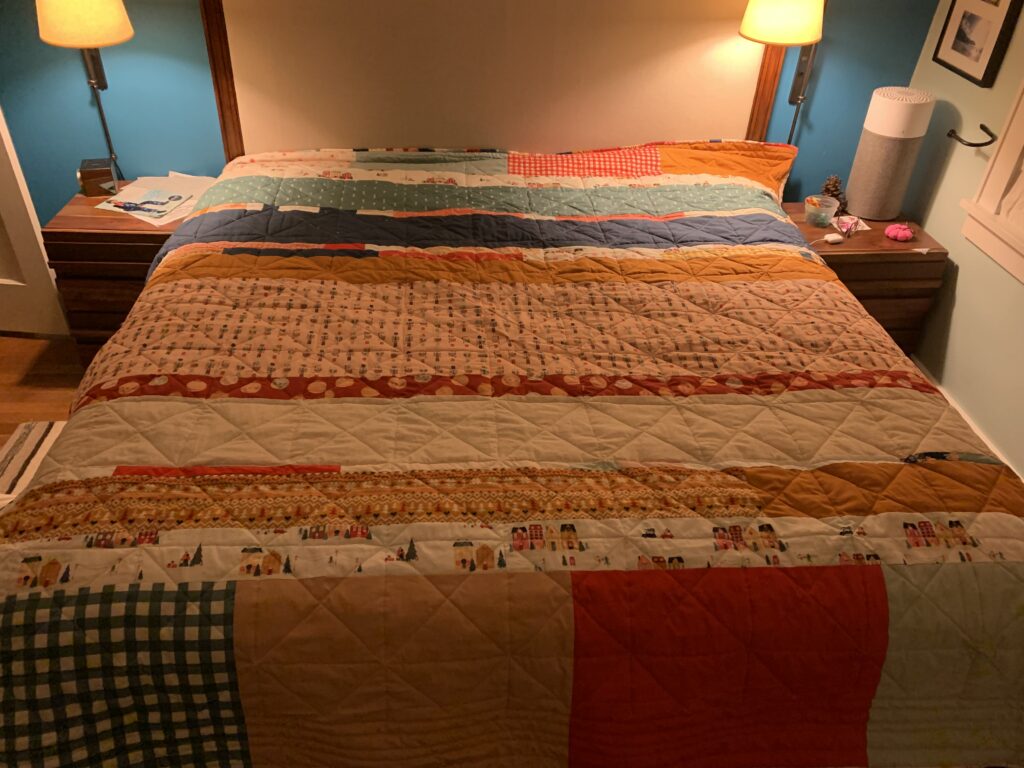
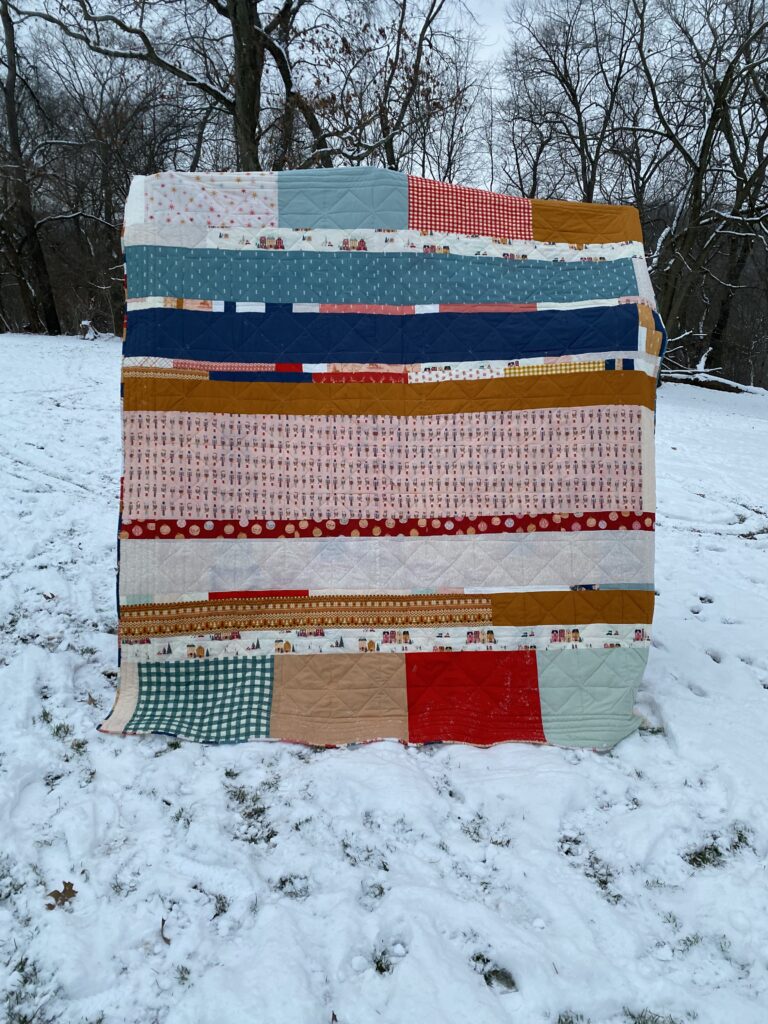
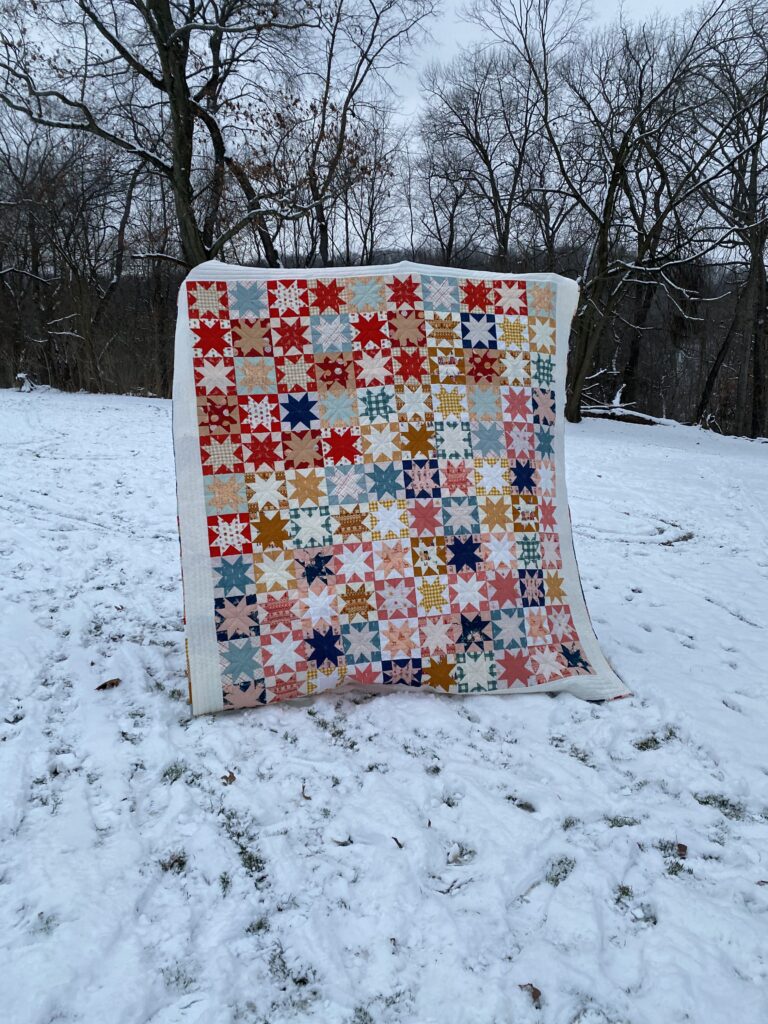
The Reverse Sawtooth Star pattern is supposed to resemble a checkerboard, alternating between light stars and dark stars. I did that and also attempted to do a red to gold to pink diagonal ombré with blues scattered throughout… there’s a lot going on here. But I like it. Since it ended up being so big, I decided to just do straight line quilting: horizontal, vertical, and on both diagonals through the stars. I did boxy outline quilting on the border.
We should use chairs next time, but that seems unsafe at 39 weeks pregnant in the snow.
I had a bunch of scraps leftover, so I decided to piece a scrappy binding and hand sew it on to the back. I did this while watching the Hawkeye series with Brad in those dark boring days between Christmas and New Years. He usually watches TV at night while I’m quilting, so it was nice to spend a few nights sewing and binge watching Hawkeye, which I really liked. He thinks I’m the only person who has only seen Black Panther and Hawkeye and none of the other Marvel shows or movies. I’m ok with that.
I also managed to finish the audiobook of Middlemarch while working on this quilt, so when I look at the prints of the quilt I can hear the narrator and I envision the scenes from the novel.
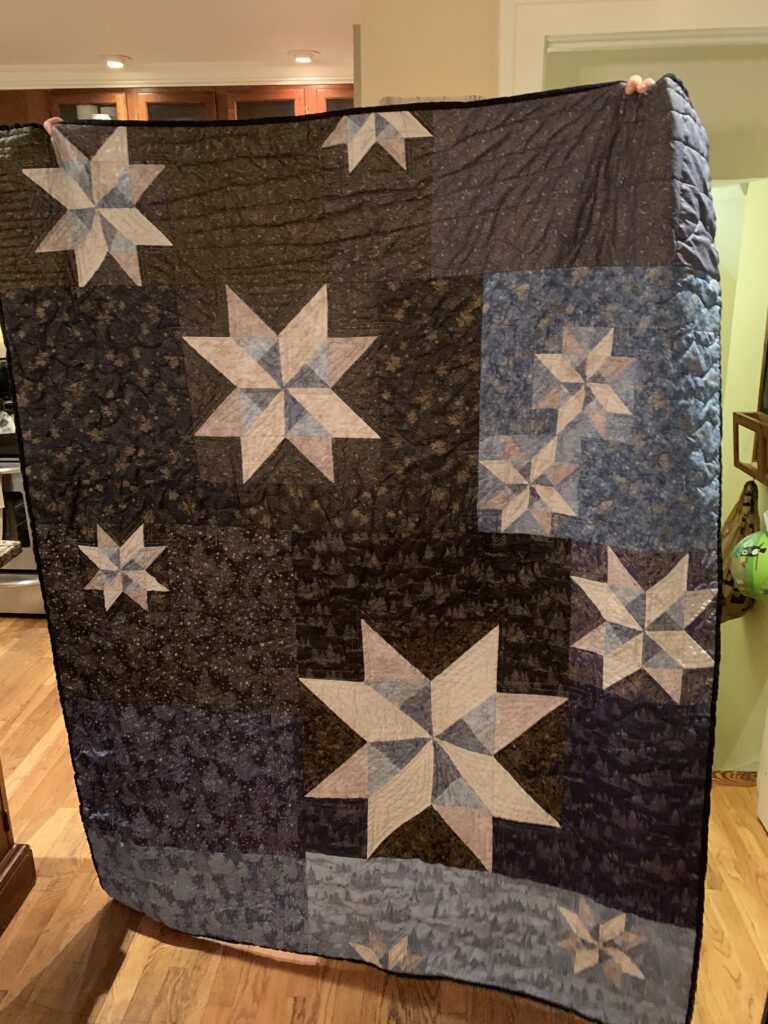
So, that’s it! Quilts 11 and 12. The new year has already brought lots of surprises. I’m already working on the next quilt, which is a tshirt quilt for Brad. I hope he likes it!
Amanda: Your goal for 2021 was to make 12 quilts, so the question on everyone’s mind is: did you do it?!
Rachel: I can hardly believe it myself, but yes, on December 30 at 11:30 p.m. I completed the binding on the last quilt of the year! The night before that I finished quilt number 11. So, it was a little rushed at the end, but thankfully I was not madly quilting as the ball dropped, trying to finish before everyone started singing Auld Lang Syne…
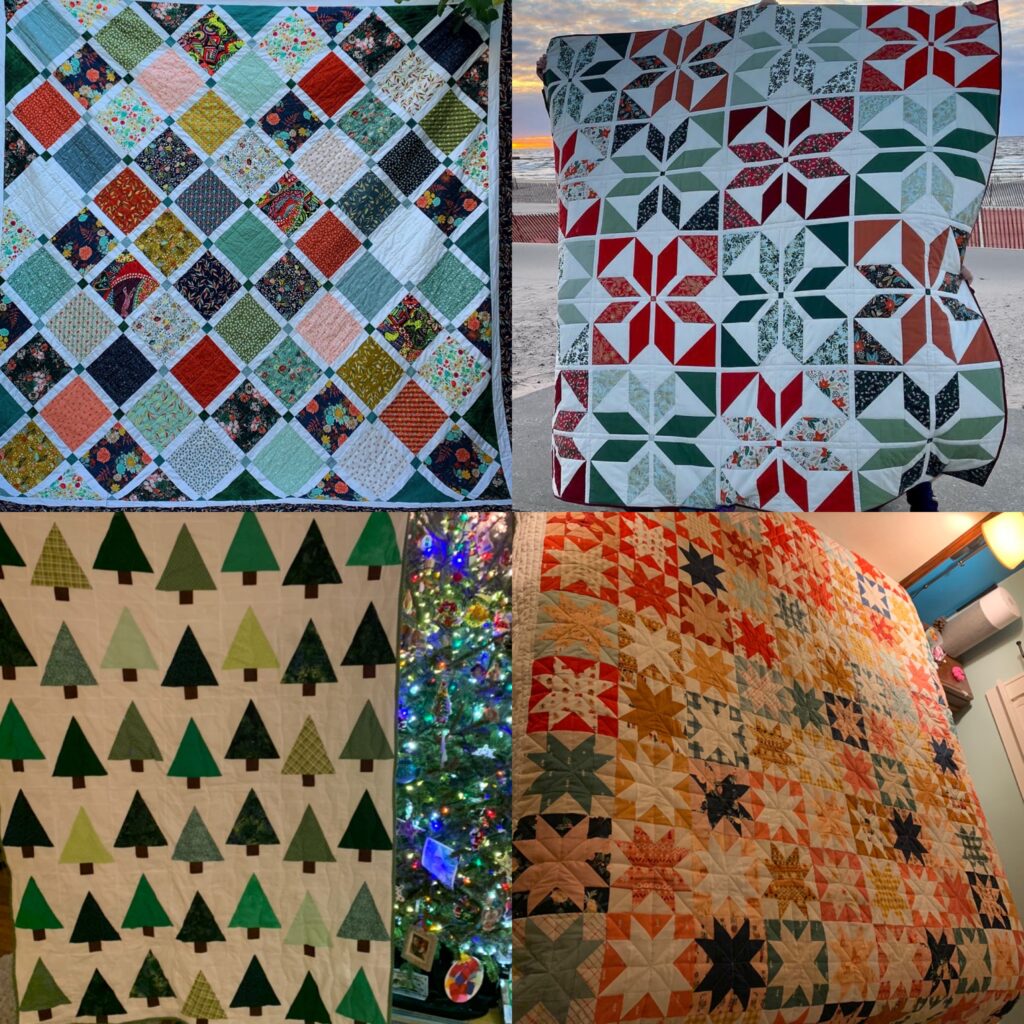
Quilts 1, 2, and 5
A: Congratulations! That is a lot of impressive work. Out of all of the quilts you made in 2021, which one was your favorite?
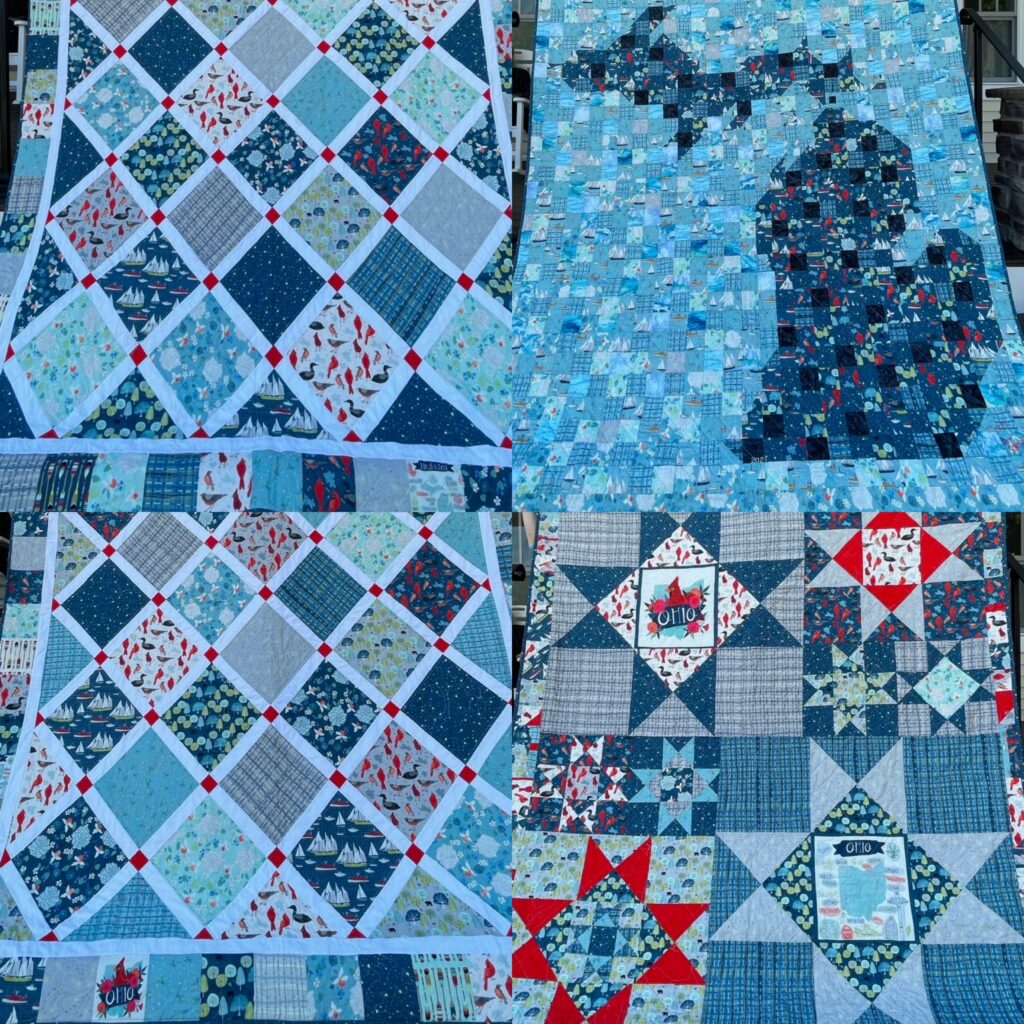
R: Ohhh that is a tough question. I think the Holiday Party quilt that I made for my in-laws was the most challenging and one of my best executed, but the “snowball” throw quilt with the bunnies and moons and flowers and owls is my favorite quilt to snuggle with. I think that super soft quilting cotton plus wool batting is a winning combination. Plus bunnies. Can’t go wrong with bunnies. I also really liked the back of the Michigan quilt, using lots of little squares to make a picture of the state. So I guess those are my three faves.
Quilts 3 and 4
A: I loved the colors in your Michigan and Ohio quilts. And, I love that the back of the Michigan quilt was the state in tiny squares. “Oh, let me just throw together the silhouette of an entire state as the backside of this quilt.”
What are some examples of where your inspiration came from this year? For example, any particular quilters you found inspiring? Or, maybe a particular quilt book you discovered and loved?
R: Well, I gotta give credit to Suzy Quilts. I watched a lot of her videos, read a bunch of her blog posts, and used three of her patterns this year! I was also inspired by her Holiday Party Quilt sew along, which connected me to quilters all over Instagram. The internet quilters are so great. Janet Patch, kitchentablequiting, zsb.creates – too many to name here. Before we got on insta, I would scroll the r/quilting subreddit, and I still do that occasionally. So many great quilting ideas out there! I also relied on the blogs, tutorials, and patterns of Amy Smart of Diary of a Quilter and Allison of Cluck Cluck Sew.
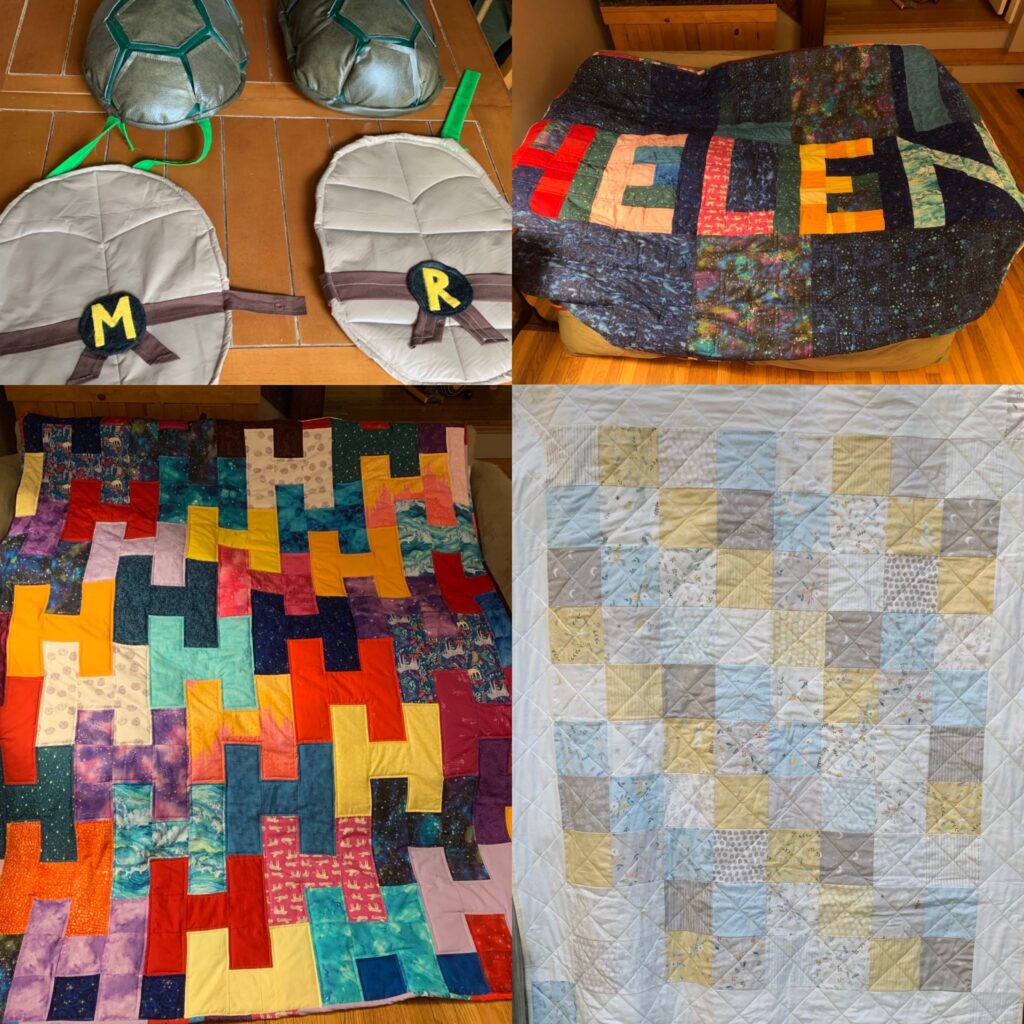
Quilts 6, 7, and 13? I think we decided that the turtle shells should count as quilts?
A: We love Suzy! And, I forgot about the turtle shells!What are some quilting hot tips you learned this year?
R: I think my biggest lesson learned is the importance of pressing in getting seams and points to line up. So many times I’ve been lazy about this, and I’ve noticed that taking the time to press is really worth it. I’m not quite at tailors clapper level, but I’m getting there! This is a literally hot tip. Use your iron! Probably obvious to 99.9999% of quilters.
The HST trimming before opening method is also really handy. It saves so much time!
Quilt 8 and some random throw pillow covers
A: You said you wanted to work on free-motion quilting and foundation paper piecing this year. Did you accomplish those goals and how did it go?
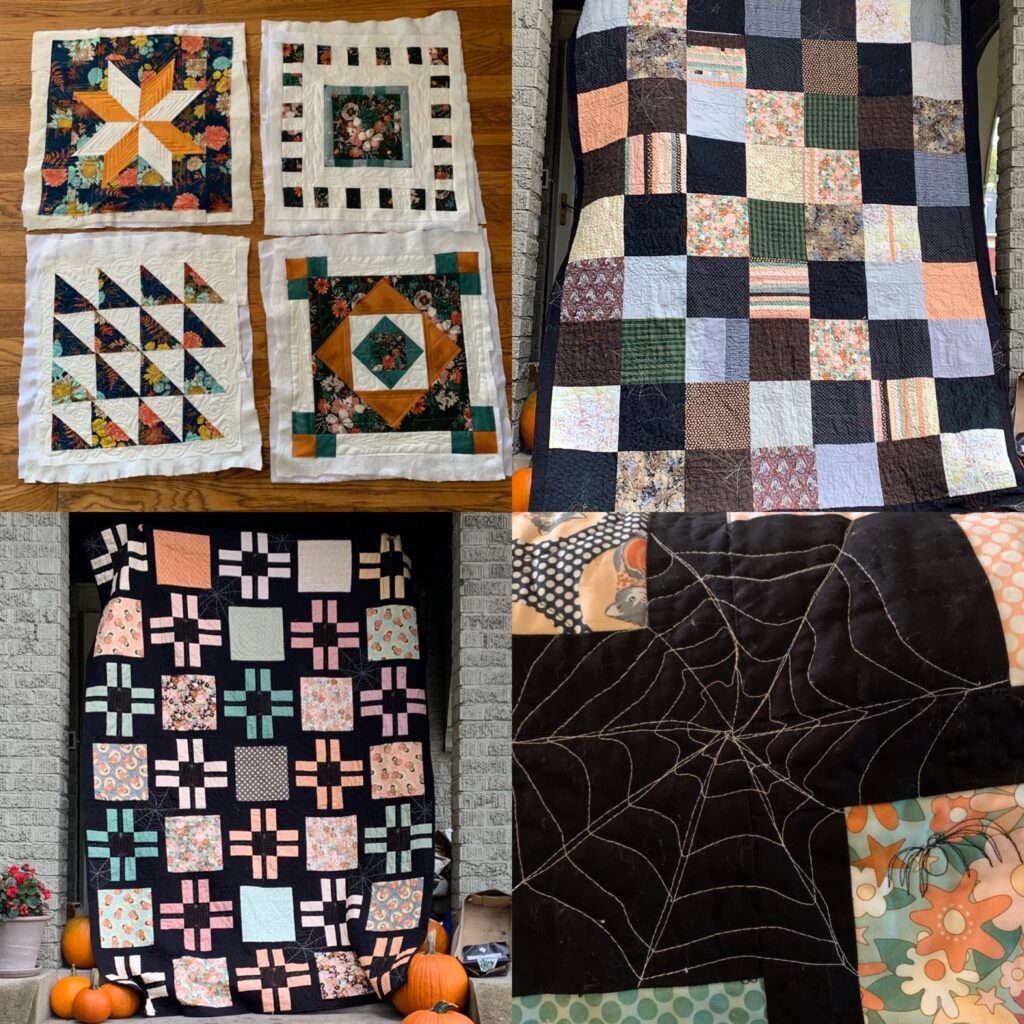
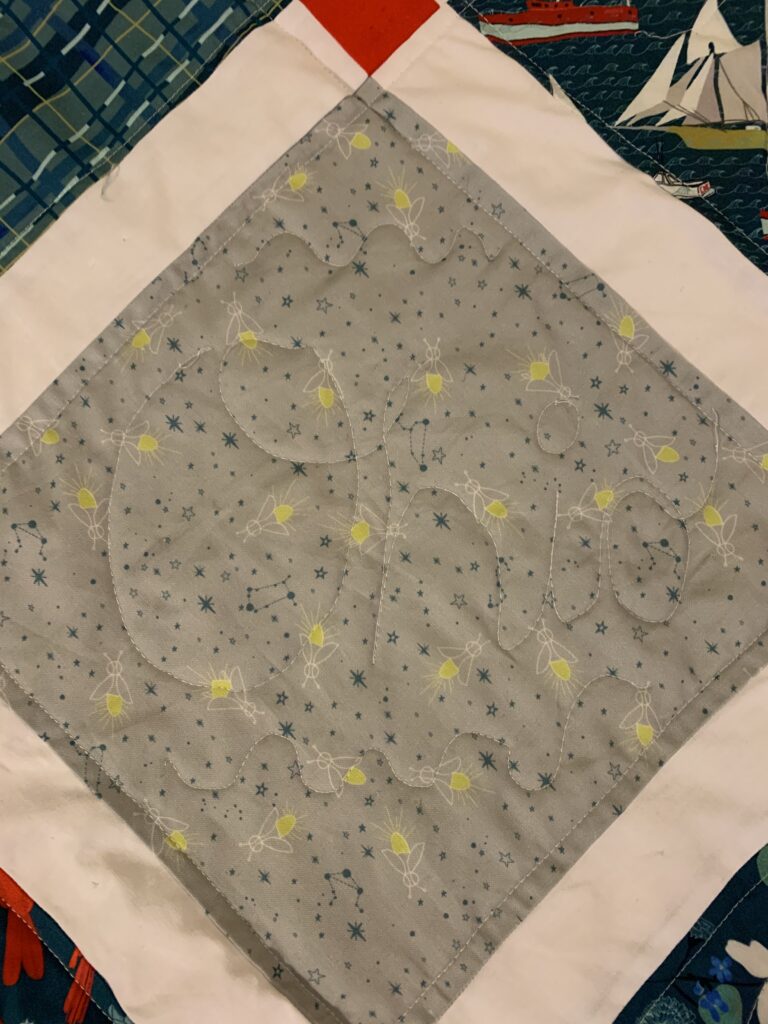
R: Well, I did manage to do some FMQ, writing script Ohio on the Ohio quilt and a few other motifs, like the pumpkins and spider webs on the Halloween quilt. I got some good practice on the pillow cases that I made. Thanks to Leah Day for some excellent FMQ tutorial videos. I think I’ve decided that all over FMQ is really only possible on smaller quilts, unless you have a long arm. Somehow we don’t have a long arm yet?! FPP… I did not do any this year. I really like traditional piecing, and I was never able to gather the brain power required to figure out how the heck FPP works. But someday… someday I will figure it out! There are so many cool things one can do with FPP.
One of my attempts at FMQ
A: The spiderwebs were so cute! Did you discover any new tools of the trade that you are loving?
R: This was the year that I bought the Juki, a key to my sewing success. The large throat space has really saved my arms, which got very tired of pushing quilts through the tiny space on my Kenmore. And the stitches are beautiful. Stopping with needle down, the automatic thread cutter, the knee lift for the presser foot… all just fantastic features. Brad got me a little magnetic gauge to use to guide the fabric along, which helps to maintain the proper seam allowance while piecing or machine binding. I used it last night while binding Quilt 12 and it was really helpful! Good job, Brad.
9, 10, 11, 12
A: I have to say, looking at all of your quilts here your progress is so notable! Comparing Quilt 1 with Quilts 9-12 you really have learned so much in a year!
We started sharing our quilts on this blog and via Instagram this year. Has that changed–for better or for worse–your quilting approach at all?
R: I love documenting our progress and sharing our quilts on the blog and Instagram. One of the highlights of the year was when the Fat Quarter shop featured my Halloween quilt on their Instagram, which was likely due to my tagging them and thanking them for their free pattern I used to make it, as well as the seasonal fabric! After that, I got a little bit carried away in my mind, imagining us becoming Quiltcon icons. I have since come back down to earth and am now motivated to keep improving my skills, partially so that we have cool stuff to share with our followers and quilty friends. The external motivation is good, but I think my own desire to make quilts that I like is what keeps me going. All in all, I think sharing our quilts with “the world” has been a good thing. Also it provides entertainment for our moms. The only downside is that we now have this great Instagram account that is full of pictures of pretty quilts, and I probably spend more time scrolling there than my personal account… but it makes me happy.
The ones I left behind, but will come back to eventually
A: What are your #quiltgoals for 2022? Are you cranking it up to 24 quilts?! R: Hahaha absolutely not! I am no longer setting quilt goals with set quantities. I made a lot of fast quilts this year, relatively easy to piece, and straight line quilted a bunch of them (usually at the maximum allowed distance between quilting that the batting allowed). I think this actually worked well for me this year, as I got a lot of practice and was also able to accomplish my goal. I will definitely keep these fast quilts in mind when I come across cool fabrics or need to make a quilt quickly, but I’d like to work on some more intermediate level quilts. Slow it down, learn some new skills.
I also bought a bunch of batting and fabric this year that I haven’t used. My fabric bin is overflowing. More quilting, less fabric buying in 2022! I already have a few quilts lined up. One is a t-shirt quilt for Brad using the logos from his Penguins playoff shirts over the years. There are a lot of them. This probably doesn’t fall into the intermediate category but it will be a new skill. I have a quilt top that I teased as one of the 12, but I never actually finished turning it into a quilt. I should do that!
During a sale, I bought a Suzy Quilts pattern called Perennial. It has some “wonky triangles” which I think will be fun to put together, and I bought some really cute fabric at our local Firecracker fabrics to use for it.
I’m also thinking about branching into quilt-adjacent projects, like quilted coats and bags. Maybe more throw pillow covers… I’ve got a lot of batting scraps to piece together and use.
Finally, I’d like to start an EPP project for travel and outdoor quilting. I don’t know if we will be doing any traveling this year, but hopefully we will be spending lots of time outside.
I’m also going to have a baby any day now, so it might just be a year of doing what I can and being happy with whatever gets done. Maybe I’ll aim for 23 quilts in 2023.
A: Yay baby!! I think not stressing over #quiltgoals is a great idea for this year! But, I still fully expect to look across the street and see you churning out quilts while bouncing that baby. ?
An Interview with Amanda
Rachel: Your goal for 2021 was to make 6 quilts. You were not counting all of them like me, a maniac, but I think you achieved and maybe surpassed that goal! Congrats! Do you agree and are you pleased with your progress?
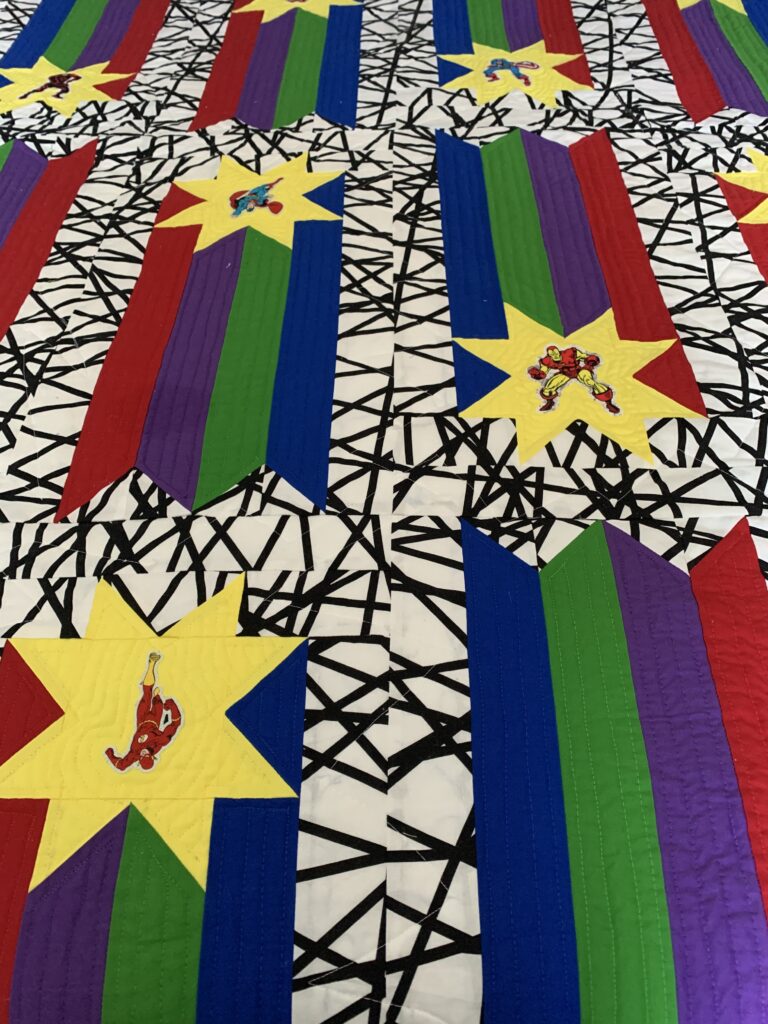
Amanda: Did I make 6 quilts? Let’s see… I made 1. a superhero quilt; 2. a superhero lap quilt; 3. another superhero whole cloth quilt (by the way, Louie told me now he does not want a superhero room anymore he wants a “boat room,” so maybe 2022 will be the year of boat quilts); 4. a baby quilt which I never posted before (see below); 5. Baby Buffalo’s quilt!; 6. a turtle shell (which you just reminded me of); 7. an unfinished cozy, lakeside cabin plus quilt; 8. a random mini-quilt designed by Louie, 9. a single Christmas tree ornament; 10. a Holiday Party runner; and 11. the Christmas Explosion quilt. So, really only 4 finished, pieced quilts. But! I think adding everything together I will say I got to 6.
I am definitely pleased with my progress, considering in some years I make zero quilts! Overall, what I really wanted to accomplish this year was just to keep consistently working on some kind of quilt project and I feel that I did that throughout the year.
So much superhero fabric in 2021
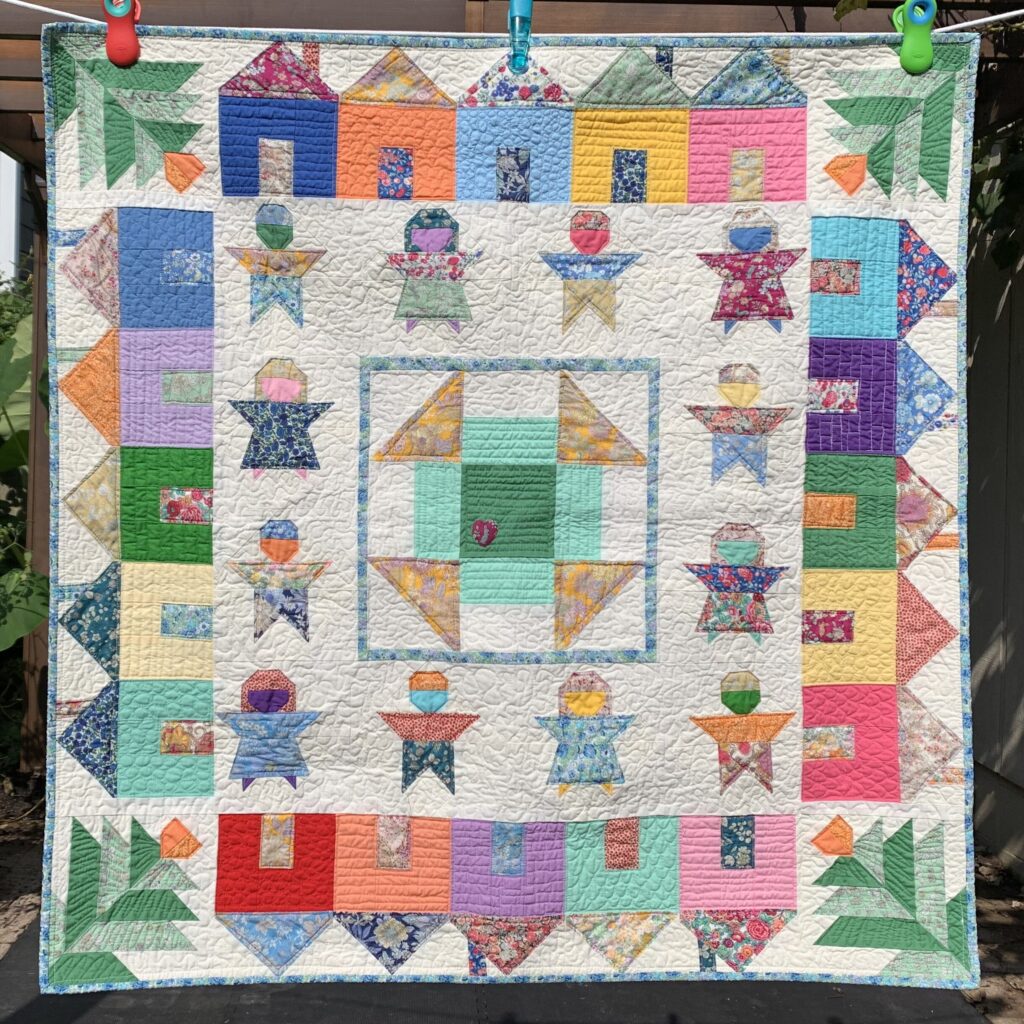
R: That looks like 11 quilts to me! You nearly doubled your goal! Amazing! Out of all of the quilts you made in 2021, my favorite is the one that you made for me and baby Buffalo, which is now hanging on my wall over the “nursery corner” of my room. But which one was your favorite?
A: Baby Buffalo’s quilt is also my favorite. I liked it because it was a challenge to come up with the design. Also, I like the idea of quilts telling a story and I tried to make the blocks in that quilt mean something. If you ever move away, I hope you and baby can look at it for many years to come and remember our neighborhood. (But, you are never moving away, right?!!?) I also liked the fabric choices in that quilt. I think a mix of prints and solids in a quilt might be my current favorite look!
R: It is SUCH a great quilt!! And no, I’m never moving away.
What are some examples of where your inspiration came from this year? For example, any particular quilters you found inspiring? Or, maybe a particular quilt book you discovered and loved?
A: Spending a lot of time following quilters on Instagram has been super inspiring. Sometimes even in an overwhelming way! I have seen so many amazing patterns and ideas created by the quilters of the internet. It keeps my head spinning. As we say above, we spent a lot of time with Suzy Quilts this year! I am a longtime fan of Allison of Cluck Cluck Sew and I used her Wish pattern for Louie’s superhero quilt. I even emailed her a picture of it and she emailed me back. It was like corresponding with a celebrity. ? On Instagram, there are so many amazing quilters, but I always seem to stop scrolling on posts from grapesodastudio, southerncharmquilts, cassandra.beaver, and mtnairhandmade.
I also bought two quilt books this year–The Modern Medallion Workbook and Make Your Own Medallion. I like them both. The medallion quilt patterns in both are very nice and also they have so many ideas for different borders, which I think will be useful in lots of different quilts.
A never-before-seen baby quilt
R. What are some quilting hot tips you learned?
A: I’m not sure I learned any hot tips that are not already known to most quilters. But, I have learned a lot that I didn’t know before! For example, when I made the quilt for Baby Buffalo, I used a minky for the background because I wanted it to be cozy. But then, I did so much quilting on it that it ended up super stiff! When I quilted the “Christmas Explosion” quilt, which I backed with a flannel backing because I also wanted it to be cozy, I purposely left the quilting a little sparse. (I also finished it the day before it needed to be gifted and so I did not have time to add anymore quilting). Deciding on how to quilt a quilt continues to perplex me, but I think I’ve learned a little more about how to make that decision. Also, when I was quilting the Baby Buffalo quilt, the minky kept pulling through to the top. I had never had that happen before and it was super frustrating. I read a little more about it and I think I needed to use a finer needle to avoid that. I wasn’t able to try that out because, once again, I finished that quilt the day before your baby celebration, but I now know I need to do a little more research before my next minky quilt.
R: You said you wanted to work on free-motion quilting and designing patterns this year. Did you accomplish those goals and how did it go?
A: I did accomplish the goal of working on those things! Though, I still have a lot of work to still do on mastering both. I think my FMQ skills have expanded mostly thanks to my Juki! When I was working on Louie’s superhero quilt I wanted to do some straight line quilting, but it was too hard to keep turning the quilt. I figured out (roughly) how to free-motion straight line quilt. Although, afterwards, I figured out that there is an actual foot for FMQ’ing with rulers and also special, thicker rulers. Maybe this year I will invest in those tools because they would make things go more smoothly, I think. I also did a ton of FMQ’ing on Baby Buffalo’s quilt and tried out some new patterns, which went fairly well!
As for designing patterns, I did buy myself EQ8, but I would not say I have it completely figured out yet. For a Christmas gift, my parents got me an EQ8 lesson book that I am excited to find time to read!
I practiced some FMQ skills on Louie’s silly mini-quilt
R: The quilting on Baby Buffalo’s quilt is exquisite. Sometimes when I’m in the nursery corner, I just stare at all of the different designs you used. I especially love the little bricks on the houses.
What a great Christmas gift from your parents! Nice work, Pam! Tell me more about your experience with Electric Quilt 8. Do you have quilt patterns in your mind that you plan to execute in the future?
A: Ah yes, as I said above, I don’t think I have it completely figured out yet. I sort of used it to make Baby Buffalo’s quilt, but I did not end up making the whole pattern on it, which made things difficult. If I knew how to use the program the piecing of that quilt would have been so much easier! I did try to make a Christmas tree skirt pattern on it, which went well, but I ended up not having time to actually sew that pattern.
For Christmas, I got the EQ8 Designing Quilts book. I am excited to do the lessons in this book because I do think the program will be incredibly helpful once I know how to use it! Right now, I don’t really have any ideas for patterns to make on EQ8, but hopefully something comes to me!
R: What’s the status of your UFOs? I think that stands for “unfinished objects” but I could be wrong. Anything you are thinking of picking back up as Pittsburgh winter drones on?
A: Well, one night this week I started to cut out a pattern for a quilt coat. That is one of my 2022 goals, so I will definitely keep working on that! I also have been working on this never ending EPP project that I have kind of abandoned. Just this week I took it all the way to Texas and did not work on it at all! I would like to do something with it eventually. And then, I made my cozy lakeside cabin quilt top, which maybe I will pick back up and finish this year if there is a cozy lakeside cabin (or, lake adjacent townhouse) in my future. I also bought an insane amount of Christmas fabric this year and I hope to start some Christmas sewing earlier in the year to use it up!
This quilt top is waiting for #lakelife to happen in 2022
R: What are your #quiltgoals for 2022?
A: As mentioned above, a quilt coat! I remember the day you said to me that you wanted a quilt coat and I am going to be honest I was not on the quilt coat train at that point. But, you got me thinking about it and once I finally decided to board the train it is all I can think about! As you already know, last year I bought a quilt top at our neighborhood yard sale. My plan is to use that for my coat.
Also, in 2022, I would like to try to make quilts for my three nephews. They range in age from 1-4 and I have never made them a quilt. I am sure they are not losing any sleep over that fact, but it makes me feel bad!
When I wrote about the cozy lakeside cabin top, I said that I find it difficult to make a quilt for myself. So, in 2022, I want to be a little more thoughtful about my own quilt aesthetic. I spend a lot of time making quilts that are fun, but I don’t particularly love looking at them. For example, Louie’s superhero quilt, which is perfect for his five year old boy bedroom, but which is actually hideous in any other context. I often dive into making a quilt and then I realize a portion of the way in that I do not like it. This happened with the Christmas Explosion quilt as well. For this year, I want to try to make quilts that I like–and just maybe one of those will get to stay in my house!
In terms of the number, I agree with you that I don’t have a set number this year. I just want to keep continuously working on some quilty project because it makes me happy! I am looking forward to seeing what we come up with in 2022!
I don’t think I have ever written about the Christmasy quilts that I made before Amanda and I started this blog, but she mentioned one of them in the Holiday quilts post, so I thought, why not write about those quilts? There are 3!
Thank you, couch, for holding my quilt.
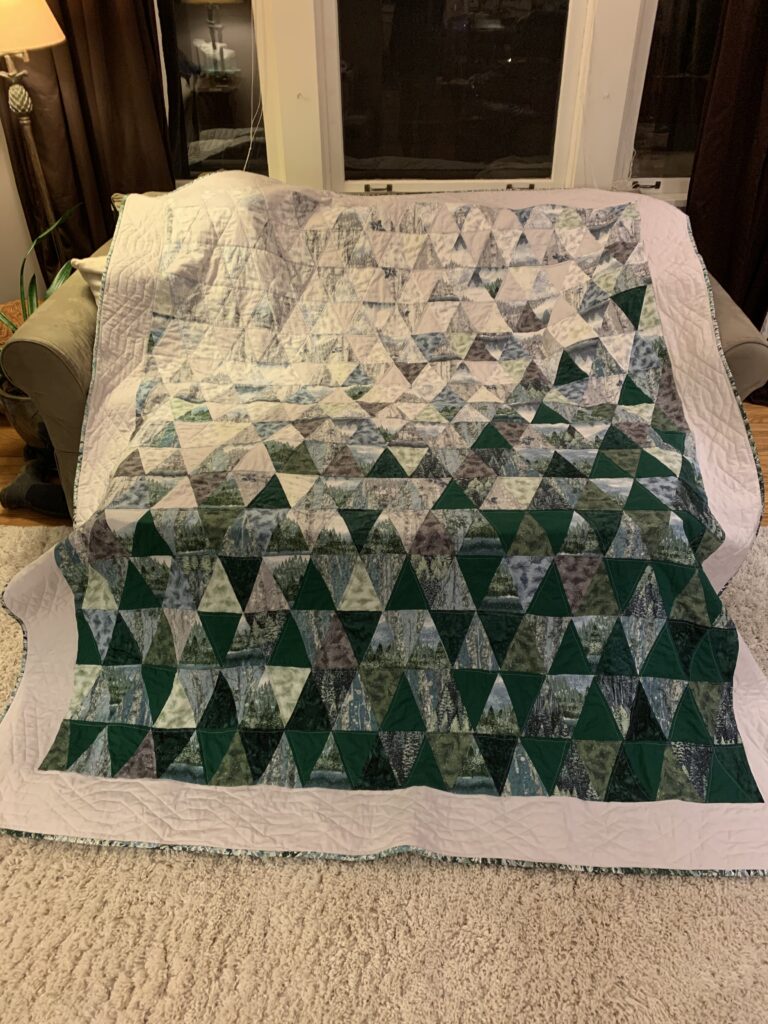
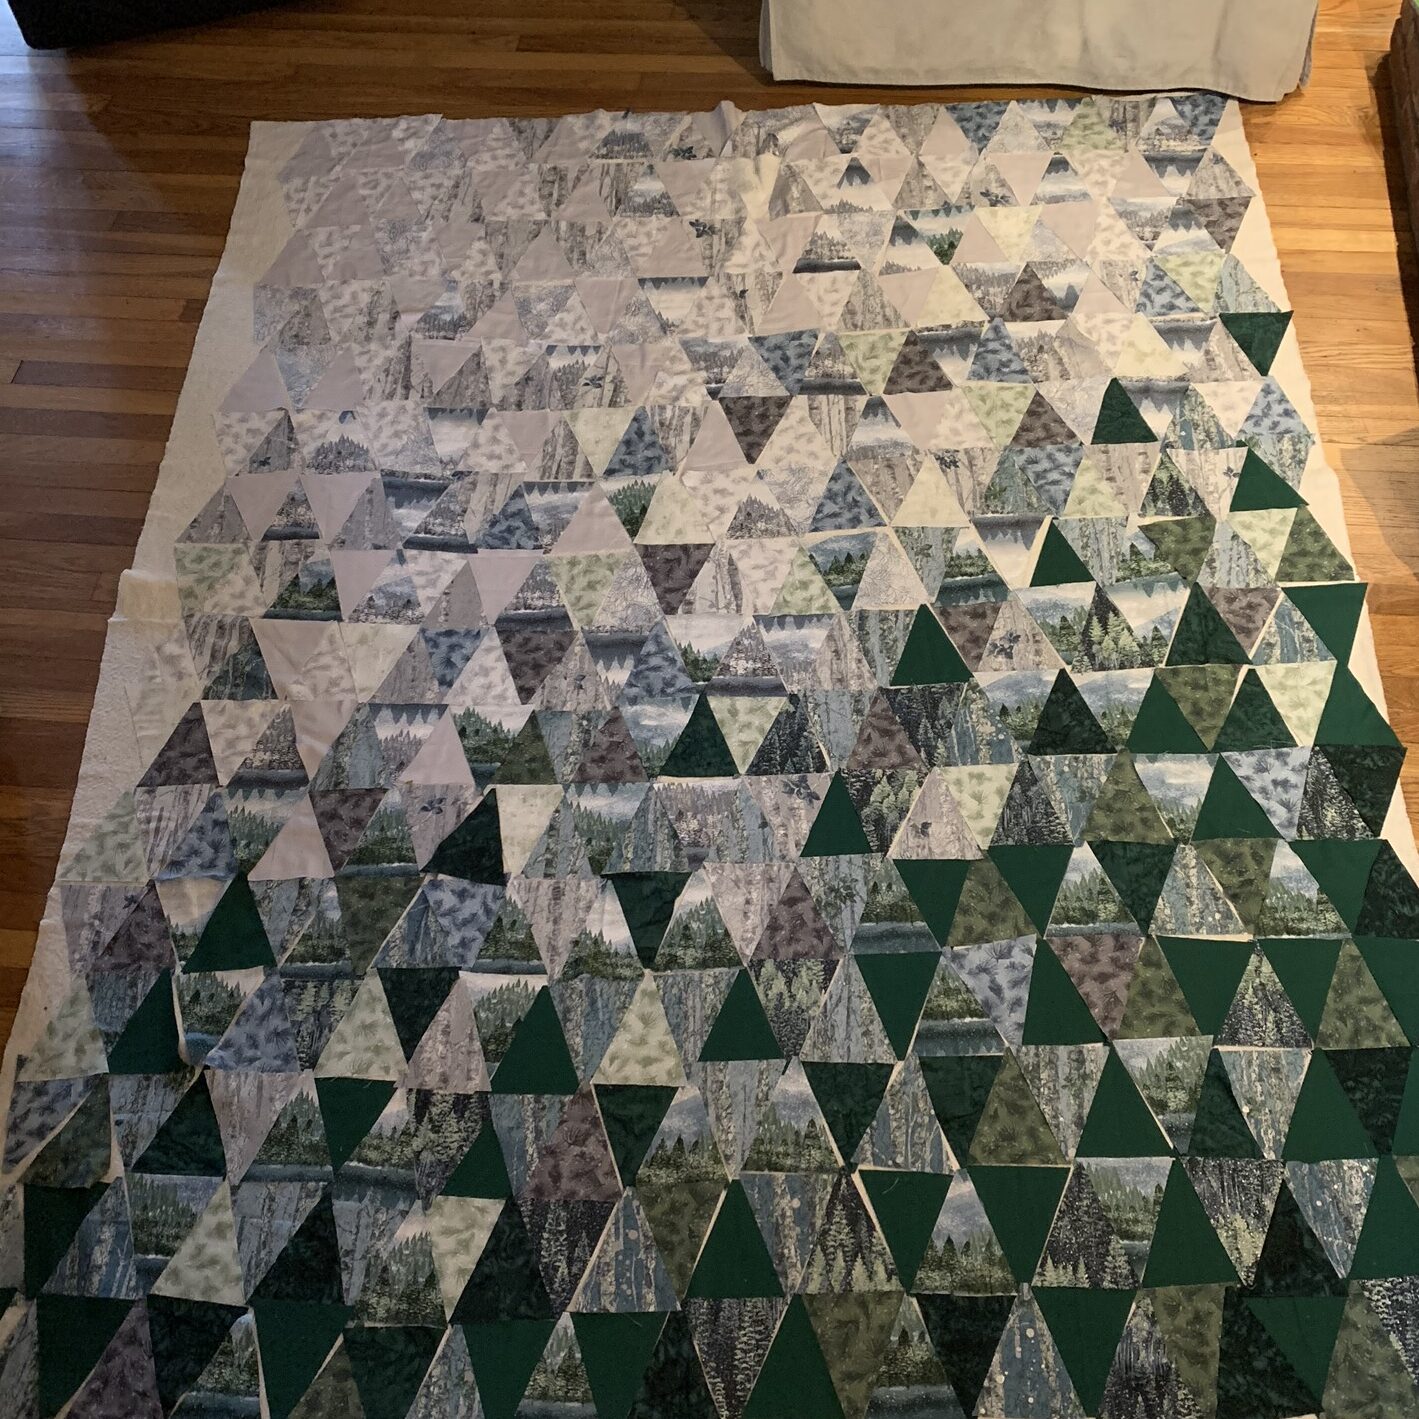
First one is the triangle quilt that I made with this lovely Robert Kaufmann Nature’s Window winter fabric collection, using a free pattern from See Kate Sew. If I could go back in time, I would cut bigger triangles so that more of the print would be visible.
This is a combination of 2 RK fabric collections. I used the snowy pine fabric in the top right for the backSo many triangles…. and so much time spent rearranging them. Thank you, OCD.
Once I got the layout just right, a perfect ombré in my mind, I sewed together the triangle rows and then added a grey border.
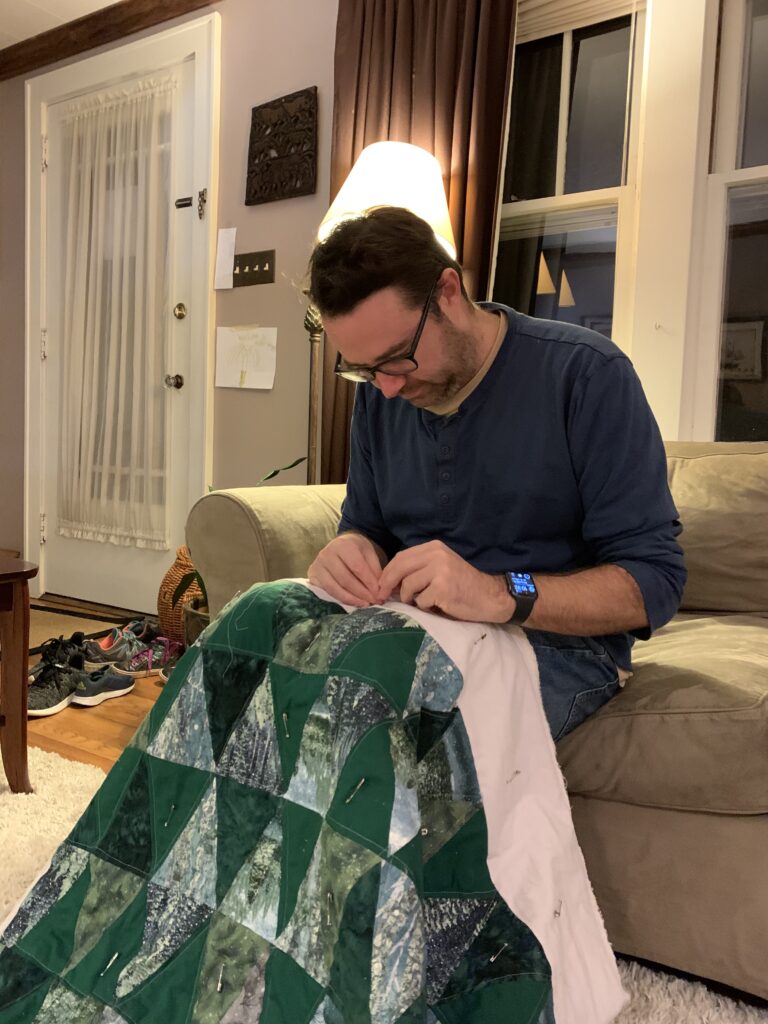
Amanda told me about this cool paper sticker thing that I could put over the border to use as a guide to quilt a design. It was so easy to make the border quilting look fancy, but I think I might be able to do something similar using a Hera marker. Something to try in the future!
my helper ♥️
I bought this fabric in May of 2020 (which was very cold! note the fire in the fabric picture) and managed to finish the quilt before Christmas, a feat that I did not accomplish this year.
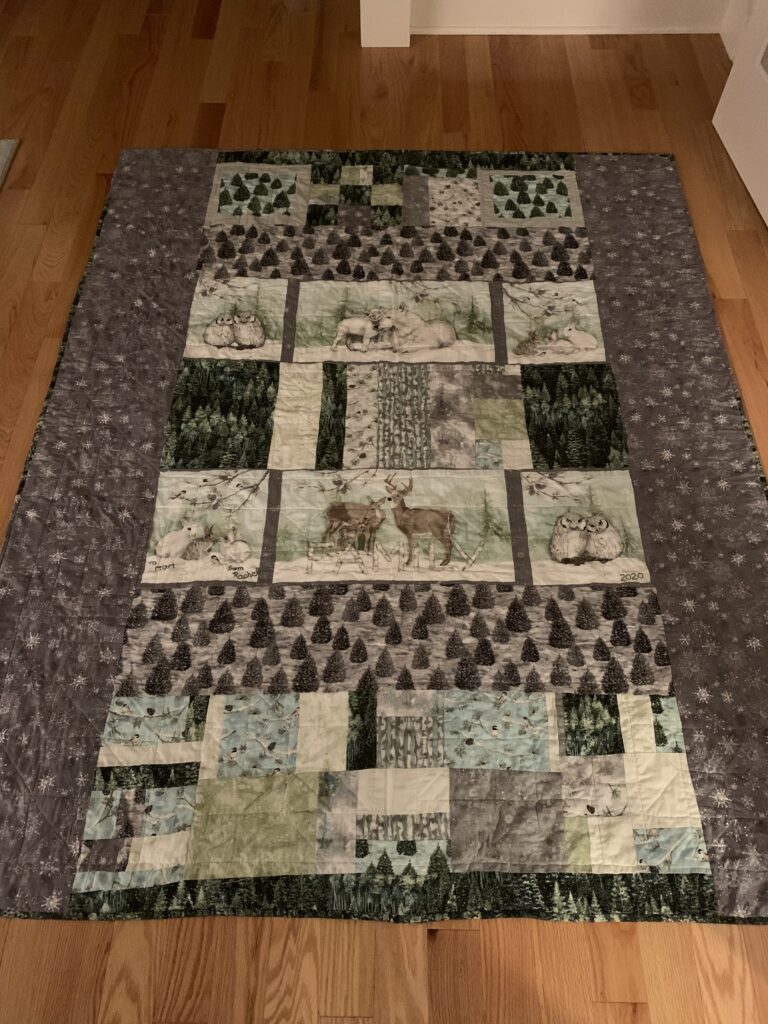
I actually bought fabric from two RK collections, but I ended up making the Winter White Solstice by Lynnea Washburn into a separate quilt for my mom. She loves chickadees, and I knew she’d love these prints.
Fussy cut chickadee cornerstones!
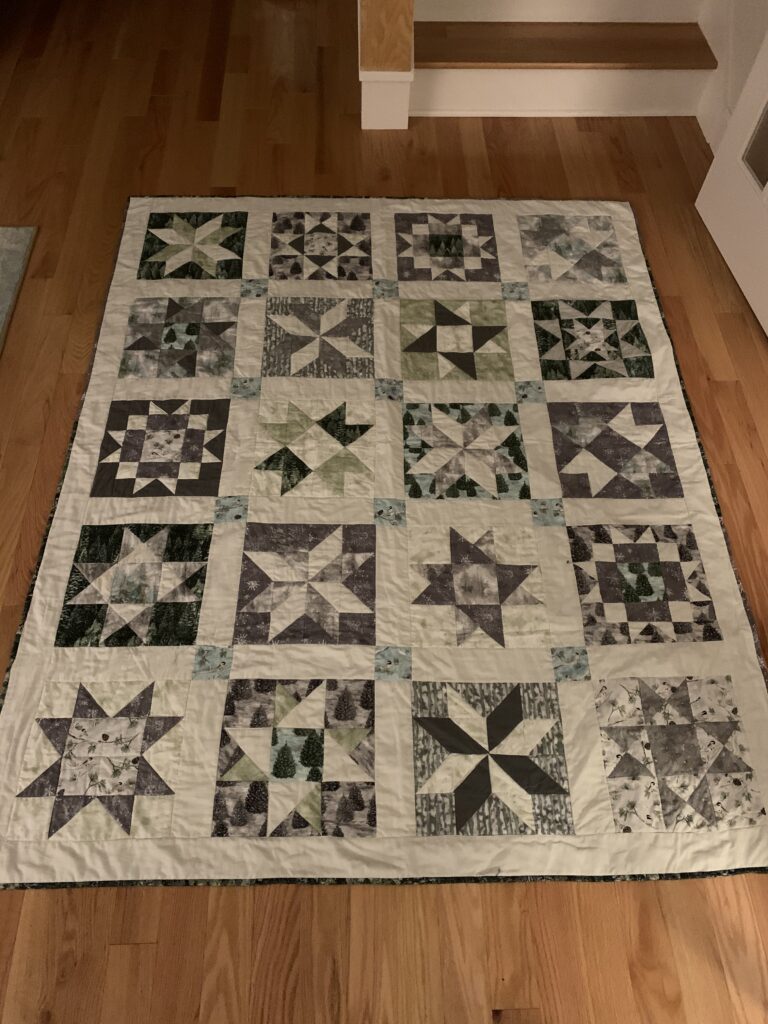
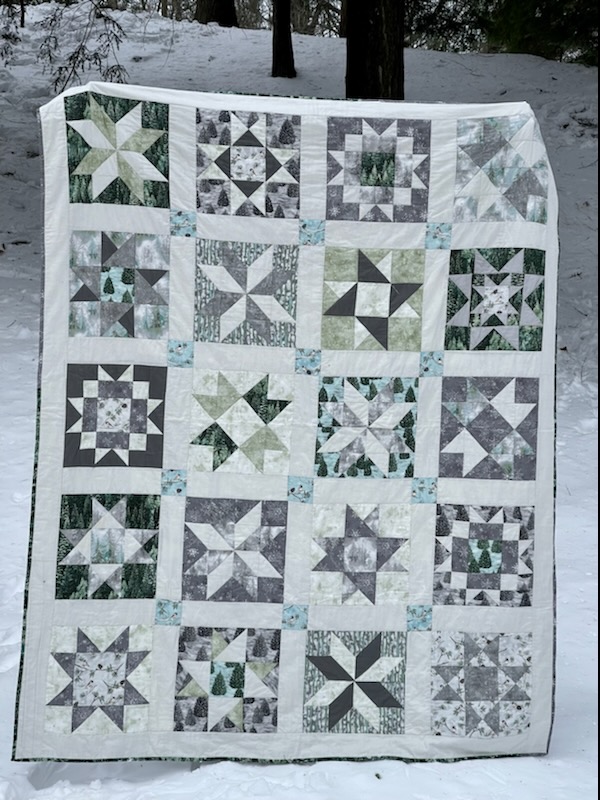
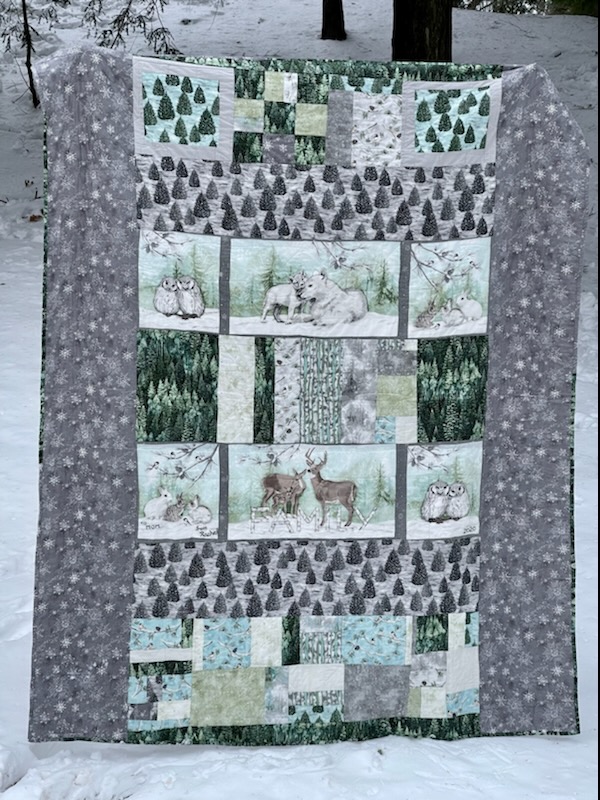
I wanted to do a kind of scrappy star block sampler quilt. This was a big step up for me, my first time making anything more complicated than squares or triangles. I learned about flying geese, HSTs, QSTs… I relied on tutorials from the Seasoned Homemaker, Amy Smart, and a bunch of other random sites on the internet to figure these things out.
The back was pieced together in a rather insane way. I was originally going to use some of the panel that I’d cut up as blocks for the front of the quilt, but that didn’t look quite right when I laid it out, so I made more star blocks.
Bunnies, owls, pine trees… you can see that this fabric spoke directly to me. “Buy me,” it said.
I sewed the binding on this one in the car while we were driving to Michigan in August 2020, and I finished it as we were turning onto my parents’ street. My mom was impressed, and she cried when I gave it to her in the driveway, since it was on my lap when I got out and she greeted us. Oh, mom! You know how to receive a quilt.
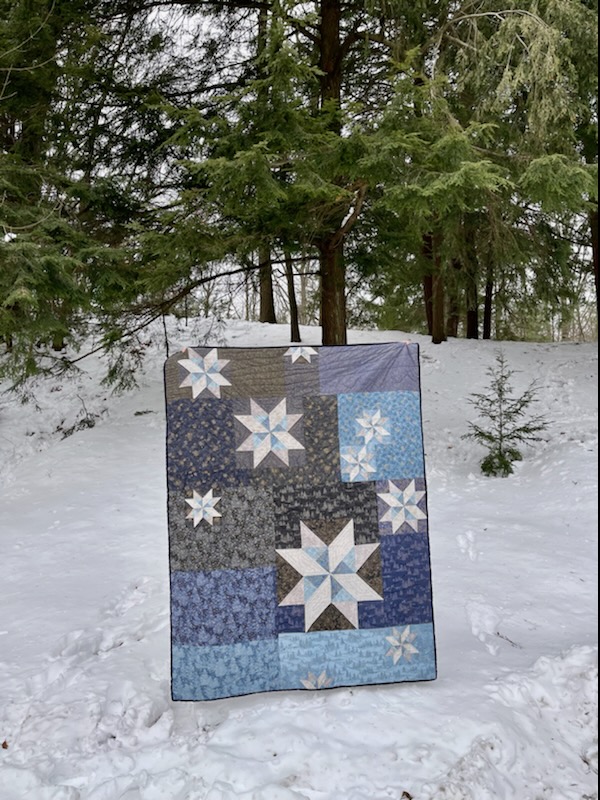
After that, I decided to make a Christmas quilt for my sister. I picked out a bunch of Christmas fabric collections and asked her to pick the ones she liked. I ordered a fat quarter bundle of this lovely Moda fabric, Forest Frost Glitter, and found a pattern in a book that I borrowed from Amanda with the hopes of using it to learn FPP. I did not learn FPP but I did make a traditionally pieced quilt.
The photos around this one in my reel show that it was snowy outside at the time this photo was taken in my kitchen, just a huge quilt photography fail! Snap the snowflake quilt in the snow!!! Lessons learned.
If I could go back in time, I would do something a bit different with the background fabric. That light blue square near the top right corner, blah, the squares. I’d cut those up and crazy quilt them together, or make them look more like the sky in Amanda’s cat quilt. But… this was the 5th quilt I ever made, so I’m cutting myself some slack.
The back is cute.
I also attempted some FMQ on this quilt, which I inspected at Thanksgiving of this year, about one year after giving this to my sister, and wow. It’s not pretty. But I used wool batting and it’s soft and snuggly and she doesn’t care (or… she doesn’t tell me that it’s terrible) because she’s a really good sister.
I’m still hoping for some snowy weather for the background of photos of my quilts of Christmas present (it’s still Christmas until epiphany, right?). Hopefully soon! The constant Pittsburgh winter grey rain has been depressing, and not ideal for Christmas quilt glamour shots.
UPDATE!!
My family in Michigan got a ton of snow and they took their Christmas quilts out into the elements for a proper photoshoot. Much better!!
Winter Star SamplerCrazy pieced backThis quilt was meant to be in the woods… or over a couch near a fireplace Snowflakes in their homePretty scrappy back
Thank you to my family for taking your quilts on a field trip.
I had really high hopes for a relaxing, not stressful holiday season and also for completing many holiday quilt projects. I managed to complete some of my planned projects, but definitely not all. And I completely failed at not being stressed. One of these years I want to crack the code on how to not lose it around the holidays. Probably not planning so many sewing projects in December would help. (Also, not having any global pandemic related school closures would also help).
I did not find the time to update the blog as my December sewing got underway. But, I wanted to share these quilts, even if a little late. So, I will simply plop them here now!
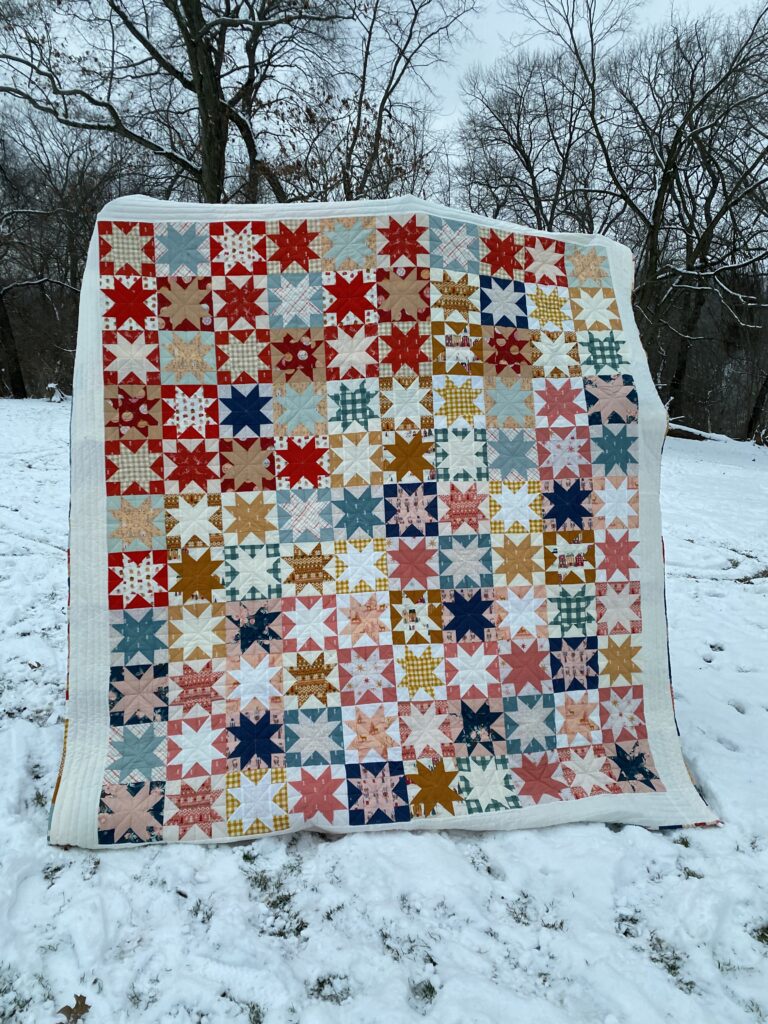
I could not get enough of Rachel’s Holiday Party Quilt. I was inspired by her to use the same Suzy Quilt’s pattern to make a table runner as a gift for my family gift exchange. I thought–how hard can it be to make a table runner?!
If Rachel was like the best guest at the holiday party who remembered to bring a hostess gift and mingled with everyone, I was her friend who stumbled in late and maybe already had too much to drink even before I arrived. By this I mean–I was really terrible at the Holiday Party Quilt pattern! I made so many mistakes from the cutting to the piecing. It took me way longer to make this table runner than I originally anticipated. And, now I am even more impressed by Rachel’s entire Holiday Party Quilt!
Also, just to note, I thought quilting this with straight lines would be super fast. No. The lines are a 1/4 inch apart. I really like the way the quilting turned out, but it was way more time consuming than I anticipated!
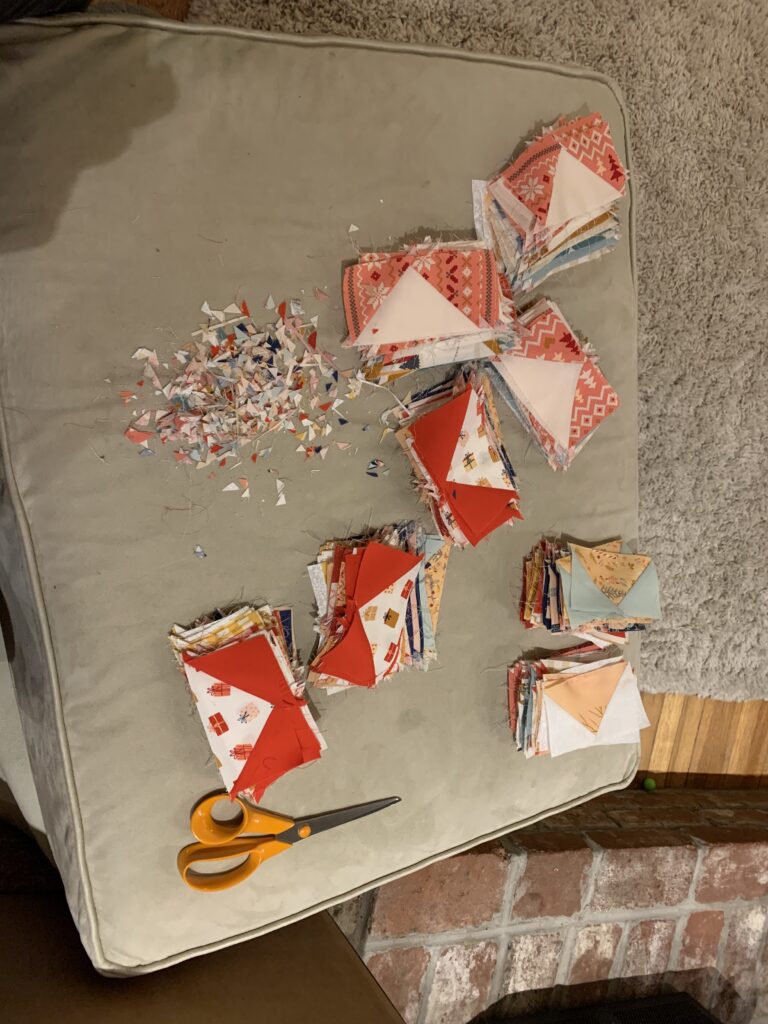
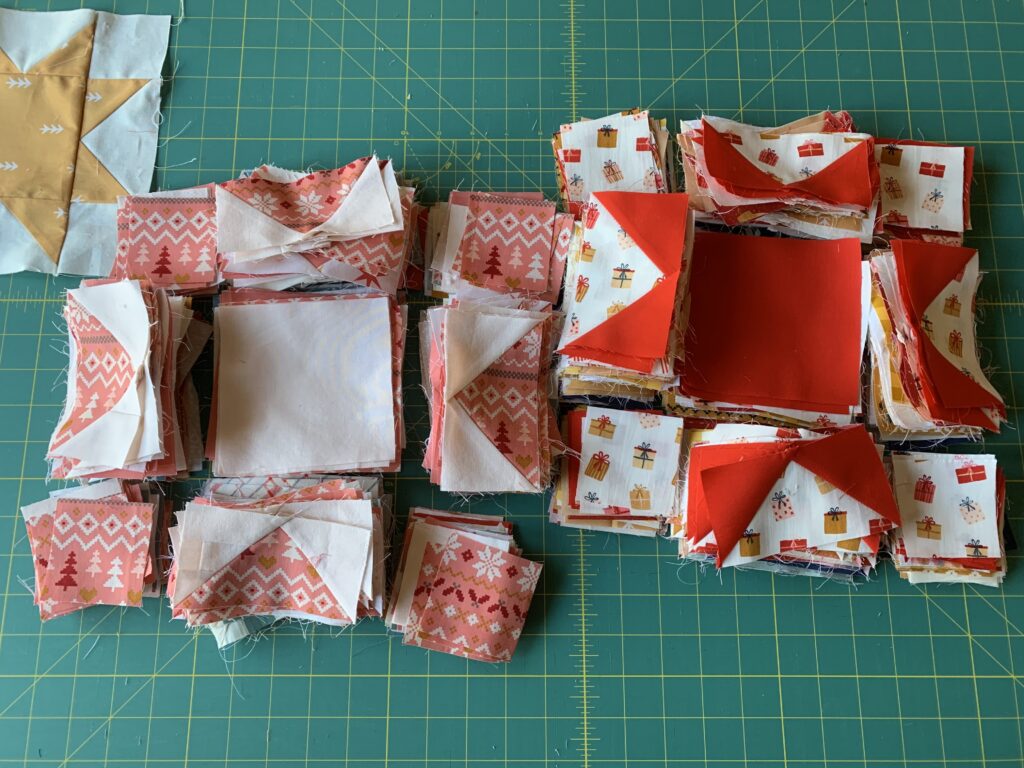
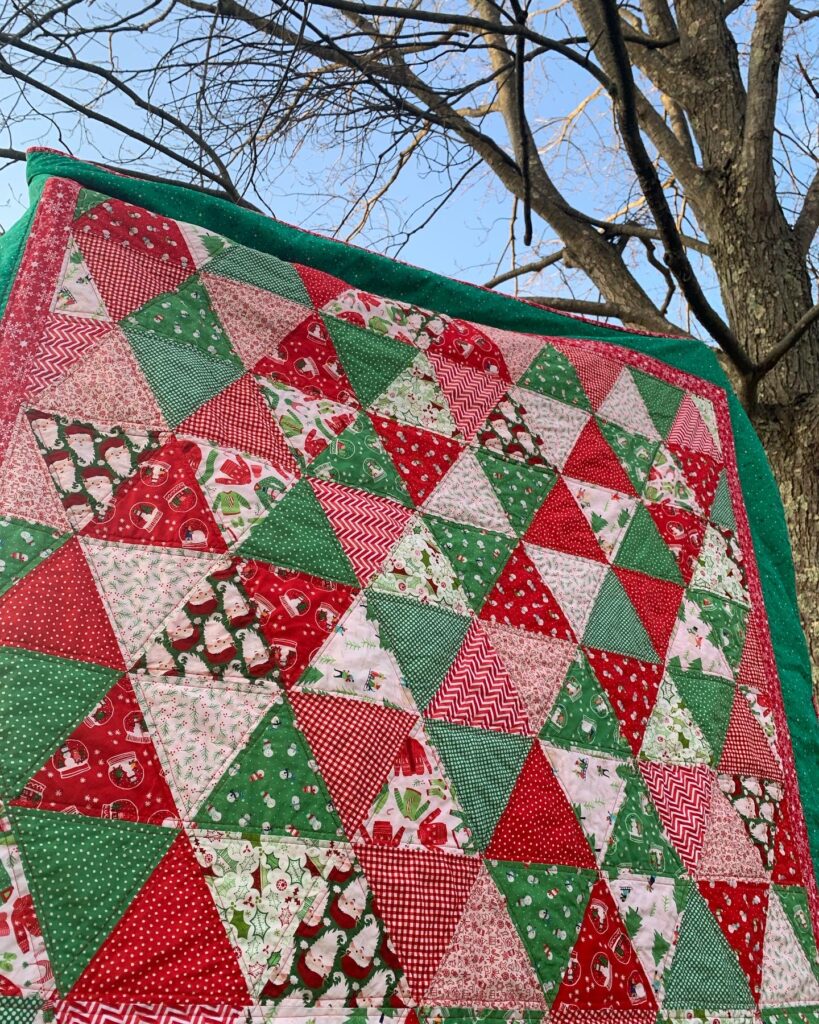
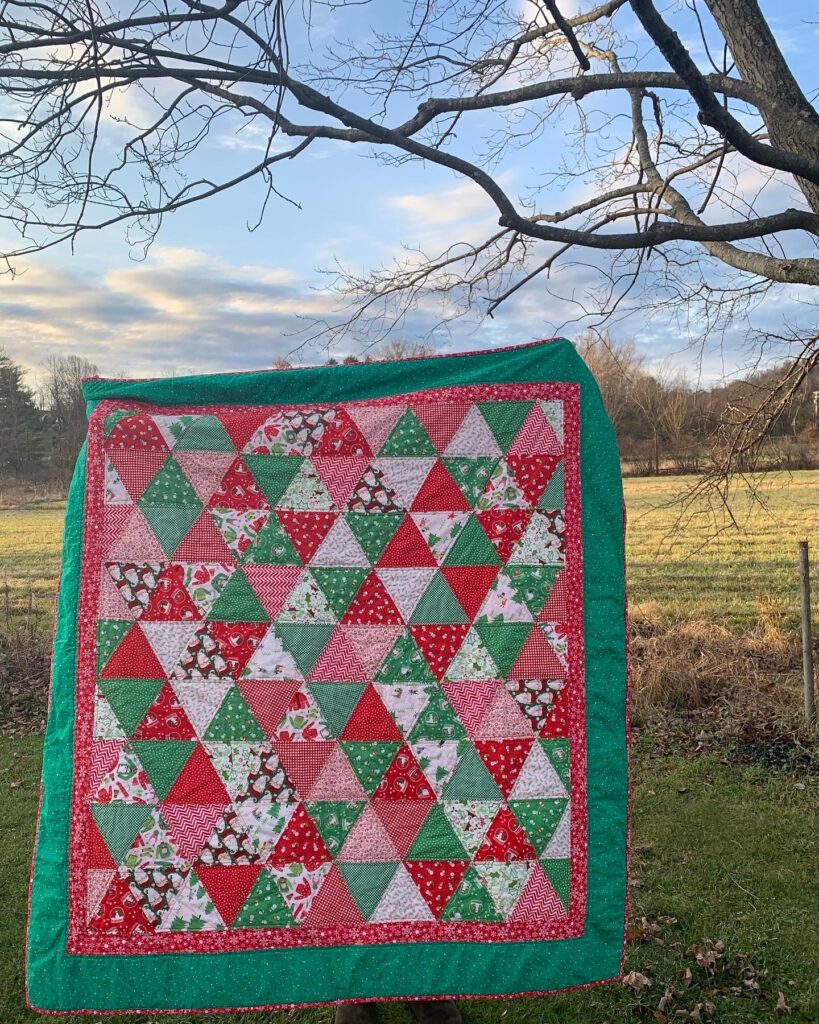
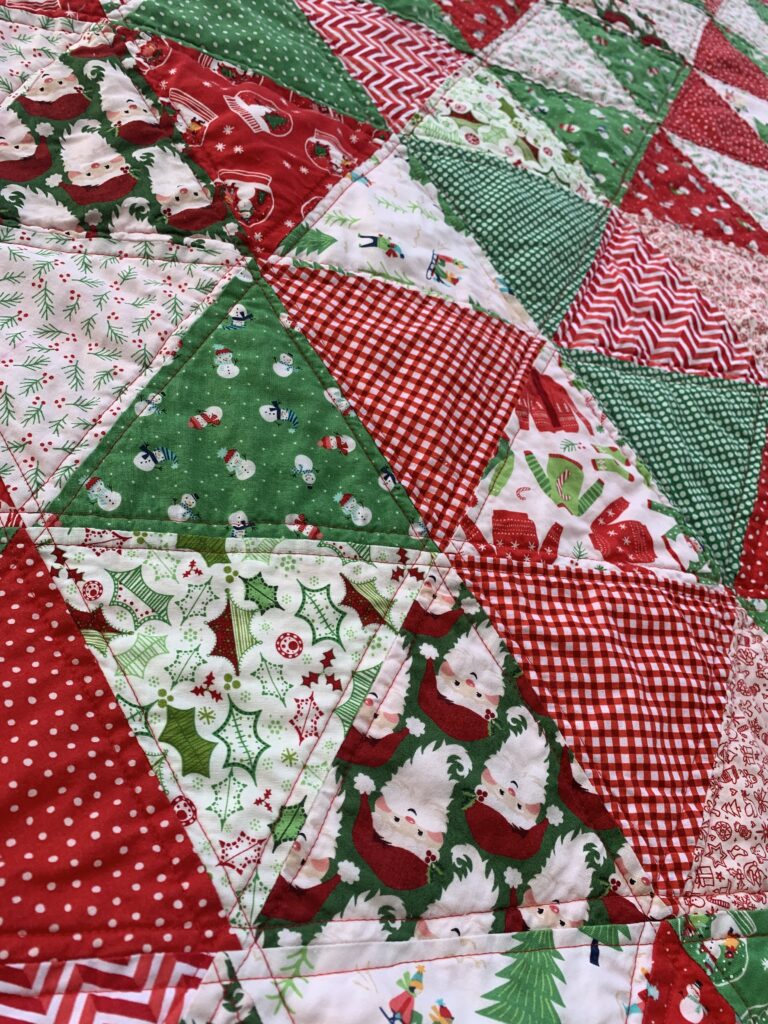
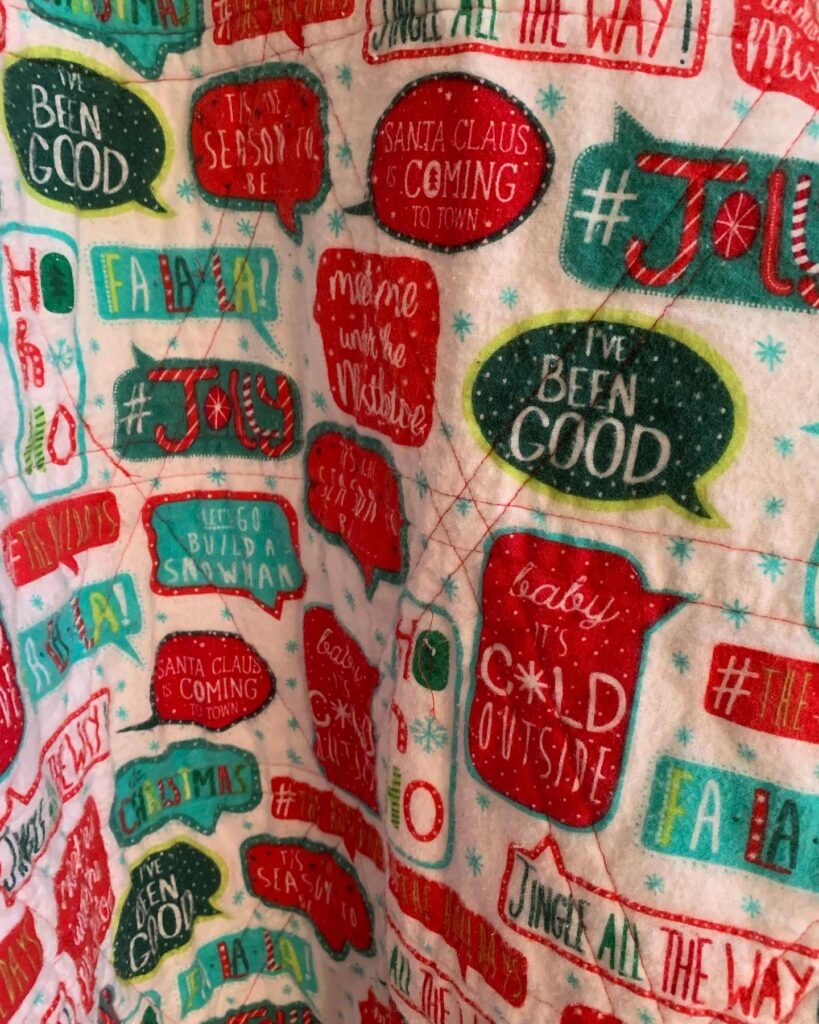
Moving on, I also managed to finish a Christmas quilt for my sister-in-law. I call this quilt “Christmas Explosion” because it’s a lot of Christmas things in one place. This quilt was also inspired by one Rachel made! I don’t think we have any blog evidence of Rachel’s triangle quilt. I actually started cutting out the triangles for this before last Christmas, but they were abandoned until this year.
I backed this with some cute flannel fabric I found at Jo-Ann’s. I wanted it to be super cozy! I am glad the triangles finally found a home and I hope my sister-in-law enjoys relaxing under this for many Christmases to come!
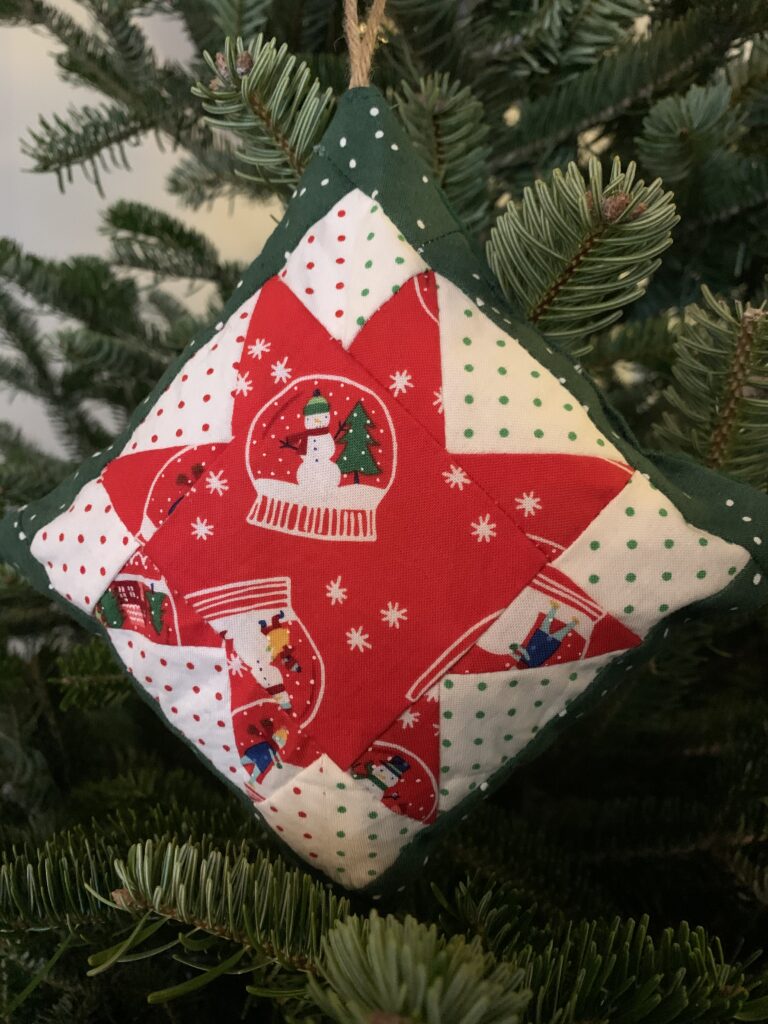
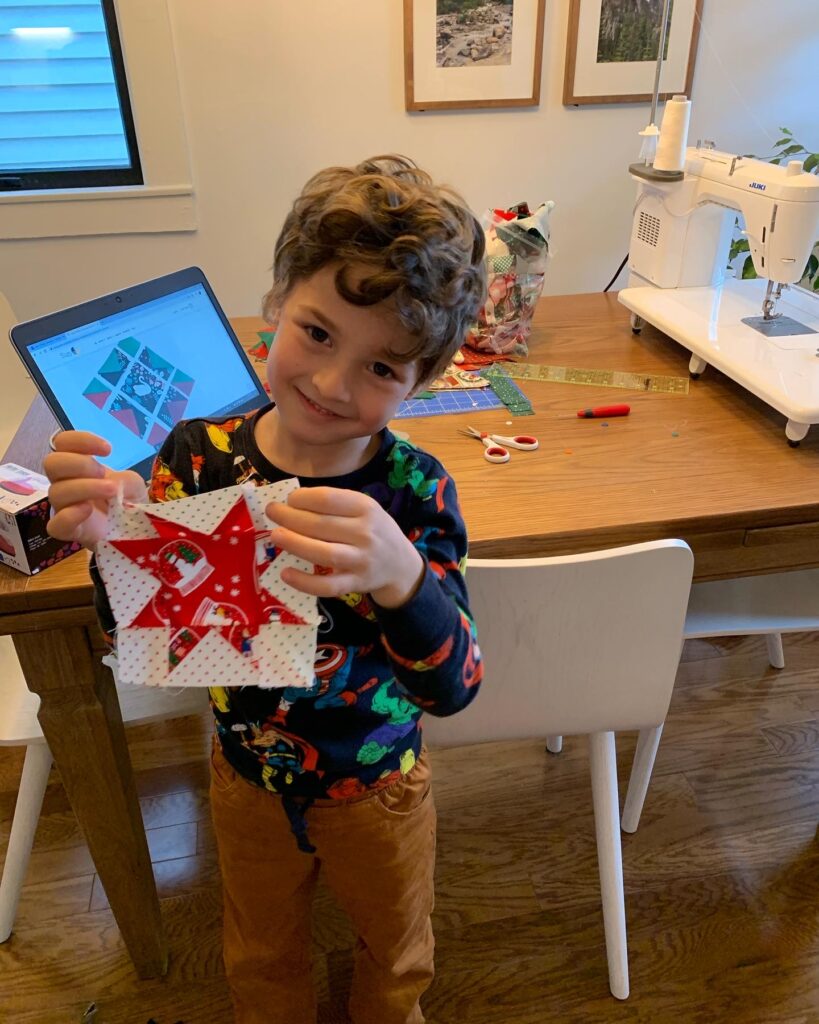
Finally, I intended to make holiday ornaments for everyone. So many ornaments! I made a grand total of…1! Louie helped me with this one during the pandemic school closure and it became the topper on our tree!
As for the tree skirt, the pillows, the ornaments, the quilted teacher gifts–maybe next year?! Happy holidays!
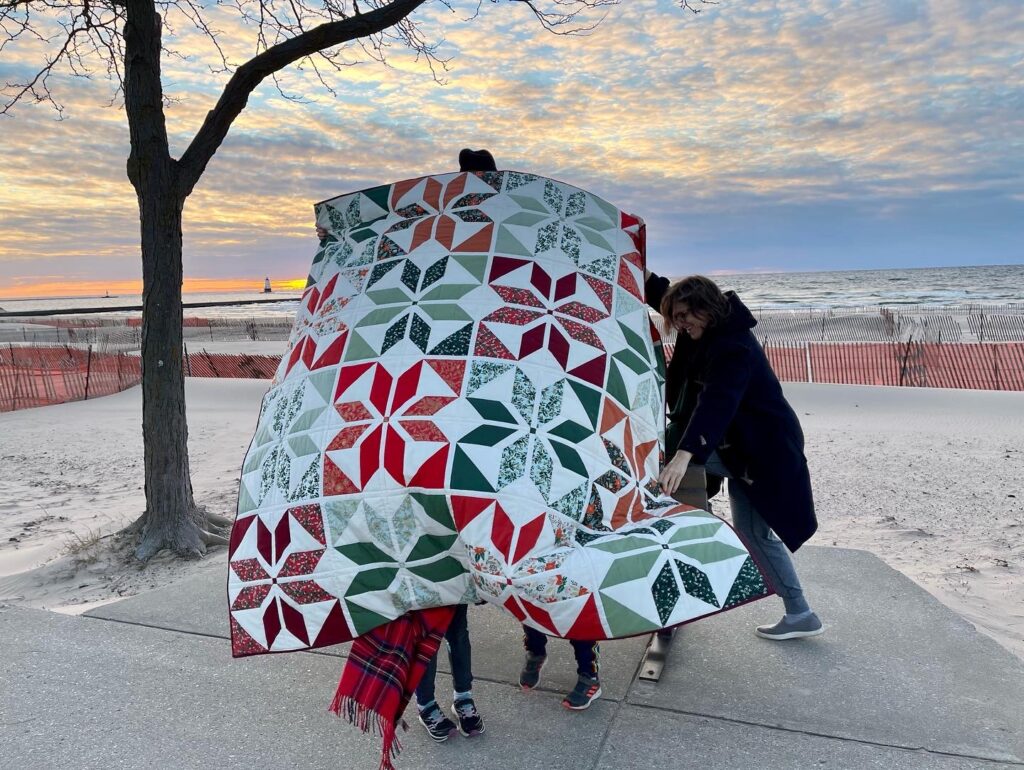
When you’ve set a ridiculous quilting goal for yourself, there are no days off from quilting. There are no vacations from your sewing machine. If you are driving (riding) 8 hours to visit your parents in Michigan for an early Thanksgiving long weekend, you pack your sewing machine, quilt top, batting, backing fabric, embroidery floss and hoop, all the notions, and you’re thankful that your mother also quilts and has a cutting mat, iron, and ironing board ready for you to use. You spend the entire day before early Thanksgiving pin basting a quilt in the dining room and then stay up until almost 2am finishing the quilting and binding. You do all of this not only because you want to meet your ridiculous quilt goal for 2021, but also because you want to take a quilty glamour shot by the beautiful Lake Michigan. You do all of this because you are 100% insane.
I’m not entirely sure why I wrote that first paragraph in second person. Probably because I am insane. 10 quilts! I think I’m gonna make it!
How should I quilt the Holiday Party quilt? I asked myself this question throughout the process. This would be a good quilt to send to a long armer and request a snowflake pattern, but I wanted to gift it to my in-laws (surprise!) at Thanksgiving, hence the need for me to take it to early Thanksgiving with my parents. I ended up doing a very simple “stitch in the ditch” or “stitch in the vicinity of the ditch” (it’s hard to stay in the ditch!). I didn’t even quilt all of the seams because I used a wool batting and only had to stitch up to 8 inches apart. Here’s an illustration of how I quilted it:
It was fast and it should hold the batting in place. Given the lovely prints and patchwork pattern, this minimalist approach worked just fine. For the back, I used one of the prints, and I don’t think the quilting is very noticeable. The light quilting + the wool batting = a warm and fluffy quilt. Love that loft!
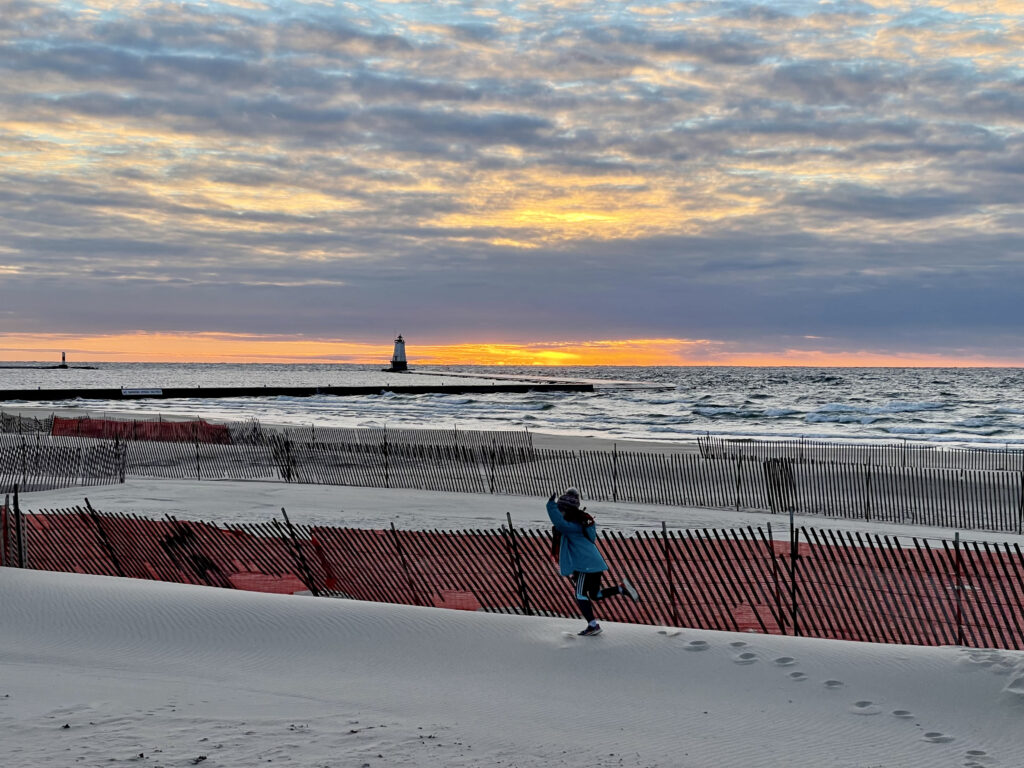
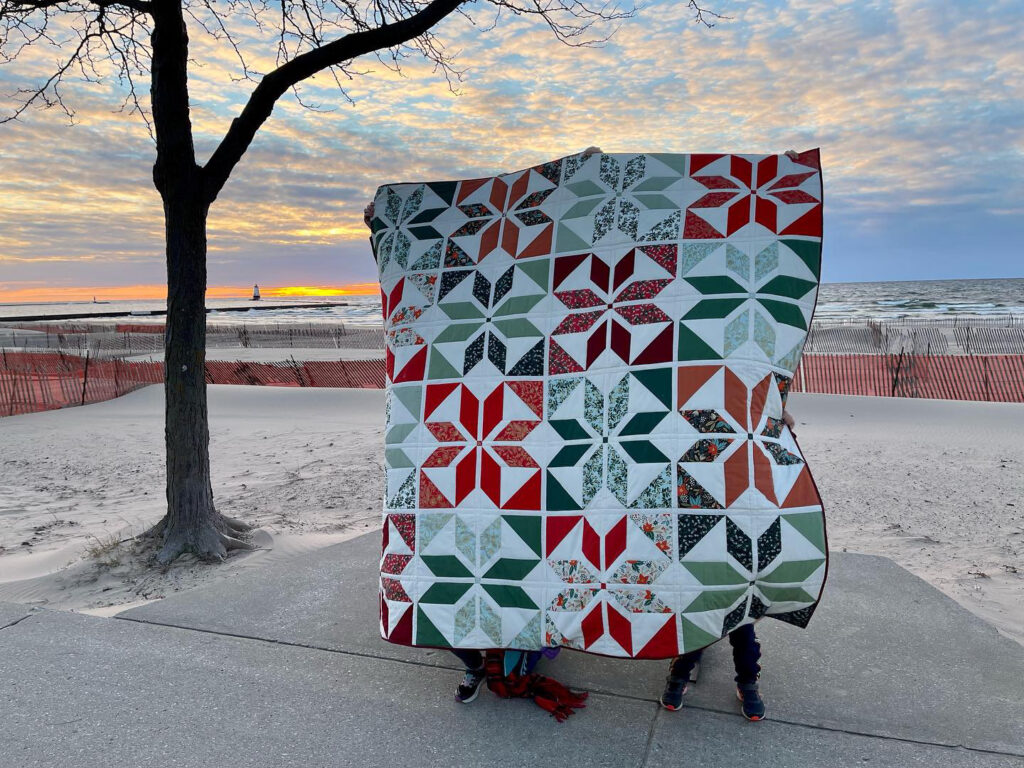
The next evening, we took the quilt down to Lake Michigan to get some pics and watch the sun set. It was freezing! But that didn’t stop my kids from running through the sand.
Although the howling and freezing cold wind made this quilty glamour shot a bit tricky, my sister, my two kids, and I managed to hold it up long enough for my dad to get a decent picture:
The outtakes were good, too:
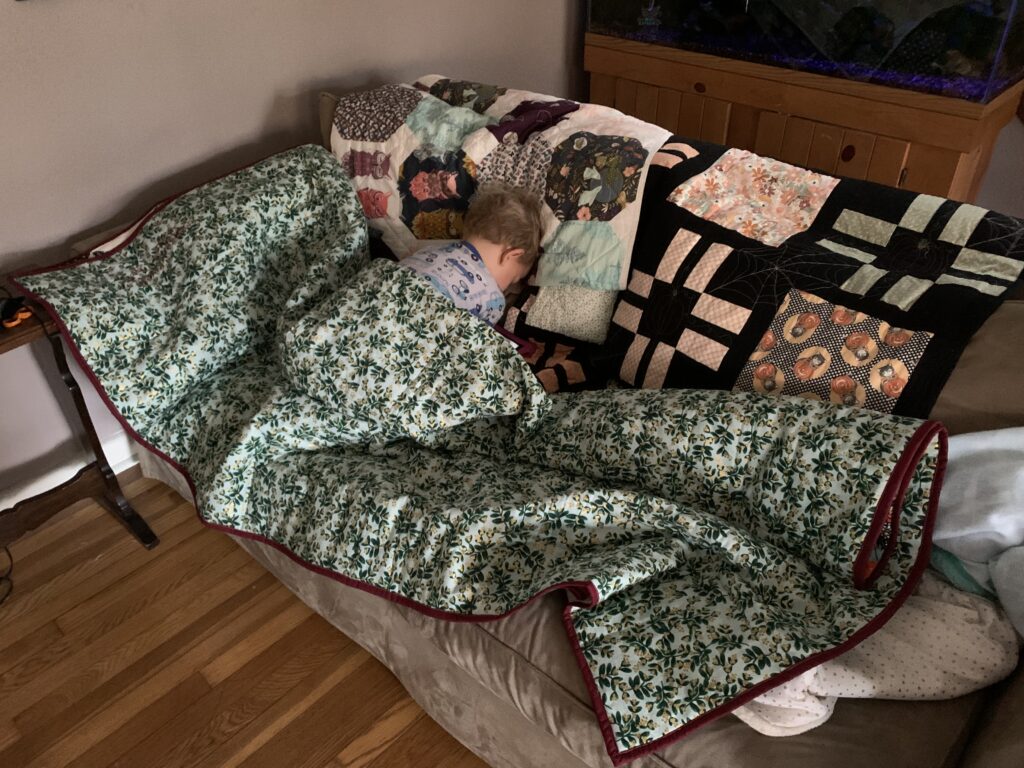
The morning after we got back to Pittsburgh, I found my son wrapped up in the quilt that I had folded up and put in a gift bag for my in-laws…
That’s the only pic I have of the back… I adore this fabric! I am using the scraps to make some Christmasy throw pillow covers.
If you want to give a gift to someone and get the best reaction, give it to my mother-in-law. Her appreciation and admiration gave me the fortitude to press on with this hobby! Kathy, you’re the best. xoxo
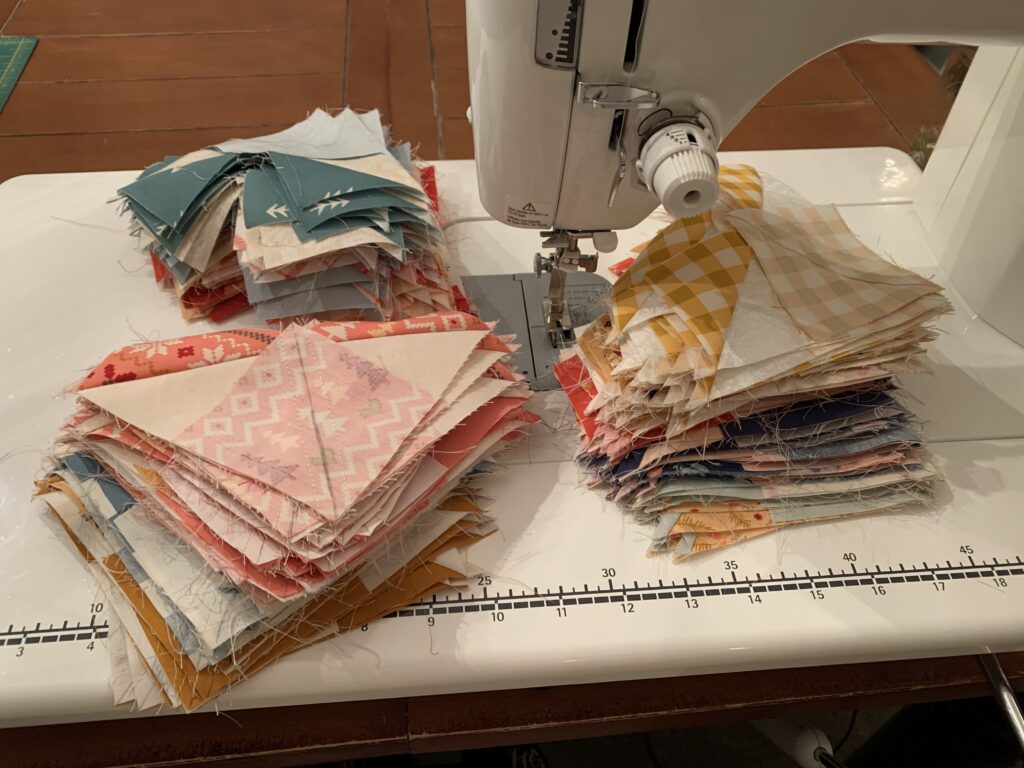
Only 2 quilts to go before I reach my goal of 12 quilts for 2021! One of them involves an unruly and very large flock of flying geese…
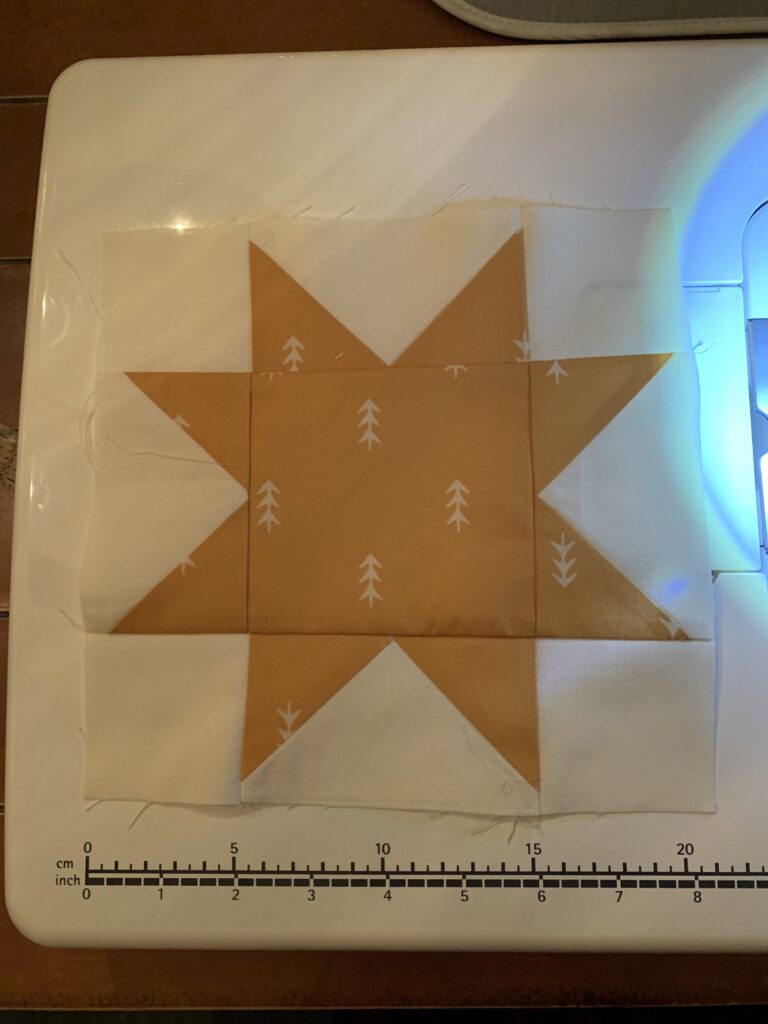
Oh yeah, it’s the middle of November and the Holiday Party quilt top is complete! I think that this is probably my best-executed quilt top to date. The blocks? Trimmed! The points? Sharp! The seam allowance? Fairly consistently 1/4 inch! The pressing? I didn’t skip any of it (except I suppose I should have pressed it before taking this photo… maybe there will be one more quilt top glamour shot for the ‘gram before I baste).
I DID IT!
I completed this quilt top in the company of quilters around the world who were also participating in the Suzy Quilts Holiday Party Quilt Sew-Along, which was way more fun than I expected it to be. I followed the Instagram hashtag and really enjoyed seeing everyone’s progress and telling others how beautiful their blocks looked. There were lots of people using the same kit that I used, but there were so many other creative fabric combinations. I can definitely see myself making this one again in a different color palette… maybe blues and greys.
I learned a lot while making this quilt thanks to Suzy’s tips, really well written pattern, and easy to follow weekly assignments. I started off behind but it wasn’t too hard to catch up. Here’s a recap:
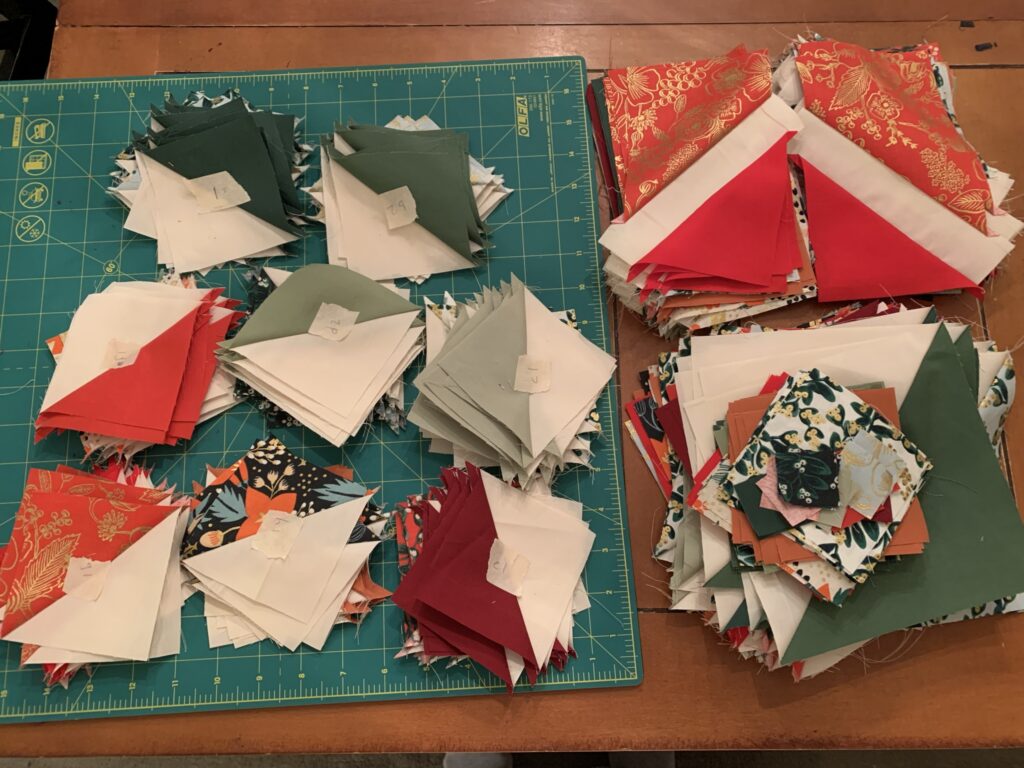
Lesson 1: Cutting up all of the fabric first is the key to getting a quilt top together quickly. Does everyone know this? I did not until this quilt. The pattern is written for fat quarters, and it included some excellent cutting diagrams. This pattern really uses most of the fabric, but thanks to warnings from Suzy, I was very careful in the cutting process and didn’t make any mistakes, a minor miracle given the fried state of my pandemic/pregnant brain.
Just barely getting in one last 4.25 inch square!
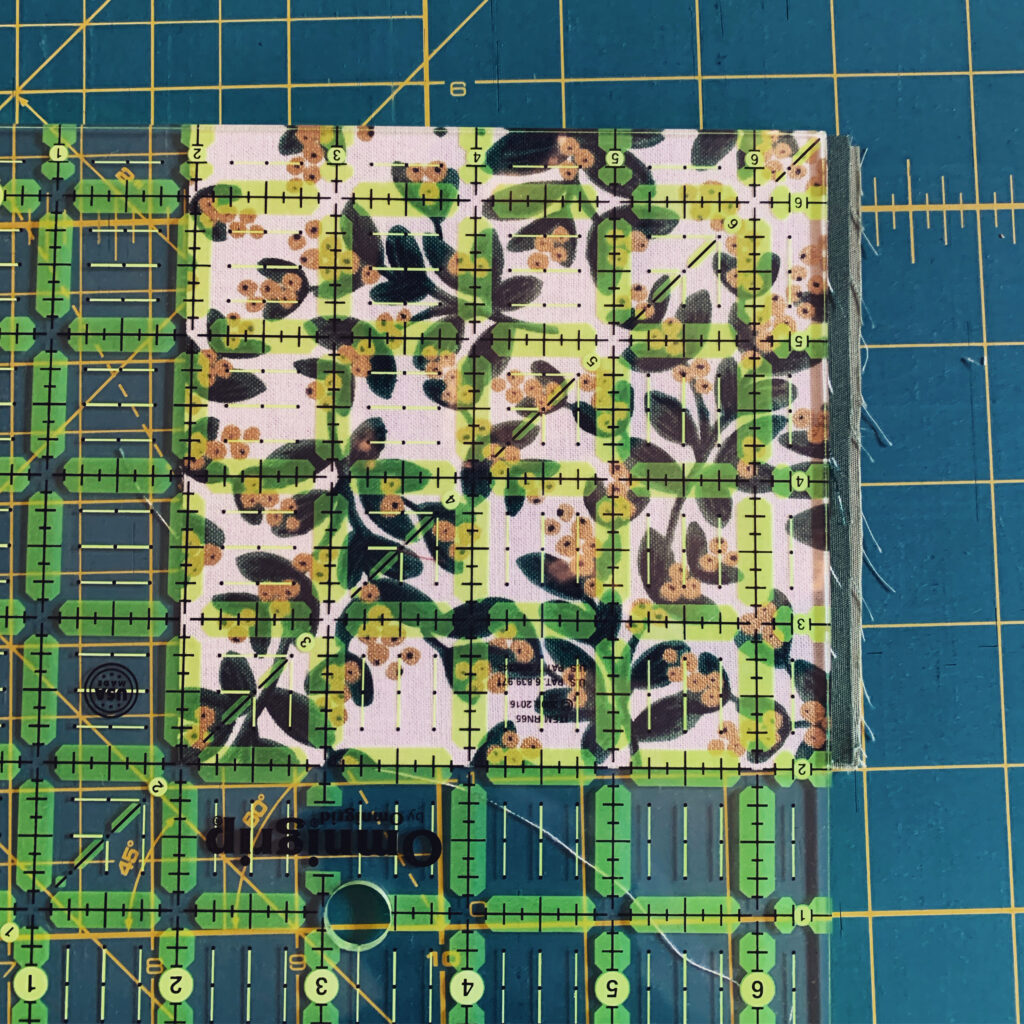
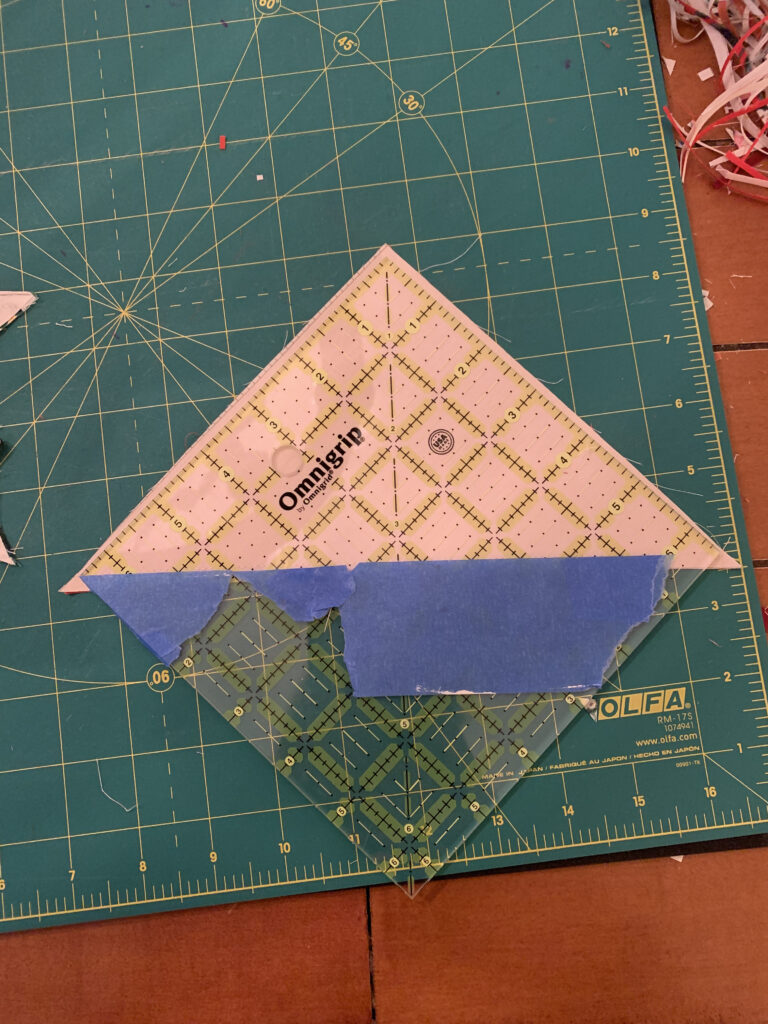
Lesson 2: Half Square Triangles (the much loved-by-me HST) can be trimmed BEFORE unfolding them. I never realized this! But it really sped up the process… only 2 cuts instead of 4! And if you have the correct size ruler, you can trim the dog ears at the same time! I did not buy this fancy ruler but basically used the technique with my regular square rulers and some tape. It worked great.
GENIUS HST TRIMMING HACK
Lesson 3: Using a hot iron and a lot of steam on fabrics that aren’t pre-washed can result in some fabric shrinkage. I did not know this! Fortunately my fabric didn’t shrink enough to make too much of a difference in the blocks. But it’s a good thing to keep in mind for future projects.
Lesson 4: Chain piecing is another key to speed, which I sort of knew, but this quilt took it to a whole new level. One week’s assignment was “make the HSTs.” Another was to make the rectangle blocks with the template. These really went fast. Listening to an audiobook or podcast and putting these together was a blissful way to spend several evenings. Once those were done, suddenly it was block assembly time, and this top came together in a snap.
I managed to stay mostly organized
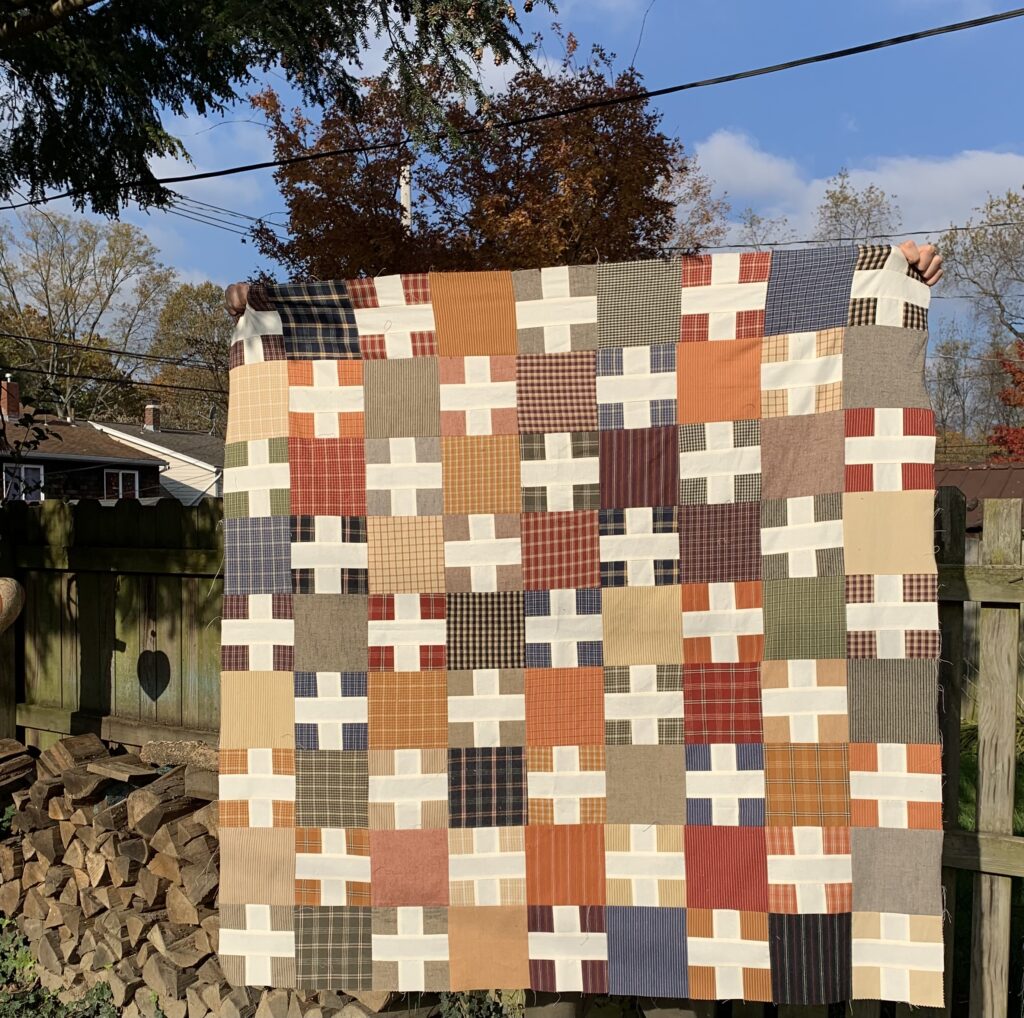
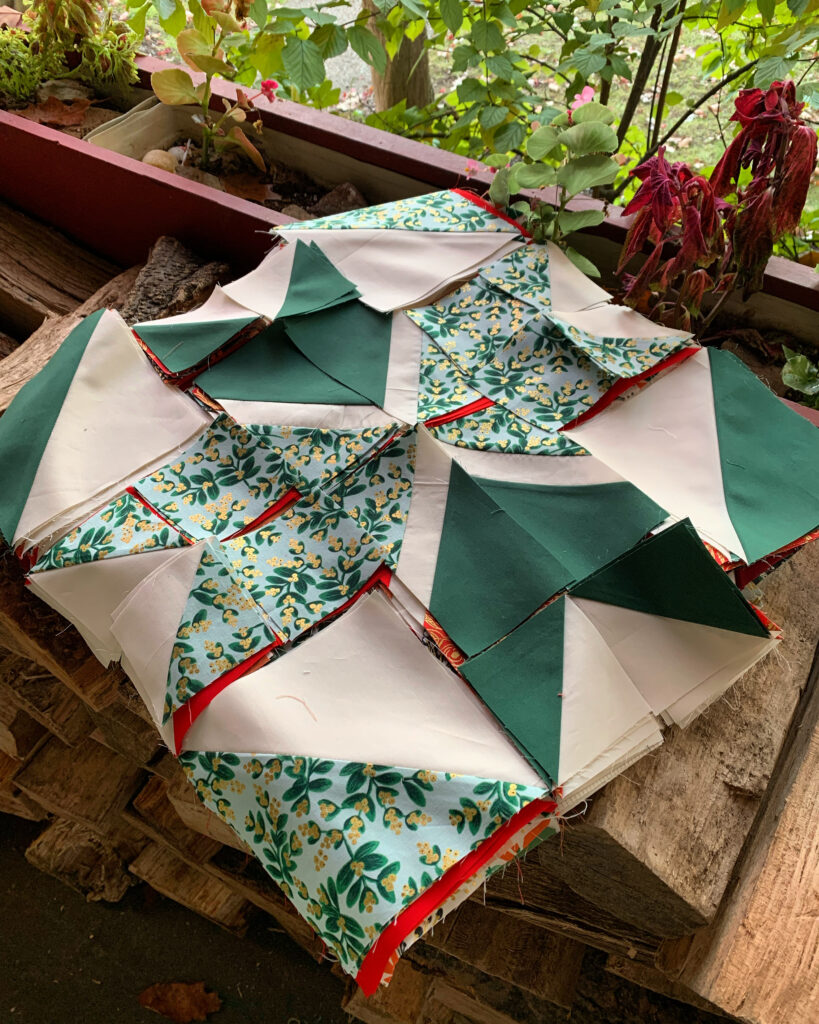
Lesson 5: Outdoor pictures look better than indoor pictures. I knew this, but I usually finish quilting and document my progress around midnight. Filters cannot compensate for the unflattering overhead dining room light. But look at how nice these block pieces look on our wood pile. I carried them out on my cutting mat for some glamour shots, like a server carrying a pizza, which prompted webmaster Brad to ask, “what … what are you doing?”
We can airbrush out that random red thread
Lesson 6: Pressing really works. Sometimes I’m lazy and just keep piecing without pressing in between and I think that’s probably one of the reasons that my seams don’t line up like like they should. Also… I think I need a new iron. Mine gets hot, but the cord also gets hot… I have no idea where I got this iron or how old it is, and I’m slightly concerned that it’s going to start a fire. (Typing that sentence made me nervous, I just ordered a new iron. Don’t worry, mom.)
I am thrilled with this quilt top, and I am very excited to quilt it up and gift it. Thank you, Suzy, for the awesome pattern, the very fun sew-along, and all of the excellent tips and tricks.
Now I just need to press it, baste it, quilt it, and bind it, and quilt #10 will be complete.